
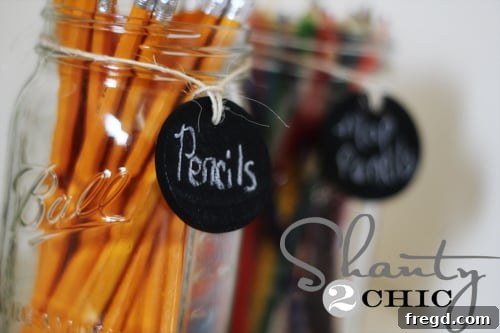
Crafting Charm: Easy and Affordable DIY Chalkboard Tags for Every Occasion
As the vibrant colors of summer begin to fade, a familiar buzz fills the air – it’s back-to-school season! For many households, this time of year brings a whirlwind of activity, from preparing school supplies to organizing busy schedules. Amidst the hustle and bustle, finding simple, creative projects that add a touch of personal flair without breaking the bank can be a delightful respite. This year, we’ve discovered the ultimate solution for adding charm and organization to your home, classroom, or next gathering: DIY Chalkboard Tags. These adorable, versatile, and incredibly inexpensive labels are a game-changer for anyone looking to infuse their surroundings with a handcrafted touch.
Imagine the possibilities: clear labeling for classroom supplies, elegant placeholders for your next dinner party, or a thoughtful, personalized gift for a special teacher. The beauty of these chalkboard tags lies in their simplicity and the endless ways they can be customized to suit any need or aesthetic. With just a few basic materials and a little creative spirit, you can transform ordinary items into stylish, functional pieces that truly stand out. Get ready to embark on a fun, budget-friendly crafting adventure that promises to add organization, beauty, and a dash of chic to your life!
Why DIY Chalkboard Tags Are a Must-Have for Crafters and Organizers
In a world brimming with mass-produced items, there’s something truly special about a handmade creation. DIY Chalkboard Tags offer a unique blend of practicality and personalized style that ready-made options simply can’t match. Here’s why these tags have become an instant favorite and why you’ll want to make a batch (or ten!):
Unparalleled Versatility
The adaptability of chalkboard tags is truly astounding. From their initial conception as back-to-school accessories, their utility quickly expands to encompass virtually every corner of your life. They can transform a chaotic pantry into an organized haven, add a rustic touch to your garden, serve as elegant place cards at a wedding, or bring a playful element to a child’s birthday party. Because the message can be easily erased and rewritten, these tags are eternally useful, adapting to new seasons, new projects, and new organizational needs with just a swipe of a cloth.
Budget-Friendly Brilliance
In an era where every penny counts, finding craft projects that deliver maximum impact without a hefty price tag is a genuine win. These chalkboard tags are exceptionally cost-effective. The core materials – unfinished wood, spray paint, and twine – are typically inexpensive, especially when purchased from craft stores that frequently offer discounts. Compared to buying specialized labels or custom signage, the DIY approach allows you to create a large batch of beautiful, functional tags for a fraction of the cost, making them ideal for large-scale organizing projects or gift-giving. For example, the wood circles we used were under $1 for a bag after a 50% discount, making each tag approximately just $0.25!
Effortless Creation
Don’t let the professional look fool you; these tags are remarkably simple to make. You don’t need advanced crafting skills or specialized tools to achieve beautiful results. The steps are straightforward, making this an ideal project for beginners, busy parents, or anyone looking for a quick and satisfying craft. With minimal drying time and simple assembly, you can whip up a batch of these tags in an afternoon, enjoying the creative process without feeling overwhelmed.
Personalized Touch and Sustainability
Beyond their practicality, DIY chalkboard tags allow for immense personalization. You can choose different wood shapes, twine colors, or even add embellishments to reflect your unique style. And because they’re reusable, they also offer an eco-friendly alternative to single-use paper labels, contributing to a more sustainable lifestyle. Embrace the joy of creating something beautiful and functional with your own hands!
Gather Your Essentials: Materials for Your DIY Chalkboard Tags
One of the best aspects of this DIY project is the accessibility of the materials. You likely have some of these items on hand already, and the rest are easily found at your local craft store or hardware shop. Here’s a detailed look at what you’ll need to create your own charming chalkboard tags:
- Unfinished Wood Circles or Discs: These are the foundation of your tags. We sourced a bag of unfinished wood circles from Hobby Lobby, which are incredibly affordable, especially with coupons or sales. You can find similar items at most craft supply stores or online retailers. Don’t feel limited to circles; squares, rectangles, or even custom laser-cut shapes can also work beautifully. Ensure they are smooth or consider a light sanding for a perfectly polished finish.
- Drill and Small Drill Bit: To create a hanging point for your tags, you’ll need a power drill and a small drill bit. The size of the bit should be appropriate for the thickness of your twine or string – generally, a 1/8 inch or 3/16 inch bit works well for standard jute twine.
- Twine, String, or Ribbon: Jute twine is a classic choice, offering a rustic and natural aesthetic. You could also opt for baker’s twine in various colors, thin satin ribbon for a more elegant look, or even leather cording for a rugged feel. Choose a material that complements your intended use and personal style.
- Chalkboard Spray Paint: This is the star of the show! We used Rust-Oleum’s Chalkboard Spray Paint, and it truly is fantastic. This particular brand delivers excellent coverage, a smooth texture, and allows chalk to go on and wipe off perfectly without leaving ghosting. Look for it in the spray paint aisle of your hardware or craft store. Make sure you have enough for at least two coats per tag.
- Chalk or Chalk Markers: Once your tags are complete, you’ll need something to write on them! Traditional chalk works wonderfully and offers that classic chalkboard look. For more precision, bolder colors, or designs that need to be smudge-proof until you decide to erase them, chalkboard markers are an excellent alternative.
- Protective Drop Cloth or Newspaper: Essential for protecting your work surface during drilling and painting.
- Optional: Sandpaper: Fine-grit sandpaper (around 220-grit) can be used to smooth out any rough edges on your wood discs before painting, ensuring a professional finish.
Step-by-Step Guide: Crafting Your Own Chalkboard Tags
Now that you have all your materials assembled, it’s time to get creative! Follow these simple steps to transform plain wood discs into charming and functional chalkboard tags.
Step 1: Prepare Your Wood Discs
Begin by laying out all your unfinished wood circles on a protected work surface, such as a drop cloth or old newspaper, in a well-ventilated area. Take a moment to inspect each disc. If any of them have rough edges or splinters, a quick, light sanding with fine-grit sandpaper will create a smoother surface for painting and handling. This small step can make a big difference in the final look and feel of your tags. Once smoothed, wipe away any sanding dust with a clean, dry cloth.
Step 2: Drill the Hanging Holes
Carefully select a small drill bit that is just wide enough to comfortably fit your chosen twine or string. Precision is key here: you want the hole to be snug but not so small that threading becomes a struggle. Position your wood disc on a scrap piece of wood to protect your workbench, and securely hold the disc in place. Drill a single hole at the very top center of each circle. Work slowly and steadily to prevent splitting the wood. After drilling, briefly run the drill bit through the hole a couple of times to clear any remaining wood dust or fibers, ensuring a clean opening for your twine.
Step 3: Apply Chalkboard Spray Paint
This is where the magic happens! Shake your Rust-Oleum Chalkboard Spray Paint can vigorously for at least one minute to ensure the contents are well mixed. In your well-ventilated area (preferably outdoors), hold the can about 6-8 inches from the wood discs. Apply a light, even coat of paint to one side of each circle, using sweeping motions. Avoid applying too much paint at once, as this can lead to drips. Let the first coat dry completely according to the manufacturer’s instructions (usually 15-30 minutes). Once dry, apply a second thin coat. Two coats typically provide excellent, opaque coverage and a durable chalkboard surface. You’ll love the smooth, velvety texture of this paint! Allow the paint to fully cure for at least 24-48 hours before writing on them. This curing time is crucial for the durability and erasability of your chalkboard surface. After curing, “prime” the surface by rubbing the side of a piece of chalk over the entire painted area, then wipe it clean with a dry cloth. This prepares the surface for smooth writing and erasing.
Step 4: Attach the Twine Hangers
Once the paint is completely dry and cured, it’s time to add the hanging element. Cut a strand of 1-ply jute twine (or your chosen string) to your desired length. A good starting point is about 6-8 inches for smaller tags, but adjust based on how you plan to use them. Fold the strand of twine in half to create a loop at one end. Slip this loop through the drilled hole from the front of the tag. Then, thread the two loose ends of the twine through the loop you just created and pull gently until the twine is secure. This simple lark’s head knot creates a neat and sturdy hanger for your tags.
Creative Ways to Use Your Versatile DIY Chalkboard Tags
Once your DIY Chalkboard Tags are complete, a world of possibilities opens up! Their reusability and charm make them perfect for an astonishing array of applications. Here are some expanded ideas to inspire your creativity:
Back-to-School & Thoughtful Teacher Gifts
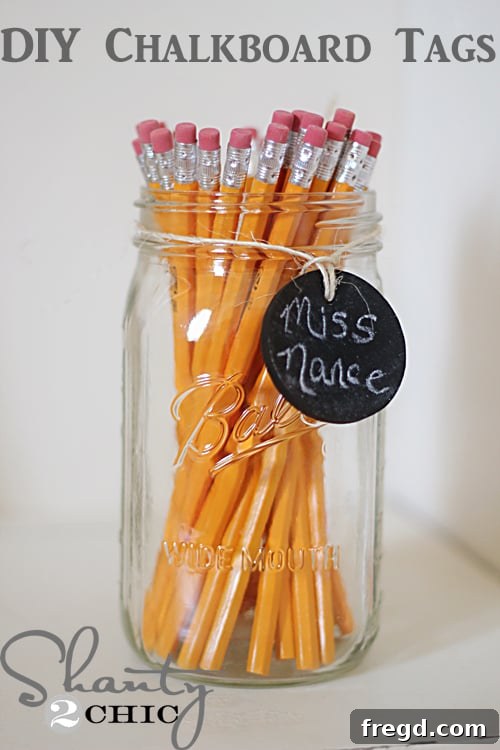
As mentioned, these tags are absolutely perfect for the back-to-school season. For a truly unique and appreciated teacher’s gift, fill a few large-mouth mason jars with essential classroom supplies like pencils, markers, erasers, or paper clips. Attach your freshly made chalkboard tags to each jar and write the teacher’s name or the contents on them. This not only makes for a beautifully presented gift but also helps teachers organize their classroom in style. Beyond gifts, use these tags to label kids’ school bags, lunch boxes (if sealed), or to create a designated homework station at home, clearly marking bins for subjects or supplies. They’re an easy way to “shanty up” your classroom and keep things in order.
Home Organization & Chic Decor
Bring order and aesthetic appeal to your home with these customizable labels. In the pantry, attach them to jars holding flour, sugar, pasta, or spices. For the laundry room, label containers for detergent, fabric softener, or dryer sheets. In craft rooms, they’re perfect for categorizing bins of fabric, yarn, or tools. For general home organization, label storage bins for toys, seasonal decorations, or linens. Beyond utility, these tags can also serve as charming decor. Use them as rustic plant markers for indoor herbs, or as part of seasonal displays – think “Happy Fall” for autumn or “Merry & Bright” for holiday ornaments.
Party & Event Planning Perfection
Planning a gathering? Chalkboard tags are your secret weapon for stylish and functional party planning. Use them as buffet labels for food and drink stations, clearly marking dishes, ingredients, or even dietary information. At a casual cookout, loop them around bundles of silverware or napkins for an organized and charming presentation, just as we planned to do. For more formal events, they can double as elegant place cards, guiding guests to their seats with a personalized touch. They’re also fantastic for labeling party favors, adding a custom message for your guests. Their versatility means they can adapt to any theme, from rustic backyard barbecues to sophisticated dinner parties.
Unique Gift Giving & Personalization

Beyond classroom gifts, these tags make wonderful additions to any present. Attach them to wrapped gifts as reusable, personalized gift tags that the recipient can then use themselves. Fill a basket with homemade treats and use a tag to write a heartfelt message. Or, create a set of these tags as a thoughtful hostess gift, perhaps accompanied by a piece of chalk or a chalkboard marker. The ability to customize the message makes every gift feel extra special and unique.
Tips for Success and Creative Variations
To ensure your DIY Chalkboard Tags turn out perfectly and to explore even more creative possibilities, consider these additional tips and variations:
Chalk vs. Chalk Markers
While traditional chalk offers a classic, dusty aesthetic and is easily erasable, chalk markers provide a bolder, more precise line. They are also less prone to smudging once dry, which can be advantageous for items that will be handled frequently. However, chalk markers can sometimes be more challenging to completely erase from a chalkboard surface, occasionally leaving a faint trace. Experiment with both to see which you prefer for different uses.
Cleaning and Maintenance
To clean your chalkboard tags, simply wipe them with a damp cloth or a chalkboard eraser. For stubborn marks, a small amount of mild soap and water can be used, but always ensure the tags are completely dry before writing on them again. Re-priming the surface with chalk after a thorough cleaning can help maintain its smooth writing quality.
Enhanced Durability and Sealing (Optional)
For tags intended for outdoor use, high-traffic areas, or items that might get wet (like plant markers), consider applying a clear, matte spray sealer over the finished chalkboard paint. Be aware that some sealers might slightly alter the texture of the chalkboard surface or make it harder to erase. Always test on a scrap piece first. If using a sealer, choose one specifically designed for outdoor use or that mentions being compatible with chalkboard surfaces.
Explore Different Shapes and Sizes
While circles are charming, don’t limit yourself! Look for unfinished wood in squares, rectangles, ovals, or even more intricate laser-cut shapes. Larger wood slices can become mini chalkboards for unique signage, while smaller ones are perfect for gift tags or charms. Consider different thicknesses of wood for varying levels of sturdiness and visual impact.
Color Variations and Embellishments
Chalkboard paint isn’t just black! Many brands offer dark green, blue, or even gray chalkboard paint. You could also paint the backside of your tags in a contrasting color or with a decorative pattern before applying the chalkboard paint to the front. For extra flair, add small beads to the twine before tying, or use decorative knots. You can also stencil small designs or letters onto the tags for a more permanent look.
Start Your Creative Journey Today!
We hope this comprehensive guide inspires you to create your own batch of DIY Chalkboard Tags. It’s truly amazing how a simple, inexpensive project can yield such versatile and beautiful results. From bringing order to your home to adding a personal touch to gifts and celebrations, these tags are a testament to the power of handmade creativity. The process is enjoyable, the cost is minimal, and the possibilities are endless. So grab your materials, unleash your imagination, and start crafting! We love how easy and cheap these Chalkboard Tags were to make, and our minds are still swirling with even more fun ways to use them.
Thanks so much for stopping by and exploring this fantastic DIY project!
~Ashley