
Hey friends!
What a whirlwind it’s been! Ash and I recently had an absolutely fantastic time at the Haven Conference in Georgia. It was incredibly inspiring, filled with creative energy, and a wonderful opportunity to connect with fellow DIY enthusiasts and home decor lovers. We gathered so many ideas and insights, and we’re excited to share more about our experience there very soon! After all that excitement and travel, I admit I was feeling a little “pooped” – in the best way possible, of course. My mind, however, was still buzzing with creative possibilities, specifically for a simple, yet impactful, home decor revamp I’d been contemplating.
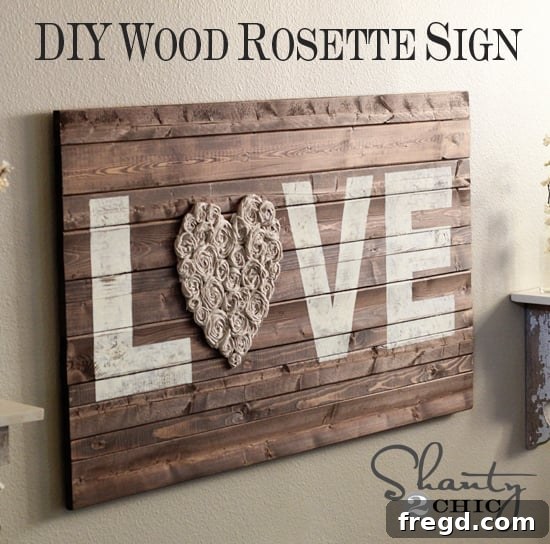
Many of you might remember the DIY wall art LOVE sign I crafted a while back. It quickly became a beloved piece in our home, and honestly, I still adore the sentiment and the craftsmanship (no pun intended, though it certainly works!). However, as our home’s aesthetic naturally evolves, I found myself growing slightly “over” the vibrant color I originally chose for the heart. I craved a more serene, neutral palette for that particular room, something that would offer texture and warmth without the bold pop of color. My goal was to refresh the sign and integrate it seamlessly into a more subdued decor scheme, ideally without the fuss of repainting. Today, I finally put my plan into action, and I couldn’t be happier with the results! I truly think I love it, and I’m eager for you to see the transformation.
Revitalize Your Decor: Giving Your DIY LOVE Sign a Neutral, Textural Makeover
Sometimes, a simple change can make all the difference in a room. While our original DIY Wood LOVE sign brought a wonderful burst of color and personality to its space, I felt it was time for an update that aligned with my evolving taste for more understated and textural aesthetics. Instead of completely replacing a beloved piece, I opted for a creative refresh that would maintain its charm while introducing a fresh, modern feel. This project is a fantastic example of how you can breathe new life into existing decor without a major overhaul, proving that thoughtful revamps can be just as satisfying as starting from scratch.
The Original Charm: My DIY Wood LOVE Sign
For those who might be new here or need a refresher, the foundation of this project is my original DIY Wood LOVE Sign tutorial, which you can find HERE. It’s a project that holds a special place in my heart – not only for its simple beauty but also for how incredibly easy and affordable it was to create. Crafted from readily available materials, it quickly became a popular post, inspiring many of you to create your own personalized word art. The beauty of this sign lies in its versatility, offering a perfect canvas for all kinds of creative embellishments. Its rustic wood base provides a wonderful contrast to softer elements, making it an ideal candidate for today’s textural transformation.
Why a Revamp? Embracing Neutrality and Texture
While I initially loved the vibrant pop of color the painted heart added to the sign, my preference for decor has gradually shifted towards more muted tones and an emphasis on varied textures. I wanted this piece to feel softer, more integrated, and to contribute to a sense of calm and sophistication in the room. The challenge was to achieve this without repainting the sign, preserving its original rustic charm. Fabric rosettes immediately came to mind as the perfect solution. They offer a fantastic way to introduce softness, dimension, and a touch of shabby-chic elegance, instantly updating the sign’s character. This project perfectly illustrates how you can adapt your existing decor to new styles with minimal effort and maximum impact.
Materials You’ll Need for Your Rosette Makeover
This project is wonderfully straightforward and requires only a few basic supplies. Here’s what you’ll gather:
- Your existing DIY Wood LOVE Sign: The hero of our revamp!
- Fabric scraps: This is where you can get creative! I opted for neutral tones like ivory, cream, and a soft beige to create a cohesive and calming effect. You can use cotton, linen, broadcloth, or even old t-shirts. The key is to choose fabrics that are easy to cut and form into rosettes. Different textures within the same color family can add even more depth and interest.
- Sharp Scissors: Essential for clean cuts, especially when working with fabric.
- Hot Glue Gun: Your best friend for this project! It provides a strong, instant bond, perfect for securing the rosettes.
- Plenty of Hot Glue Sticks: You’ll be surprised how many you might use! Stock up.
Crafting Your Fabric Rosettes: A Simple, No-Sew Approach
The core of this makeover lies in the creation of beautiful fabric rosettes. The best part? They’re incredibly simple to make and require absolutely no sewing! If you’re new to making these charming fabric flowers, I highly recommend checking out my detailed tutorial on how to make a fabric flower HERE. This guide will walk you through the process step-by-step, ensuring you can create perfect rosettes every time. For this project, you’ll want to make “a bunch” – the exact number will depend on the size of the area you wish to cover and how full you want the look to be. For a typical heart shape on a sign like mine, I’d estimate needing anywhere from 30-50 rosettes, varying in size, to achieve a lush, full coverage.
Steps for Making Basic Rosettes (Quick Overview):
- Cut Fabric Strips: Start by cutting strips of fabric. For a no-sew flat rolled rosette, a good starting point is a strip about 1.5 to 2 inches wide and 10-15 inches long (adjust length for desired rosette size). Don’t worry about perfect edges; a slightly distressed look adds character.
- Fold and Roll: Fold one end of the strip over a couple of times to create a base. Then, begin to twist and roll the fabric strip around this base, occasionally folding the fabric away from you to create the “petals.”
- Secure with Hot Glue: As you roll, use small dots of hot glue to secure the fabric in place, especially at the base of the rosette, to prevent it from unraveling.
- Finish the Back: Once you’ve reached your desired size, trim any excess fabric and glue the end securely to the back of the rosette, creating a flat base for easy attachment.
Repeat this process until you have a generous collection of rosettes, varying slightly in size and fullness to add organic beauty to your sign.
Bringing it Together: Attaching Rosettes to Your LOVE Sign
Once you’ve crafted your beautiful batch of fabric rosettes, the transformation is just a hot glue gun away! This is the most satisfying part, as you watch your sign come to life with new texture and dimension.
Detailed Attachment Steps:
- Prepare Your Workspace: Lay out your rosettes and your LOVE sign on a protected surface. Have your hot glue gun ready and plugged in.
- Start at the Edges: Begin by applying rosettes along the outer edge of the heart shape. This helps define the boundary and ensures a neat finish. Apply a dab of hot glue to the back of a rosette and press it firmly onto the surface of the heart.
- Layer and Overlap: Work your way inward, gradually filling the entire heart shape. Don’t be afraid to overlap the rosettes slightly; this creates a lush, full, and realistic floral effect. Vary the sizes of your rosettes to add visual interest.
- Cover Completely: Ensure that the original color of the heart is completely obscured by the fabric flowers. You may need to tuck smaller rosettes or even individual fabric “petals” into gaps to achieve full coverage.
- Mind the Gaps: Step back periodically to assess your progress and identify any noticeable gaps. Fill these in with smaller rosettes or by gently adjusting existing ones.
- Patience is Key: While this is a quick project, taking your time with placement ensures a beautiful, professional-looking finish.
And just like that, the transformation is complete! It’s truly “easy peasy” when you have your rosettes prepped and your hot glue gun ready. The immediate visual change is incredibly gratifying, and the result is a piece that feels entirely new.
The Transformed Look: A Celebration of Texture and Neutrals
I absolutely adore the way the soft, undulating fabric texture now looks against the rustic warmth of the wood. The contrast is simply beautiful, creating a piece of wall art that is both inviting and visually captivating. It brings a new dimension to the sign, transforming it from a colorful statement into a sophisticated, textural accent. The neutral tones of the fabric blend effortlessly with various decor styles, from farmhouse chic and shabby elegance to a modern minimalist look that seeks a touch of organic warmth. This revamp proves that sometimes, the most dramatic changes come from subtle, textural additions rather than bold color shifts. It feels fresh, updated, and perfectly aligned with the current aesthetic of the room.
So fun!
Here are a few more pictures to give you a better sense of the finished piece from different angles. Notice how the light catches the various folds and layers of the fabric, enhancing its three-dimensional quality.
Creative Variations and Personalization
The beauty of this project lies in its adaptability. While I opted for a neutral fabric to cover a heart, the possibilities are endless:
- Different Shapes or Words: Apply rosettes to other shapes, initials, or even entire words for a completely custom look.
- Color Palettes: Experiment with ombré effects using different shades of the same color, or create a vibrant, multi-colored floral burst.
- Fabric Types: Consider using denim for a rustic, industrial feel, lace for delicate elegance, or even burlap for a strong farmhouse statement. Each fabric type will bring its own unique texture and character.
- Added Embellishments: Once the rosettes are in place, you could further adorn your sign with small pearls, buttons, or a touch of glitter for extra sparkle.
Caring for Your Fabric Art
To keep your fabric rosette sign looking its best, a little gentle care goes a long way. Dust regularly with a soft brush or a can of compressed air. Avoid placing it in direct sunlight for extended periods, as this can cause fabric colors to fade over time. If a rosette ever loosens, a quick dab of hot glue can easily re-secure it.
Frequently Asked Questions About This DIY Project
- Q: How long does this DIY project take?
- A: The most time-consuming part is making the rosettes. Once you get into a rhythm, it goes quickly. For a sign this size, expect to spend 2-4 hours total, including rosette creation and attachment.
- Q: Can I use different types of fabric?
- A: Absolutely! Cotton, linen, felt, even old t-shirts or flannel scraps work wonderfully. Experiment with different textures for a unique look.
- Q: Is hot glue durable enough to hold the fabric?
- A: Yes, for indoor decor, hot glue provides a strong and lasting bond, especially when applied generously and pressed firmly. The fabric rosettes are very lightweight, so they don’t put much strain on the adhesive.
- Q: What if I don’t have an existing sign?
- A: No problem! You can easily cut a shape (like a heart or a letter) out of a piece of plywood or even sturdy cardboard, paint it, and then apply the rosettes as described. Alternatively, you can buy unfinished wood signs from craft stores.
I truly hope you love this revitalized look as much as I do! It’s such a simple yet effective way to refresh a beloved piece of decor and align it with your current home aesthetic. The elegance of the neutral fabric against the rustic wood has completely transformed its character, and I can’t wait to show you the full room reveal and what direction I went with the new color scheme that prompted this makeover!
If this project has inspired you, I would SO appreciate it if you could spread the word! Please consider pinning this idea to your Pinterest boards or sharing it with your friends on social media using the buttons below. Your support means the world to us!
Thanks so much for stopping by, and have a wonderfully creative week!!
~Whitney