
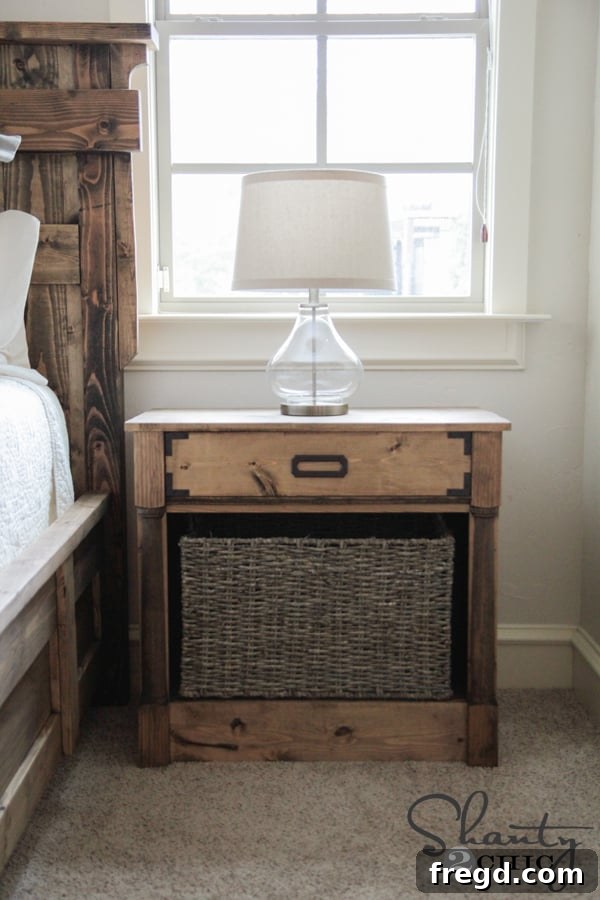
First and foremost, a heartfelt thank you for the incredible response to my DIY king-size bed project shared last week. Your encouraging comments and shares were truly overwhelming, and it’s wonderful to see the post reach so many aspiring builders. As promised, I’m thrilled to be back today to unveil the comprehensive, free woodworking plans for the DIY nightstands I crafted to perfectly complement that bed. These plans empower you to create functional and stylish pieces that elevate your bedroom decor.
Build Your Own Farmhouse Nightstands: Free Woodworking Plans
Aren’t they absolutely charming? I’m completely in love with how these DIY farmhouse nightstands turned out. They’ve transformed our bedroom, offering the ideal blend of style and practicality. Now, I have a dedicated, easily accessible spot for my cozy blanket and heating pad (yes, I genuinely use both!) and a perfectly sized drawer to keep books, journals, and other bedside essentials neatly organized. This project isn’t just about building furniture; it’s about creating personalized storage solutions that enhance your daily comfort and add character to your space.
As with all my projects, I’m excited to guide you through every step of this nightstand build below. To make your journey even smoother, you can effortlessly download and print the complete free plans by clicking HERE or by utilizing the convenient button provided below. These detailed plans, complete with diagrams and measurements, are designed to make this DIY project accessible for builders of all skill levels.
Why Choose to Build Your Own Farmhouse Nightstands?
Embarking on a DIY nightstand project offers a multitude of benefits beyond just saving money. It allows for unparalleled customization, ensuring your new furniture perfectly matches your existing decor and meets your specific storage needs. You can select the exact wood species, finishes, and hardware that complement your taste, creating pieces that truly reflect your personal style. Furthermore, the sense of accomplishment you gain from building something with your own hands is incredibly rewarding. For this project, specifically, building these nightstands allowed me to create pieces that perfectly coordinate with the king-size bed I previously built, achieving a cohesive and professionally designed bedroom look without the hefty price tag of custom furniture.
Essential Tools & Materials for Your DIY Nightstand Project
Before diving into the build, gather your tools and materials. Having everything ready will make the process much smoother and more enjoyable. Here’s what you’ll need to create your beautiful DIY nightstands:
- Plywood: 3/4″ PureBond Plywood Birch (available in 4×8′ sheets at Home Depot). A 4×4 sheet is sufficient for one nightstand; a full 4×8 sheet is needed for two.
- Lumber: 1x2s, 1x3s, and 1x6s for various frame and support pieces.
- Kreg Jig: I highly recommend the Kreg K5. Its user-friendly design and robust capabilities make it an excellent investment for any woodworking enthusiast, allowing you to build a wide range of furniture projects with ease.
- Drill: A reliable 18V drill (like my Ryobi 18V) is essential for drilling pocket holes and driving screws.
- Miter Saw: For making precise cuts on your lumber.
- Wood Glue: Gorilla Wood Glue provides a strong and durable bond.
- Pocket Hole Screws: 1.25″ pocket hole screws for most assemblies.
- Finish Nails: 1.25″ and 2″ finish nails for various attachments and trim.
- Staples: 3/4″ staples for attaching the drawer bottom.
- Stapler: A reliable stapler (e.g., Ryobi Stapler) for securing thin materials.
- Clamps:
- Kreg Right Angle Clamp: Indispensable for holding pieces at 90 degrees during assembly.
- Kreg Face Clamp: Useful for securing face frames to your workbench.
- Kreg Bar Clamps: Great for clamping larger assemblies, such as the legs.
- Cove Molding: A small piece for decorative trim.
- Half Legs: Custom-designed half legs from Osborne Wood Products. These add a touch of elegance and character.
- Drawer Hardware: Liberty Hardware Vintage Style Campaign Hardware Set.
- Wood Stain: Varathane Ash wood stain.
- Polyurethane: Varathane Triple Thick Polyurethane (satin finish recommended) for a durable top coat.
Step-by-Step Guide: Building Your Custom Farmhouse Nightstand
Let’s get started on building these beautiful nightstands. Follow these detailed steps to ensure a successful and rewarding DIY experience.
Step 1: Preparing Your Plywood – The Foundation of Your Nightstand Box
The first critical step in this build is constructing the main box of the nightstands. For this crucial structural component, I opted for 3/4″ PureBond Plywood Birch. This material is not only durable but also offers a beautiful finish, perfect for farmhouse-style furniture. You can easily find these 4×8′ sheets at your local Home Depot. A helpful tip I always use: have the friendly staff at Home Depot rip the large sheets down for me. This makes transportation significantly easier, as a full 4×8 sheet can be quite unwieldy. If you’re building a single nightstand, you’ll only need a 4×4 sheet. Since I was crafting two, I purchased a full sheet and had it ripped twice at 17.25″. Once home, I used my miter saw to precisely cut these boards down to the exact lengths required by the plans.
Next, you’ll be making all of your pocket holes using a Kreg Jig. For this project, I utilized my Kreg K5, which I wholeheartedly recommend if you’re considering purchasing a Kreg Jig. In my experience, among all the models available, the K5 offers the most user-friendly experience, and its price point is incredibly reasonable considering the vast array of furniture pieces it can help you create. I set my Kreg Jig to make 3/4″ pocket holes for all the plywood pieces. To simplify your build, our free plans clearly mark all the necessary pocket hole locations, ensuring you place them accurately and efficiently.
For drilling the pocket holes, I relied on my Ryobi 18V drill. The appropriate drill bit for creating these specific pocket holes is conveniently included with the Kreg K5 kit, so you’ll have everything you need right from the start.
Step 2: Assembling the Main Box Structure for Durability
With your plywood pieces cut and pocket holes drilled, it’s time to assemble the core structure of your nightstand. To attach the base of the box to the sides, I always start by drawing a light reference line on the base. This ensures precise alignment and helps create a perfectly square box. Following this, I apply a generous line of Gorilla Wood Glue where the boards will meet. Wood glue provides an incredibly strong bond, complementing the pocket hole screws for a truly robust assembly.
To hold the side pieces firmly in place while I drive the pocket hole screws, I found my Kreg Right Angle Clamp to be an absolute lifesaver. This clamp acts like an extra set of hands, keeping everything steady and square. The driver bit needed for the pocket hole screws also comes with your Kreg Jig. For this part of the assembly, I used 1.25″ pocket hole screws, which provide ample holding power for the 3/4″ plywood.
Once the sides are securely attached, your nightstand box base will begin to take shape, looking much like the image below. This forms the sturdy foundation for the rest of your build.
The next step involves adding the 1×2 pieces to the top of the box structure. These pieces provide additional rigidity and a mounting surface for the top. Just like before, I used 3/4″ pocket holes for attaching these 1x2s. Remember to apply a thin bead of wood glue before securing them with pocket hole screws for maximum strength.
And once again, the Kreg Right Angle Clamp proves its worth by holding your pieces perfectly steady as you attach them. This tool is invaluable; it truly feels like having an extra set of hands, making precise assembly much easier. I use mine on almost every single woodworking project because of its reliability and ease of use.
Step 3: Crafting the Decorative Face Frame for a Polished Look
The next critical step is building the face frame, which adds both structural integrity and a refined aesthetic to your nightstand. While we provide detailed measurements in the plans, it’s always best practice to measure your specific piece as you go. Wood dimensions can vary slightly, and this ensures an exact, flush fit for a professional look. The base of the face frame is constructed from 1×6 lumber. For this piece, and indeed for the entire face frame assembly, I used 3/4″ pocket holes, securing all joints firmly with pocket hole screws and wood glue.
For assembling the face frame, I used my Kreg face clamp to hold the frame firmly down to my workbench. While not strictly a must-have for every builder, I find it incredibly helpful for securing the pieces precisely while attaching the pocket hole screws. It prevents any shifting and ensures a perfectly flat and square frame, which is essential for a clean final appearance.
Once you have the face frame fully assembled, the next step is to attach it to the front of your nightstand box. Use 1.25″ pocket hole screws, driving them through the pocket holes you previously created on the box itself. For an extra layer of security and a perfectly tight fit, I also apply wood glue along the contact points and use 1.25″ finish nails along the front of the face frame, driving them into the sides of the box. This combination ensures the face frame is incredibly sturdy and seamlessly integrated with the main structure.
Step 4: Installing Robust Wooden Drawer Slides for Smooth Operation
Now, let’s move on to the drawers! This nightstand design incorporates simple yet effective wooden drawer slides that you’ll build yourself. I personally much prefer these over cumbersome metal slides, which can often be noisy or difficult to install. Wooden slides offer a classic look and smooth operation. First, you will attach the 1×3 pieces to the interior sides of the nightstand box. I used 3/4″ pocket holes and 1.25″ pocket hole screws for this part, along with a bead of wood glue for added strength and stability. Ensuring these are perfectly level is key for proper drawer function.
Next, I used wood glue and 2″ finish nails to attach the 1×2 pieces directly on top of the previously installed 1×3 supports. These 1x2s create the upper track for your wooden drawer slides, completing the simple yet effective drawer glide system.
Step 5: Adding the Elegant Half Legs for a Unique Touch
My next step in bringing these nightstands to life was adding the distinctive half legs. I absolutely adore these half legs! I had the pleasure of collaborating with Osborne Wood Products to custom design and create these unique pieces specifically for this project, and for you all to use. They add such a beautiful, classic touch to the farmhouse aesthetic. You can purchase these exact legs HERE directly from Osborne Wood Products.
To attach them, I first ran a consistent line of wood glue down the sides of the front face frame of the nightstands. This ensures a strong bond with the legs.
Next, I securely clamped the half legs to the glued surfaces using my new Kreg bar clamps. These clamps are fantastic for applying even pressure along longer pieces, ensuring a tight, flush, and secure bond while the wood glue dries completely. I love how these things perform on larger assemblies, making the process much easier and more precise.
While those beautiful legs were drying and setting perfectly, I moved on to another essential component: the drawers themselves. This allows for efficient use of time during the building process.
Step 6: Constructing the Functional Drawers for Optimal Storage
Building the drawers is a straightforward process, again utilizing the power of pocket hole joinery for strong, hidden connections. I constructed the drawer boxes using 3/4″ pocket holes and 1.25″ pocket hole screws. For accurate and square drawer assembly, the Kreg Right Angle Clamp was once again indispensable, ensuring that each corner formed a perfect 90-degree angle. This precision is vital for drawers that operate smoothly.
The base of each drawer uses 1/4″ plywood, which is lightweight yet sturdy enough for typical nightstand contents. To attach this, I first applied a line of wood glue around the bottom edges of the drawer frame. Then, I secured the plywood base using 3/4″ staples with my Ryobi Stapler. Using a stapler for thin materials like this plywood is highly recommended; nails tend to shoot straight through, or split the wood, whereas staples provide a much wider and more secure hold without causing damage. This method ensures a durable and clean drawer bottom.
Step 7: The Finishing Details – Molding & Drawer Guides for Functionality
Now that the legs were fully dry and firmly attached, it was time to add a touch of decorative flair with the small piece of cove molding. This molding is applied to the front of the nightstand, just below the drawer opening. I secured it using a combination of wood glue for a lasting bond and finish nails for immediate hold and a clean appearance. The subtle curve of the cove molding adds an elegant detail, enhancing the overall farmhouse aesthetic.
At this stage, I carefully set my completed drawer into its opening. To prevent the drawer from pushing too far back into the nightstand, you can add a couple of small screws to the very back of the drawer box, positioned to act as simple but effective stops. Additionally, I installed two 1×2 boards along the top interior edges of the drawer opening. These boards serve as essential guides, preventing the drawer from tipping downwards as you pull it out, ensuring smooth and stable operation every time.
Step 8: Assembling the Planked Top for a Farmhouse Look
My final construction step before moving on to staining and finishing was building and attaching the beautiful planked top. This feature truly defines the farmhouse style of these nightstands. I assembled the planks using 3/4″ pocket holes and 1.25″ pocket hole screws, ensuring a strong and seamless top surface.
To permanently attach this gorgeous top to the nightstand, I first applied a generous layer of wood glue to the top edges of the table base. After carefully setting the planked top into place, I secured it further with 1.25″ finish nails, driving them through the top and into the underlying frame. This combination of glue and nails ensures the top is firmly affixed and will withstand daily use.
The Art of Finishing: Staining and Sealing Your DIY Nightstands
The finishing touches truly bring these nightstands to life, enhancing the wood grain and protecting the surface for years to come. I stained these nightstands using the exact same stain I applied to my king-size bed, ensuring a perfectly matched bedroom set. The stain is called Varathane Ash, and it’s readily available at Home Depot. This particular shade provides a beautiful, muted, and sophisticated tone that complements the farmhouse aesthetic beautifully.
To provide robust protection for the top surface, which will see regular use, I applied a coat of Varathane Triple Thick Polyurethane. I cannot express how much I love this product! It offers the equivalent thickness and protection of three coats of traditional polyurethane in a single application, and it dries in under an hour, making the finishing process incredibly efficient. I also used this on my dining table, and the results were phenomenal – a durable, beautiful finish that stands up to daily wear and tear. Please note: I used the satin finish, not the gloss version pictured. The satin finish provides a softer, more natural look that perfectly suits the farmhouse style without being overly shiny.
Bringing It All Together: Decorating Your New Farmhouse Nightstands
And there you have it – all finished!
With the construction and finishing complete, it’s time to personalize your new nightstands with decor. Finding the right accessories can truly complete the look. I managed to find these super affordable yet stylish baskets at Home Goods. It’s always worth checking Home Goods and Marshall’s, as they often have a fantastic selection of unique and budget-friendly home decor items. While these particular baskets were actually labeled as laundry baskets, they fit perfectly into the nightstand’s open shelf, demonstrating that sometimes unconventional finds work best!
The lamp that graces the top of the nightstand is a chic find from Target, offering both ambient lighting and a touch of modern farmhouse appeal.
Now, let’s talk about the hardware – oh, the hardware! I absolutely adore it. Home Depot generously sent me a box of exciting new hardware from a line that Liberty Hardware was launching at their stores. This specific set is a pack that includes a stylish pull and four coordinating corner accents. The best part? This entire pack costs just $8 on Home Depot’s website! You can take a closer look at it HERE. I am head over heels for the vintage campaign look it creates. This entire line is so much fun and offers endless possibilities for adding character to your furniture; simply search “Liberty Vintage Restoration” on Home Depot’s site to explore all the beautiful goodies they offer.
I believe that just about covers everything you need to know to build your very own farmhouse nightstands. Here’s another look at the finished project, showcasing all the hard work and attention to detail.
Conclusion: Start Your DIY Journey Today!
I truly hope you love these DIY nightstands as much as I do! They are a testament to what you can achieve with a little wood, some tools, and free, detailed plans. Crafting your own furniture is an incredibly rewarding experience, resulting in pieces that are not only functional but also deeply personal. Please feel free to reach out with any questions you might have during your build. As always, we would absolutely LOVE for you to share your creations, pin these plans to your Pinterest boards, and spread the word about the joy of DIY woodworking!
Thank you so much for stopping by and being a part of our creative community! Ash and I are actually on set today filming our pilot for HGTV… Did I just say that out loud?! It’s been a crazy journey, and we are beyond thrilled and can’t wait to share all the exciting details with y’all later this week. In the meantime, get inspired and go #buildlikeagirl!
~Whitney