
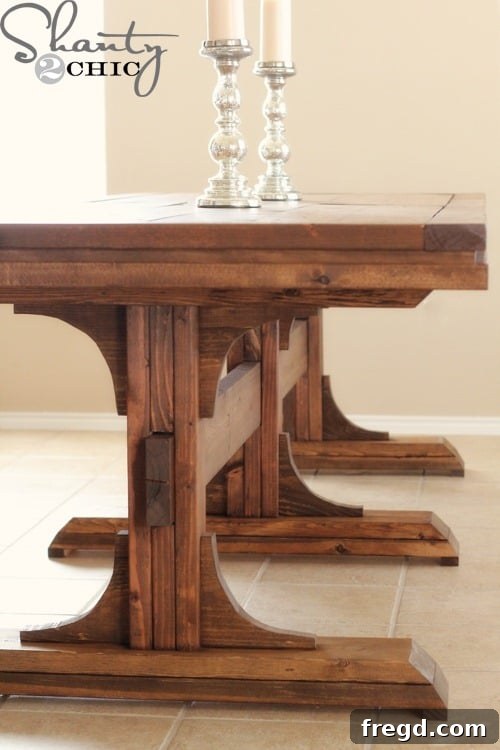
***For those eager to complete their dining ensemble, I have also crafted matching benches to complement this magnificent table. You can access the detailed plans for these benches HERE!***
Craft Your Dream Dining Space: A DIY Triple Pedestal Farmhouse Table for Under $150
The satisfaction of creating something beautiful and functional with your own hands is truly unparalleled. Today, I am incredibly thrilled to unveil my latest woodworking masterpiece: a stunning triple pedestal farmhouse dining table that completely transforms our home’s central gathering space. This project was so exciting, I simply couldn’t wait to share it, even amidst all the holiday preparations!
Inspiration Strikes: Achieving High-End Style on a Budget
The journey to this gorgeous farmhouse table began with a moment of pure inspiration during a shopping trip. I stumbled upon a breathtaking dining table, admiring its grand presence and elegant design. However, the hefty price tag—well over $1,000, not including shipping and tax—quickly brought me back to reality. With two lively boys and a curious toddler in our home, investing such a significant amount in a dining table seemed impractical and almost reckless. That’s where the magic of DIY truly shines.
Rather than giving up on my dream table, I turned to our incredibly talented and generous friend, Ana White. Known for her brilliant and accessible woodworking plans, Ana absolutely hit it out of the park with her design for this triple pedestal farmhouse table. Following her exceptional plans, and with a good dose of elbow grease, I was able to build an incredibly beautiful, expensive-looking, and wonderfully grand dining table for an unbelievable total cost of just $125! It’s a testament to what you can achieve with a vision, the right guidance, and a little dedication.
Why Choose a DIY Triple Pedestal Farmhouse Table?
Opting to build your own dining table, especially a magnificent piece like this triple pedestal farmhouse design, offers a multitude of benefits. Beyond the phenomenal cost savings, you gain the satisfaction of crafting a unique piece perfectly tailored to your home and family’s needs. This table isn’t just a piece of furniture; it’s a statement of personal style and a testament to the power of DIY. Farmhouse tables are renowned for their robust construction, timeless appeal, and ability to foster warm, inviting atmospheres—perfect for family meals, entertaining guests, or simply gathering for conversation. Building it yourself means you can ensure its durability, knowing every joint and finish detail, making it ideal for busy households with children. Plus, the sense of accomplishment you feel every time you sit down at your handmade table is priceless.
Getting Started: Your Essential Guide and Plans
Building this table was a remarkably straightforward process, far less challenging than one might imagine. From the initial cuts to the final protective finish, the entire project took me approximately 10 hours of focused work. To embark on your own farmhouse table journey, the first and most crucial step is to obtain Ana White’s detailed plans. Her instructions are clear, comprehensive, and designed to guide even intermediate builders through each stage with confidence. You can find Ana’s invaluable plans HERE.
Now, let’s dive into the exciting construction process!
Building the Sturdy Pedestal Legs
The foundation of any great table lies in its stability, and for a grand piece like this triple pedestal design, sturdy legs are paramount. The construction of the legs is surprisingly simple but requires precision and strong adhesive. I began by cutting the necessary pieces for the individual legs according to Ana’s plans.
A little Gorilla Glue Wood Glue goes a long way in ensuring these critical joints hold strong for years to come. Apply glue liberally, clamp the pieces securely, and allow ample drying time for maximum strength.
Assembling the Robust Bases
With the individual legs prepared, the next step involves constructing the sturdy bases that will support each pedestal. This stage introduces mitered cuts, which create clean, professional-looking joints.
For these precise angled cuts, I relied on my Kobalt sliding compound miter saw. This tool makes achieving perfectly aligned corners simple and efficient, essential for the clean lines of the farmhouse aesthetic. Once cut, the base pieces are then assembled and secured, creating the solid foundation for each pedestal.
Connecting the Pedestals: The Core of Your Table
With the individual legs and bases ready, it’s time to bring these components together to form the distinct triple pedestal structure. This stage involves carefully attaching the legs to the bases and then connecting the three pedestals with a central runner, creating the table’s robust support system.
Accurate measuring and careful alignment are key here to ensure a level and stable table. Wood screws, often in conjunction with wood glue, are used to secure these connections, building a structure that can withstand daily use.
The pictures above illustrate the progressive steps of connecting the various components, showcasing how the robust and elegant pedestal structure takes shape. This is where the table truly starts to reveal its impressive form and strength.
Crafting the Elegant Decorative Arcs
To add a touch of classic farmhouse elegance to the pedestals, decorative arcs are incorporated. This step might seem a bit intimidating at first glance, but I assure you, it’s surprisingly simple and yields a significant visual impact.
I absolutely adore my cordless 18-volt Ryobi jig saw for tasks like this. The process involves simply drawing a smooth arc onto each piece of wood and then carefully following the line with the jigsaw. Don’t worry if the cuts aren’t perfectly smooth initially; that’s what sanding is for! I used my Ryobi cordless sander to quickly smooth away any jagged edges, creating a polished finish before attaching them to the pedestals.
Constructing the Expansive Farmhouse Tabletop
The tabletop is arguably the most visually prominent part of your dining table, and its construction requires attention to detail to ensure a flat, stable, and beautiful surface. For a large farmhouse table like this, creating a solid and seamless top is crucial.
I constructed the entire tabletop using my Kreg Jig® pocket hole system, which creates incredibly strong, concealed joints, perfect for a clean aesthetic. Combined with Gorilla Glue Wood Glue and my cordless Ryobi brad nailer, this combination provided a durable and seamless surface. The Kreg Jig makes joining multiple boards together for a wide tabletop surprisingly simple and creates a robust structure.
These images capture the various stages of tabletop assembly, from the initial framing to the final, completed panel ready for finishing. The result is a smooth, expansive surface that promises to be the heart of many memorable meals.
The Finishing Touches: Staining and Protection
The finish is what truly brings out the beauty of the wood and protects your handmade table for years to come. Choosing the right stain and protective coat is key to achieving that perfect farmhouse look and ensuring durability.
For this project, I selected my favorite: Rust-Oleum Early American stain. This classic shade provides a rich, warm tone that perfectly complements the rustic elegance of a farmhouse design. I applied one coat evenly with a bristle brush, allowing it to penetrate the wood for about 5 minutes before wiping away the excess. A helpful tip for larger projects like this: work in small, manageable sections. I tackled the legs first, then one side of the tabletop at a time, ensuring an even application and consistent color. I also found it beneficial to stain the legs, runner, and tabletop separately before the final assembly, which allows for easier and more thorough coverage.
Once the stain was completely dry, I applied one coat of Rust-Oleum Ultimate Polyurethane in a satin finish. This protective layer is essential for guarding the wood against spills, scratches, and everyday wear and tear, ensuring your beautiful table remains pristine for many years. The satin finish provides a lovely soft sheen, allowing the natural beauty of the stained wood to shine through without being overly glossy.
Final Assembly & Practical Considerations
This impressive table measures 9 feet in length and is, understandably, quite heavy—a testament to its solid construction! After the stain and protective finish were fully cured, I brought the separate pieces into the house for final assembly. My strategy was to attach the tabletop to the legs before sliding the central runner through, and this method worked perfectly for us. An important practical decision I made was to use only wood screws to attach the tabletop to the leg assemblies, intentionally omitting wood glue for this connection. This allows the table to be easily disassembled should we ever need to move it, making future relocations much more manageable without compromising structural integrity.
And just like that, it’s done!
It’s truly incredible to see how simple 2x4s and pine boards can be transformed into such a sophisticated and elegant piece of furniture. This DIY triple pedestal farmhouse table not only serves as a central hub for our family but also stands as a proud example of what can be accomplished with a little vision and a lot of passion for building.
Click HERE for the matching Bench Plans to complete your dining set!
Thank you so much for joining me on this woodworking journey! I hope this inspires you to take on your next DIY furniture project.
~Ashley
Tools and Materials Used for This Project
For your convenience, I’ve compiled a list of the essential items and tools I used to build this beautiful table, along with links for where you might purchase them.
Essential Tools:
- Kreg Pocket Hole System: Indispensable for creating strong, hidden joints.
- Ryobi Cordless Jig Saw: Perfect for cutting curves and decorative elements.
- Kobalt Compound Sliding Miter Saw: For precise miter and cross cuts.
- Ryobi 18-Volt Drill: A versatile tool for drilling pilot holes and driving screws.
- Ryobi Brad Nailer: For quickly securing pieces during assembly.
Key Materials:
- Gorilla Glue Wood Glue: For strong, durable wood bonds.
- Rust-Oleum Early American Stain: My preferred wood stain for a classic look.
- Rust-Oleum Ultimate Polyurethane (Satin): For a long-lasting protective finish.
- Wood (2x4s and pine boards): Purchased from local hardware stores.
- Wood screws