
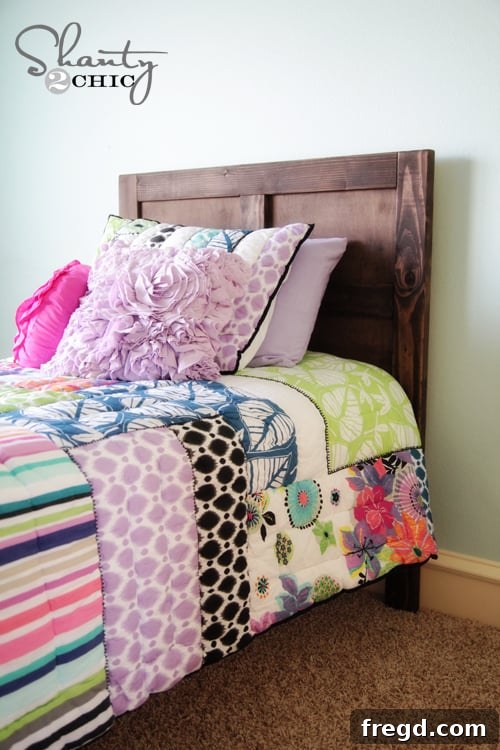
Crafting Dreams: My DIY Pottery Barn Kids Emmet Twin Bed Build
Hey fellow DIY enthusiasts and proud parents!
Happy Monday, and welcome to another exciting furniture build journey. Today, I’m thrilled to share a project that’s very close to my heart: a beautiful, custom-built twin bed for my little girl. As our children grow, so do their needs, and my baby is officially ready to graduate to a ‘big girl’ bed. It’s a bittersweet milestone, let me tell you – she’s ready, but I’m still holding onto those baby days! Nevertheless, creating a space that grows with her was my primary goal, ensuring durability, style, and a touch of handmade love.
My inspiration for this project struck when I stumbled upon the Pottery Barn Kids Emmet line. The timeless design, sturdy construction, and elegant aesthetic immediately captivated me. I knew this was the direction I wanted to take for her new bed. Recreating that high-end look without the hefty price tag became my mission. For the perfect plans, I reached out to my amazing friend, Ana White, a true wizard in the world of DIY furniture. As always, she delivered with incredible, easy-to-follow plans that made this dream a tangible reality. With plans in hand, I dove into the build last week, and I couldn’t be happier with the results. Just take a look!
Unveiling the Masterpiece: My DIY Emmet Twin Bed
One of my absolute favorite features envisioned for this bed, which truly elevates its functionality and charm, is the addition of a trundle. Although not part of this initial build, we will absolutely be constructing a matching trundle to complement this twin bed. Trundles are a game-changer for sleepovers or simply providing extra storage, and I can’t wait to share that build with you all in the near future! Imagine the possibilities for her room!
You might notice the room looks a bit empty at the moment – please ignore that for now! This bed is just the first piece of an entire room transformation. I’ll be building all the matching furniture pieces to create a cohesive and beautiful space for her. Think dressers, nightstands, and perhaps even a desk, all designed to grow with her and provide functional elegance. As I embark on these future projects, I promise to share more tips, progress photos, and insights right here. But for now, let’s focus on the star of the show, the twin bed! You can find the full set of detailed plans over on Ana White’s site, which I highly recommend for anyone looking to tackle this project.
The Swift Build: A Project Completed in Hours
Timing is everything, especially with a busy family schedule. Last week, my awesome in-laws graciously took my four oldest kids camping for a few days, creating the perfect window of opportunity to tackle this build. And what an opportunity it was! I was genuinely surprised by how quickly and easily this bed came together. I purchased all the wood around 1 PM and had the entire bed stained and finished by 7 PM that very same night. And yes, that impressive timeframe includes a dinner break and tending to our youngest baby! This project truly is an excellent choice for a weekend warrior or anyone looking for a rewarding, fast-paced build.
So, are you ready to dive into the details? Let’s get started on how you can build this incredible bed too!
Material Spotlight: Why PureBond Plywood is Our Go-To
The plans call for plywood, and for this crucial component, our choice was obvious and unwavering: PureBond Plywood. Many of you who follow our projects, especially those familiar with my partner Ash’s and my work, know just how much we adore this material. Building beautiful, durable furniture with plywood might sound a bit unconventional to some, and honestly, it did to us too initially! That was until we discovered the incredible benefits of PureBond Plywood. It has completely transformed our approach to woodworking projects.
You can conveniently find PureBond Plywood at any Home Depot store, making it easily accessible for your projects.
The PureBond Advantage: Health, Sustainability & Beauty
What truly sold us on PureBond, making it an indispensable material in our workshop, are its numerous compelling benefits:
- Formaldehyde-Free Glue: This is a massive selling point. Knowing that we’re building furniture for our home and children with formaldehyde-free glue provides immense peace of mind. It’s unsettling to think about the harmful chemicals we might have been breathing in from traditional plywoods until now. PureBond eliminates that worry.
- Made in America: We are incredibly proud to support American manufacturing. “Whoop!!!” indeed! This commitment to domestic production speaks volumes about the quality and standards behind the product.
- Sustainable Sourcing: PureBond Plywood is crafted using wood sourced from sustainable forests. This eco-conscious approach aligns perfectly with our values, allowing us to create without compromising environmental responsibility.
- Exceptional Workability: This plywood is a dream to work with. It cuts cleanly, drills smoothly, and holds fasteners securely, making the building process significantly easier and more enjoyable for DIYers of all skill levels.
- Stunning Aesthetics: Perhaps the biggest selling point for us is its sheer beauty. PureBond offers the luxurious look of real hardwood at a mere fraction of the cost. Home Depot typically stocks birch and oak varieties, but for those seeking something different, you can also order hickory, maple, or virtually any other wood species and have it delivered directly to your store. We absolutely love this flexibility!
After experiencing the undeniable benefits of PureBond Plywood, there’s simply no going back for us. It’s such an obvious, superior choice, and it fits perfectly within our “shanty budgets,” allowing us to create high-quality pieces without breaking the bank.
For this project, I opted for convenience at Home Depot. I had the incredibly helpful guy at the lumber department cut down the large 4×8 sheet for me. This saves so much time and makes transporting the wood in my car a breeze! One 4×8 sheet of plywood is actually sufficient for two twin beds, which speaks to its efficiency. For the remainder of the bed structure, I utilized standard pine boards and sturdy 2x4s, completing the material list.
Essential Tools for a Professional Finish
Building furniture doesn’t have to be intimidating, especially with the right tools. Certain tools become indispensable, transforming complex tasks into simple, precise operations. Here are the key players that made this bed build a success:
The Indispensable Kreg Jig
I simply wouldn’t attempt to build this bed – or honestly, most of my furniture projects – without my trusty Kreg Jig! For those unfamiliar, a Kreg Jig allows you to create incredibly strong pocket-hole joints. You guys know just how much Ashley and I love our Kreg Jigs; they are a cornerstone of our workshop. They make building so much easier, faster, and the resulting pieces are significantly more professional, sturdy, and durable. The beauty of pocket holes lies in their hidden strength, allowing you to create seamless connections that are both robust and aesthetically pleasing. This is the exact model that Ashley and I rely on for countless projects, and it’s an investment that pays dividends in quality and ease.
For the 2×4 sides and frame elements of the bed, I utilized 1 1/2-inch pocket holes, secured with robust 2 1/2-inch pocket hole screws. These larger screws and deeper holes ensure maximum strength and stability for the main structural components. Below, you can see exactly where I placed these pocket holes for the bed frame, strategically positioned for optimal support.
When it came to attaching the 1/2-inch plywood panels into the frame, precision was key. For these thinner panels, I adjusted my Kreg Jig to create 1/2-inch pocket holes, which were then secured with 1 1/4-inch pocket hole screws. This combination ensures a flush, strong connection without over-drilling or causing damage to the thinner material.
The Game-Changing Ryobi Brad Nailer
For the 1×4 trim pieces on the fronts of the headboard and footboard, I turned to my reliable Ryobi brad nailer. I attached these from the back using 1-inch brads, reinforced with a strong bond of Gorilla Wood Glue. This combination provides both immediate hold and lasting strength. Speaking of nailers, have you heard about the new Ryobi One+ Airstrike Cordless Brad Nailer? I am absolutely giddy with excitement for this tool! It uses the same 18-volt batteries as our drills, which means no more lugging around cumbersome air hoses and compressors. It’s all about convenience, speed, and freedom to work anywhere. Woohoo for cordless power!
Mastering Assembly with the Kreg Right Angle Clamp
For those of you who already love your Kreg Jig, you are absolutely going to adore their Right Angle Clamp! For projects like this, where you’re joining large pieces and often working alone, this clamp is a true lifesaver. It made the final assembly of the bed a complete breeze. I was indeed working alone for much of this process – well, save for the invaluable assistance of this genius tool.
The Kreg Right Angle Clamp ingeniously holds your boards tightly and perfectly square through a pocket hole while you drive in your screws. This ensures a precise, strong joint every single time, eliminating frustration and saving precious time. It’s truly a testament to clever tool design.
Step-by-Step Construction Insights
Preparing Your Wood and Pocket Holes
One crucial tip I discovered during this build: I decided to attach three sides of the headboard and footboard frames first. Next, I secured the plywood panels to these three sides using pocket hole screws. Only then did I add the bottom 2×4 piece, attaching it to both the existing frame and the plywood panel. This slightly deviates from the order in Ana White’s original plans, but I found it significantly easier. Trying to fit the plywood panel into an already fully constructed frame can be a tight squeeze and lead to frustration; my adjusted method allows for smoother panel integration.
Attaching the Runners for Ultimate Stability
To simplify getting this “big girl” bed into her room, I wisely cut the runners (the long support beams that connect the headboard and footboard) separately and stained them apart from the main headboard and footboard pieces. This made handling and moving the components much more manageable, especially when navigating hallways and doorways.
Finishing Touches: Staining for a Rich Look
For her room, I envisioned a dark, rich color that would provide both warmth and practicality (because let’s be honest, dark stains hide coloring marks remarkably well!). After much deliberation, I chose Rust-Oleum Ultimate Wood Stain in Kona. This stain delivers a deep, beautiful hue that I absolutely adore. Once applied, the Kona stain provided a gorgeous contrast with her existing bedding and wall color, creating a sophisticated yet playful aesthetic that truly makes the bed pop.
Once the stain had thoroughly dried, I carefully brought all the components upstairs and began the final assembly of the bed.
First, I securely attached the 2×4 runners to the headboard and footboard. These form the primary structural support. Next, I attached the 1×8 runners. A critical detail here: I made sure to place the pocket holes on the 1×8 boards at the very top edge. This ensures that the wider 2×4 runners, which run parallel below, wouldn’t obscure access to the pocket holes on the 1x8s, allowing for clean and easy fastening. After attaching both sets of runners with pocket hole screws, I went back through the 2x4s and drove 2-inch wood screws directly into the 1×8 boards. This extra step of double-fastening was purely for added peace of mind, knowing exactly who will be jumping sleeping on this bed! Superior strength and stability are always a priority for kids’ furniture.
The Budget-Friendly Brilliance: Under $70!
Now for the best part – the cost! If you stick with common white wood boards for the frame and runners, and factor in the PureBond plywood, the total cost for all the lumber for this twin bed will come in at under an astonishing $70. That’s a truly happy number, especially when you consider the quality, durability, and custom design you get compared to retail options. This DIY approach allows for significant savings without compromising on style or structural integrity.
That’s it for the detailed breakdown! I know it was quite a mouthful, but I wanted to be as thorough and detailed as possible to empower you to tackle this project yourself. My final step was setting up the bed, arranging the bedding, and capturing these beautiful photos to share with all of you.
Styling Her New Sanctuary: Bedding & Beyond
For those wondering about the bedding, I purchased it from PBTeen.com. While I absolutely love to “knock off” their furniture designs, I consistently turn to Pottery Barn Teen for my kids’ bedding. Their quality is unmatched – it washes incredibly well, holds up to countless cycles, and just look how darn cute it is! I often find their bedding on clearance, which makes it an even sweeter deal. The durable fabric and charming designs perfectly complement the rustic elegance of the DIY bed.
The Complete Room Vision: A Collaboration with Ana White
I am beyond excited to share every single piece of her newly transformed room as we build it out. As I mentioned, I’m thrilled to be teaming up with Ana White once again to bring you the entire collection of matching furniture pieces for this room. It’s going to be absolutely beautiful, a truly custom and cohesive space designed with love and functionality in mind. Stay tuned for those upcoming builds!
Here is the finished bed, ready for a lifetime of sweet dreams and adventures:
So, what do you think? Does she look like a satisfied customer?
I sincerely hope you love this DIY twin bed as much as we do! It’s a project that brings immense satisfaction, both in the building process and in seeing your child enjoy a piece crafted especially for them. Remember to head over to Ana White’s site for the full set of plans – she makes building dreams a reality. I would absolutely love for you to pin this project and share it with your friends and fellow DIY enthusiasts below. Your support means the world! Thanks so much for stopping by and sharing in our latest creation!
~Whitney