
Building the Ultimate DIY Kids Play Table: A Double Trestle Design
Hey there, DIY enthusiasts and parents!
If you’re anything like me, your family grows, and so does the need for functional, beautiful, and durable spaces for your little ones. After welcoming two new additions to our family, it became clear that our existing playroom table, as much as we loved it, simply wasn’t cutting it anymore. We needed an upgrade – a bigger, better, and more versatile solution to accommodate our growing crew and their friends. That’s when I embarked on a journey to create a truly spectacular double trestle kids’ play table, a project that combined style, practicality, and an unbelievably affordable price tag.
The Vision: Spacious, Sturdy, and Stylish Playroom Furniture
I had a very specific design in mind: something that could comfortably seat multiple children for crafts, homework, snack time, or imaginative play. It needed to be robust enough to withstand the daily adventures of energetic kids, yet attractive enough to complement our playroom decor. After sketching out some ideas, I knew exactly where to turn for expert plans: the incredible Ana White. Her brilliant designs always deliver, and she certainly came through with fantastic plans for this double trestle kids’ table. The moment it was finished, I was absolutely smitten! It fits our space perfectly, and now there’s ample room for all my kiddos and their friends to gather around. This isn’t just a table; it’s a central hub for creativity and connection in our home.
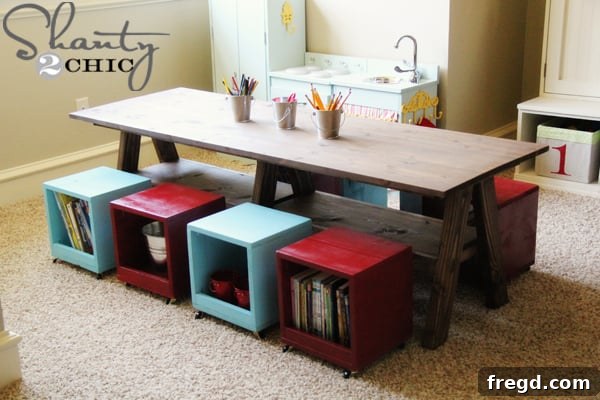
Our magnificent new double trestle kids’ play table, ready for action and endless fun!
While I’ll share some of my personal tips, tricks, and detailed photos here to inspire your own build, remember that the full, comprehensive set of plans for this exact table can be found directly on Ana White’s website. She provides all the precise measurements and cut lists you’ll need for a seamless building experience.
An Unbelievably Quick & Budget-Friendly Kids Table Build
One of the most astonishing aspects of this project was how quickly and affordably it came together. From the first cut to the final screw, I had this entire table constructed in under an hour and a half! This truly is a testament to the simplicity and efficiency of the double trestle design. It’s a very straightforward, basic build, making it an ideal project even for those with moderate woodworking experience looking for a rewarding weekend DIY. What’s more, the total cost for all the lumber was incredibly low – less than $65! For a sturdy, spacious table that comfortably seats eight children, that’s an exceptional value that simply can’t be beaten by expensive store-bought alternatives. Imagine the countless memories that will be made around a durable kids’ table you built with your own hands, all without breaking the bank!
Getting Started: Essential Tools & Materials for Your DIY Play Table
Before diving into the construction of your own large kids’ table, let’s briefly touch upon the essential tools and materials that made this project a breeze. While the exact lumber dimensions are meticulously detailed in Ana White’s plans, you’ll primarily be working with common wood sizes like 2x2s for the frame and sturdy 1xXs for the tabletop planks. As for tools, a reliable drill, an accurate measuring tape, and a good saw (a miter saw will make cuts quicker and more precise, but a circular saw works too) are fundamental. However, one tool truly shone in this build and is a game-changer for woodworking projects: my Kreg Jig®. This pocket-hole system creates incredibly strong, hidden joints, making assembly both simple and remarkably robust. It’s perfect for creating professional-looking furniture and I highly recommend it for any aspiring or experienced DIYer!
The Construction Process: A Step-by-Step Guide to Your New Kids Table
Step 1: Building the Sturdy Trestle Bases
The foundation of this robust play table lies in its three trestle bases. You’ll begin by carefully constructing these leg assemblies. Two of them will serve as the strong, broad ends of the table, providing excellent support and stability. The middle trestle base is designed slightly differently to integrate seamlessly into the overall structure, offering additional rigidity and preventing any potential sagging of the large tabletop over time. Ensuring your cuts are precise and your corners are perfectly square at this early stage will pay significant dividends in the final stability and professional appearance of your finished play table.
Starting with the initial trestle leg assemblies, the backbone of our sturdy kids’ play table.
Careful assembly ensures a strong foundation for a durable kids’ table.
The middle trestle base features a slightly modified design to best support the center of the expansive tabletop. This strategic variation offers enhanced rigidity and crucial support, ensuring the table remains stable and flat, even with heavy use from active children. It’s a small detail that makes a big difference in the table’s overall longevity and performance.
The distinct middle trestle base, strategically designed for optimal tabletop support.
Step 2: Connecting the Trestle Bases with the Kreg Jig
Once your individual trestle bases are meticulously built, the next crucial step is to connect them firmly to form the main table frame. For the 2×2 support pieces that elegantly bridge and connect the trestles at the corners, I exclusively used my trusted Kreg Jig. This ingenious tool allows you to drill angled pilot holes, known as pocket holes, into one piece of wood, and then join it to another with specialized screws. The result is an incredibly strong, concealed joint that is both highly durable and aesthetically clean. This method is perfect for ensuring the table’s frame is rock solid, stable, and boasts a professional finish.
Creating strong, hidden pocket holes with the Kreg Jig for a seamless table frame.
A Key Lesson Learned & Pro Tip for DIY Kids’ Tables: While I successfully used the Kreg Jig for the main corner attachments, I faced a minor setback when it came to attaching some of the 1×2 supports in the very center of the table. I had already installed these 1x2s before realizing I should have added pocket holes there first. Consequently, I had to resort to traditional wood screws to attach them, which, while functional, isn’t quite as clean or strong as a pocket-hole joint. If I were to do this project again, I would definitely ensure those central 1x2s also got pocket holes from the outset. This is a valuable lesson for any DIYer: always plan your pocket holes in advance and drill them *before* final assembly to ensure the strongest, most secure, and most aesthetically pleasing connections possible!
Direct wood screws were used here for a quick fix, but planning pocket holes would have been ideal.
Step 3: Preparing and Attaching the Spacious Tabletop
Once the base frame is completely assembled and sturdy, it’s time to bring the tabletop into play. For ease of attachment and to ensure a perfectly flat and level surface, I highly recommend laying your assembled tabletop flat on the ground (or on a clean, protected workspace). Then, carefully position your newly built table base directly on top of it, upside down. This ingenious method allows you to easily align everything, make any necessary adjustments, and then securely fasten the top from beneath, ensuring a perfectly clean, screw-free aesthetic on the visible surface of your kids’ table. Using robust wood screws of appropriate length, drill from the underside of the 2×2 supports directly into the tabletop planks. This creates a powerful, lasting bond that will withstand years of enthusiastic play. It’s truly as “easy peasy” as it sounds, making the final assembly quick, satisfying, and stress-free.
Preparing the spacious tabletop for secure attachment to the base.
Securing the table base to the tabletop from below, ensuring a flawless visible surface.
The Finishing Touches: Durability Meets Beauty for Kids’ Furniture
For a kids’ table, the finish isn’t just about aesthetics; it’s about crucial protection and long-lasting durability. Kids are notoriously creative at making messes, so a durable, easy-to-clean, and highly resistant surface is absolutely paramount. I chose two fantastic Rust-Oleum products that deliver spectacularly on both fronts, ensuring this table will withstand years of active use.
Rich Color with Rust-Oleum Ultimate Wood Stain in Dark Walnut
To give the table its beautiful, deep, and classic color, I used my absolute favorite wood stain: Rust-Oleum Ultimate Wood Stain in Dark Walnut. This premium stain penetrates deeply into the wood grain, highlighting its natural beauty while providing a rich, warm hue that complements any playroom or home decor style. It’s incredibly user-friendly to apply, spreads smoothly, and dries remarkably quickly, making the staining process efficient and highly rewarding. The rich dark walnut color adds a touch of sophistication to this functional play table.
My go-to stain for a gorgeous, deep wood finish that enhances the natural beauty of the timber.
Ultimate Protection with Rust-Oleum Ultimate Polyurethane with Soft Touch
Knowing my kids’ well-deserved reputation for creating “creative spills” and energetic play, I knew a robust, protective topcoat was non-negotiable. For this essential layer, I turned to Rust-Oleum Ultimate Polyurethane with Soft Touch. This product is truly outstanding! It provides an incredibly durable, water-resistant, and scratch-resistant finish that stands up exceptionally well to spills, daily wear, and the inevitable bumps and scrapes of a busy playroom. What I particularly love about it is how quickly it dries, allowing for multiple coats in a single day, and the fact that it leaves absolutely no visible brush strokes, resulting in a smooth, flawless finish. The “Soft Touch” aspect adds a subtle, smooth, and pleasant tactile feel to the surface, making it enjoyable to interact with while being incredibly hard-wearing. It’s the absolute perfect topcoat for high-traffic furniture like a kids’ play table, ensuring it stays beautiful, protected, and functional for many joyful years to come.
The secret weapon for a spill-proof, scratch-resistant, and soft-to-the-touch kids’ table.
The Finished Masterpiece: Ready for Endless Play!
And that’s it! A truly stunning, super functional, and incredibly durable kids’ play table, built with love, precision, and on a very manageable budget. The entire process was surprisingly simple, and the results speak for themselves. This table isn’t just a piece of playroom furniture; it’s an inviting canvas for endless hours of drawing, building, crafting, learning, and sharing with friends. It has truly transformed our playroom into an even more welcoming, organized, and inspiring space for our children to grow and create.
Our bright and inviting playroom, proudly featuring the new double trestle kids’ table.
Ample space on the tabletop for multiple activities and children simultaneously.
A closer look at the robust and elegantly designed trestle leg construction.
The elegant dark walnut finish beautifully enhances the natural wood grain and table’s design.
A vibrant and engaging space for children, centered around their new custom table.
The perfect blend of functionality, rustic charm, and modern durability.
Beyond the Table: More Playroom DIY Inspiration & Storage Solutions
What do you think of our new playroom centerpiece? I’m absolutely thrilled with it! And if you’re looking to create an entire dream playroom, this large kids’ play table is just one component of a truly inspiring space. I’ve tackled several other DIY projects to make this area as functional, organized, and inspiring as possible for my children. Here are a few more goodies to spark your creativity and help you organize and beautify your own children’s play area with stylish, budget-friendly solutions:
Smart Storage Solutions: Rolling Storage Cubes
Every dynamic playroom needs smart storage solutions that can keep up with the chaos! These versatile rolling storage cubes double as comfortable stools, offering both extra seating and a convenient place to stash toys, books, or craft supplies. They’re incredibly easy to make, highly functional, and a fantastic way to keep clutter at bay, promoting a more organized play environment. Want to see how to easily make my rolling storage cubes?
Functional and fun: our DIY rolling storage cubes offer both seating and clever toy storage.
You can check out the full plans for these amazing rolling storage cubes HERE!
Budget-Friendly Decor: Fabric Covered Diaper Boxes
Who knew humble diaper boxes could be transformed into stylish, decorative storage? These fabric-covered boxes are virtually free to make, requiring just some fabric scraps and adhesive, and add a touch of charming personality while keeping smaller toys and art supplies neatly tucked away. It’s a fantastic upcycling project that proves you don’t need to spend a fortune to achieve beautiful and practical playroom organization!
Creative Play: The DIY Play Kitchen
Every little chef deserves a fantastic kitchen! Our custom-built DIY play kitchen provides endless hours of imaginative cooking and role-playing fun, inspiring creativity and storytelling. Best of all, it’s a fraction of the cost of store-bought versions, allowing you to personalize every detail to your child’s delight. It’s a project that truly sparks joy and encourages valuable developmental play.
Personalized Decor: DIY Picture Frames with Clips
Showcase your children’s latest masterpieces or cherished family photos with these simple yet charming DIY picture frames with clips. The ingenious clip design makes it incredibly easy to swap out artwork or photos, keeping the display fresh, dynamic, and reflective of your child’s evolving creativity without constantly changing frames. It’s a personal touch that truly makes a playroom feel like home.
Maximized Storage: Pottery Barn Inspired Storage System
For ultimate playroom organization, I took inspiration from high-end design to build a Pottery Barn-inspired storage system. This robust and beautiful unit offers ample space for books, toys, craft supplies, and more, keeping the playroom tidy, functional, and aesthetically pleasing. Achieving that coveted high-end style on a practical DIY budget is incredibly rewarding and totally achievable with the right plans and a little elbow grease!
Join the DIY Fun! Build Your Own Dream Playroom
I hope this detailed walkthrough inspires you to tackle your own DIY projects! Building furniture, especially for your children’s spaces, is an incredibly rewarding endeavor. Not only do you save a significant amount of money compared to retail prices, but you also get to create custom, high-quality pieces that are built to last, perfectly suited to your specific needs, and infused with your personal touch. There’s nothing quite like the satisfaction of seeing your children enjoy something you’ve crafted with your own hands.
A huge thank you again to the amazing Ana White for her incredible plans that made this dream double trestle play table a reality! Don’t forget to visit her site for the comprehensive, step-by-step instructions and detailed measurements for this fantastic project.
Make sure to check out the full plans for this GREAT table at Ana-White.com!
We’d love for you to share this project with your friends, family, and fellow DIY enthusiasts! Let’s inspire more custom-built, beautiful spaces for our little ones.
Happy building!
~Whitney
Rolling Storage Cubes – A Perfect Companion Project for Your Play Table!