
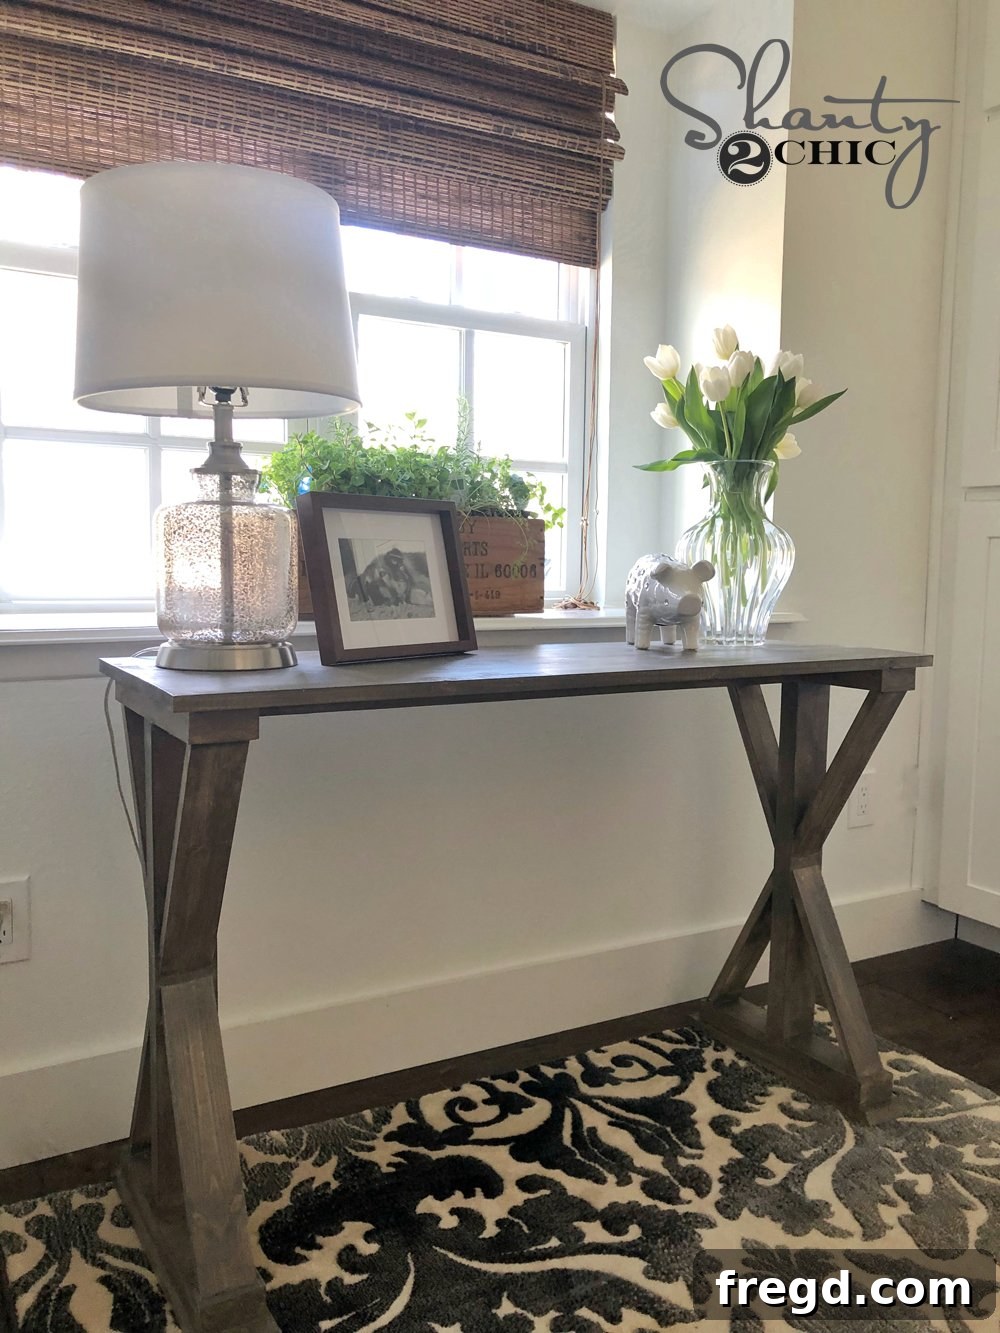
Welcome back to the third installment of our exciting Alvarez Series! We’re thrilled to continue our journey with our dear friends and esteemed producers, who recently embarked on a new chapter by relocating to our area. Their latest adventure involved purchasing an outdated ranch house and dedicating months to its incredible transformation into a stunning glam farmhouse. Their hard work has truly paid off, and now it’s our turn to contribute by crafting custom furniture pieces that perfectly complement their stylish new home. We’re incredibly excited for this collaborative project!
Among their furnishing needs, Lauren expressed a desire for a compact yet elegant writing desk to fit perfectly within her butler’s pantry. This challenge sparked the inspiration for our latest project: a charming and functional DIY farmhouse desk that costs under $30 and can be built using just six humble boards. This project is a testament to how simple materials and a little ingenuity can create beautiful, personalized furniture. Get ready to embark on this rewarding build by watching our comprehensive tutorial video below!
Craft Your Own Charming $30 DIY 6-Board Farmhouse Desk: A Step-by-Step Guide
Discover the Charm and Simplicity of a DIY Farmhouse Desk
Isn’t this desk absolutely captivating? Its rustic charm, combined with practical functionality, makes it an ideal addition to any home, especially in a cozy nook like a butler’s pantry or a dedicated small office space. This DIY farmhouse desk project isn’t just about saving money; it’s about building a piece of furniture that tells a story, a desk that exudes warmth and character. Imagine the satisfaction of creating this beautiful and sturdy desk with your own hands, knowing it perfectly fits your space and budget. Its clean lines and classic farmhouse aesthetic blend seamlessly with various decor styles, offering a versatile solution for your writing, crafting, or planning needs.
Getting Started: Essential Tools and Materials for Your Farmhouse Desk Project
Before diving into the construction of your beautiful new farmhouse desk, it’s crucial to gather all your tools and materials. Preparation is key to a smooth and enjoyable building process. We’ve designed this project to be accessible, even for beginner woodworkers, utilizing common tools and readily available lumber. To ensure you have all the precise measurements and cutting details, be sure to download our free, printable plans. These plans are your blueprint for success, guiding you through each cut and joint with clarity.
Make your build even easier by securing the FREE PLANS for this DIY 6-Board Farmhouse Desk by clicking HERE!
Recommended Tools & Materials:
- Lumber:
- Six boards (as specified in the free plans – typically 2x4s, 1x4s, and 1x3s, plus a laminated pine board for the desktop). The beauty of this desk lies in its efficient use of standard lumber dimensions.
- Wood Glue: A high-quality wood glue is essential for strong, lasting joints. We highly recommend the Glu-Bot for its incredible ease of use and precise application, making glue-ups much cleaner and more efficient.
- Pocket Hole Jig: For creating strong, concealed joints. Our favorite Kreg Jig model (Kreg K5 Jig) is invaluable for projects like this, providing professional-looking results with minimal effort.
- Drill/Driver: For drilling pocket holes and driving screws.
- Miter Saw: For precise cuts on your lumber, especially when creating angles.
- Pocket Hole Screws: Various lengths (2.5″, 1.5″) as specified for different connections.
- Wood Screws / Spax Screws: 2″ and 1.5″ lengths for attaching the desktop and decorative elements.
- Nails: 1.25″ nails for the final decorative diagonal pieces.
- Measuring Tape, Pencil, Safety Glasses: Standard workshop essentials.
- Optional: Table saw for ripping boards (if you choose to narrow 2x4s for a custom look, as we did).
- Finish: The stain we used on this desk provides a beautiful, rich farmhouse look, but feel free to choose paint or stain that matches your personal style.
- Decor: The beautiful rug featured in our photos is from At Home Stores, adding a touch of warmth and style.
Having these items ready before you begin will streamline your process and help you create a sturdy, beautiful DIY desk with confidence.
Step-by-Step Construction: Crafting Your Farmhouse Desk
Now that you have all your materials and tools at hand, let’s begin the exciting process of building your DIY 6-board farmhouse desk. Follow these steps carefully, and remember that each connection contributes to the overall strength and aesthetics of your finished piece.
Step 1: Assembling the Foot Pieces and Runner
Begin by preparing your foot pieces. We used 2×4 boards that we thoughtfully ripped down to 3 inches wide. While this step is optional, narrowing the boards creates a slightly more refined and slender appearance for the desk’s base. If you opt not to rip your boards, the desk will still be sturdy and charming, simply with a slightly chunkier profile. Once your foot pieces are ready, attach the runner board to two of these foot pieces. Ensure these connections are strong and secure. Apply a generous amount of wood glue to the joint surfaces, then use 2.5-inch pocket hole screws driven through 1.5-inch pocket holes. For drilling these precise pocket holes, we highly recommend our Kreg K5 Jig, which makes the process quick and accurate, creating durable, hidden joints.
Step 2: Attaching the Base to the Desktop
With the initial “I” shaped base assembly complete, it’s time to connect it to the desktop. The desk top itself is a laminated pine board, chosen for its smooth surface and durability. We purchased a 16-inch wide board and precisely cut it to the desired length using our miter saw to ensure a clean, straight edge. To attach your assembled “I” piece to the underside of the desktop, apply a continuous bead of wood glue along the top edges of the “I” structure where it will meet the desk. Then, secure it firmly with 2-inch Spax or other suitable wood screws. Ensure proper alignment and even spacing before fastening to create a stable and flush connection between the base and the working surface.
Step 3: Integrating the Leg Pieces
Next, it’s time to add the primary leg pieces that will give your desk its height and structural integrity. These leg pieces attach vertically to the “I” boards you previously assembled. For a strong and seamless connection, use wood glue along the joining surfaces and secure them with 2.5-inch pocket hole screws through 1.5-inch pocket holes. It’s important to align these leg pieces so they are flush with the outside edges of the “I” piece, and also perfectly centered. This precise alignment ensures a balanced appearance and even weight distribution, which is crucial for the desk’s stability. Take your time with this step to ensure everything is square and secure.
Step 4: Securing the Remaining Foot Pieces
Once the main leg pieces are in place, you’ll attach the remaining two foot pieces to the bottom of the legs. Similar to the initial foot assembly, these connections will utilize both wood glue and 2.5-inch pocket hole screws, driven through 1.5-inch pocket holes. A critical detail here is to orient your pocket holes so they all face the same direction – specifically, towards what will be the back of the desk. Since the back of the desk will typically be against a wall or less visible, there will be no need to fill these pocket holes, saving you time and effort in the finishing stages. This strategic placement helps maintain the clean aesthetic of the visible desk surfaces.
Step 5: Adding the Decorative 1×4 Boards
Now it’s time to add the decorative 1×4 boards, which significantly enhance the farmhouse aesthetic of the desk. These pieces attach to each footboard, creating a visually appealing and sturdy structure. Each end of these decorative boards will require a 30-degree angle cut. Precision in these cuts is important for a seamless fit. Once cut, apply wood glue to the mating surfaces and secure the boards to the foot pieces using 1.5-inch Spax or other appropriate wood screws. The screws will provide a strong mechanical hold, while the glue creates a solid bond, ensuring these decorative elements remain firmly in place for years to come.
Step 6: Installing the Diagonal Braces – The Final Structural Touch
The final structural step involves attaching the decorative diagonal pieces, which are crafted from 1×3 boards. These diagonal braces not only add significant stability to the desk but also contribute greatly to its authentic farmhouse look. To achieve perfectly fitting diagonal pieces, the best approach is to hold each board in its intended position against the leg and foot boards, then carefully mark the exact cut lines directly on the wood. Once marked, set your miter saw to match these angles. After making the cuts, apply wood glue to the ends and edges where the diagonals will meet the leg and foot boards. Secure them firmly in place using 1.25-inch nails. These diagonal elements are the crowning touch, reinforcing the structure while elevating the overall design of your DIY farmhouse desk.
Personalizing Your Farmhouse Desk: Paint, Stain, and Style!
Congratulations, your DIY 6-board farmhouse desk is now fully assembled! This is the exciting stage where you get to infuse your personality and style into your creation. The raw wood provides a perfect canvas, ready for your chosen finish. Whether you prefer the timeless warmth of a rich wood stain, a distressed paint finish for a true vintage farmhouse feel, or a vibrant pop of color to make a statement, the possibilities are endless. We used a beautiful stain on our desk (linked above) to highlight the natural wood grain and complement the glam farmhouse aesthetic of the Alvarez’s home. Remember, the finish you choose will dramatically impact the desk’s final look and how it integrates with your existing decor.
One of the most remarkable features of this DIY farmhouse desk design is its inherent adaptability in terms of length. Should you require a desk that is either longer or shorter to perfectly fit a specific space – perhaps a grander home office or a more compact reading nook – the adjustment is incredibly straightforward. Simply modify the length of your runner board and your desktop piece accordingly. All other dimensions and construction methods remain the same, making customization a breeze for this incredibly versatile piece of furniture. This flexibility ensures your DIY desk is not just beautiful and affordable, but also perfectly tailored to your unique needs.
Share Your Creation!
We absolutely love seeing your completed projects! Once your DIY farmhouse desk is finished and styled, please don’t hesitate to share pictures with us. We encourage you to use the hashtag #shanty2chic on social media so we can easily find and share your inspiring work with our community. Your creativity and finished pieces truly motivate us!
Take one last moment to admire the charming beauty of this handmade farmhouse desk. It’s more than just a piece of furniture; it’s a testament to the joy and accomplishment of DIY.
Thank you for joining us on this DIY journey. We hope you feel inspired and empowered to build your very own $30 6-board farmhouse desk. Happy building!