
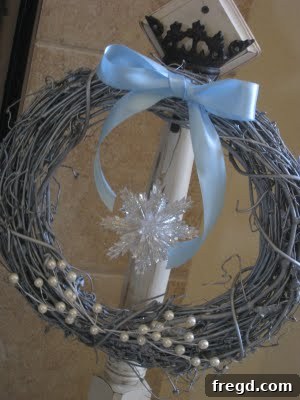
Craft Your Own Elegant & Simple DIY Metallic Winter Wreath
As the chill of winter approaches, there’s no better way to welcome the season than with beautiful, handcrafted decorations that add warmth and character to your home. Following the success of our unique Shanty Wreath Hangers, we knew we needed the perfect complementary wreaths to complete the look. That’s why we’re thrilled to share this straightforward, yet stunning, DIY project: our Simple Metallic Winter Wreath Tutorial. This guide will walk you through creating an enchanting piece of decor that combines rustic charm with a touch of modern elegance, perfect for adorning your front door or gracing your mantelpiece throughout the colder months.
Crafting your own wreath is not only a rewarding experience but also an excellent way to infuse your personality into your home decor. Our “shanty” style embraces simplicity, resourcefulness, and a slightly distressed aesthetic, which makes this project incredibly accessible for crafters of all skill levels. Get ready to transform basic materials into a captivating winter accent that will be admired by all who see it.
Gather Your Essential Materials for This Easy Winter Wreath Project
Before diving into the creative process, let’s ensure you have all the necessary components for your DIY winter wreath. One of the best aspects of this project is its affordability, especially if you keep an eye out for sales at your local craft store. Remember, creativity often starts with smart shopping!
Materials You’ll Need:
- 1 Medium-Sized Grapevine Wreath: We found ours at Hobby Lobby during a 50% off sale, making this project even more budget-friendly. Grapevine wreaths offer a wonderful natural texture and a sturdy base for your embellishments.
- Rust-Oleum Metallic Spray Paint: Choose your favorite metallic shade – silver, gold, or even a rose gold can create distinct looks. This paint will give your wreath a sophisticated, icy, or warm glow.
- Decorative Snowflake Ornament: Snowflakes are quintessential winter symbols. Select one that catches your eye, perhaps also found at Hobby Lobby during a seasonal markdown. Ensure it has a hole or loop for hanging.
- 1 Ply Jute Twine: A natural, rustic twine is perfect for hanging your snowflake ornament, complementing the grapevine wreath beautifully.
- Ribbon for a Bow: Pick a ribbon that matches your chosen metallic paint and overall winter theme. Burlap, satin, or velvet can all work wonderfully.
- White Decorative Berries: These add a delicate touch of winter frost and texture. Faux berries are ideal for longevity.
- Hot Glue Gun and Glue Sticks: Your essential tool for securing all your decorative elements firmly in place.
- Scissors: For cutting twine and ribbon.
Having all your supplies ready ensures a smooth and enjoyable crafting experience. Now, let’s transform these materials into a beautiful winter display!
Step-by-Step Guide to Crafting Your Simple Winter Wreath
Follow these detailed steps to create your custom metallic winter wreath. Each stage is designed to be straightforward, allowing you to personalize your creation while maintaining a consistent and elegant aesthetic.
Step 1: Preparing Your Grapevine Wreath Base
Begin with your medium-sized grapevine wreath. Grapevine wreaths are excellent choices for DIY projects due to their organic texture and durability. Ensure your wreath is clean and free of any debris. Set up your workspace in a well-ventilated area, preferably outdoors or in a garage with open windows, as you’ll be using spray paint.
Step 2: Adding a Touch of Metallic Elegance
Now, it’s time to apply the Rust-Oleum Metallic Spray Paint. Shake the can well for about a minute before use. Hold the can approximately 8-12 inches away from the wreath and apply light, even coats. Avoid holding the spray in one spot for too long to prevent drips. Rotate the wreath to ensure full coverage, reaching all the nooks and crannies of the grapevine. The metallic finish will instantly elevate your wreath, giving it a sophisticated shimmer that catches the light beautifully. Allow ample drying time between coats and before proceeding to the next step, as per the manufacturer’s instructions, usually a few hours.
Once dry, your wreath will have a stunning, uniform metallic sheen.
Step 3: Selecting and Preparing Your Snowflake Ornament
Snowflakes are a beloved motif for winter, adding a delicate and festive touch. We chose a beautiful ornament from Hobby Lobby, also purchased at a discount. Carefully remove any existing hanging string or ribbon from your snowflake ornament. You’ll be replacing it with a more rustic option to match our shanty-chic theme.
Step 4: Customizing the Snowflake Hanger
Take a piece of 1 ply jute twine. Thread it through the hanging hole of your snowflake ornament. Jute twine provides a wonderfully natural and robust look that contrasts beautifully with the metallic finish of the wreath. Once threaded, tie a secure knot at the top of the ornament, ensuring the snowflake hangs evenly.
This simple change in hanging material makes a significant difference in the overall aesthetic.
Step 5: Attaching the Snowflake to Your Wreath
Carefully position your snowflake ornament where you want it to hang on the wreath, typically towards the upper center. Pull both ends of the jute twine around the underside of the top of the wreath. Ensure the snowflake hangs at the desired length and is centered. Then, tie another strong knot at the back of the wreath to secure it. For extra durability and peace of mind, apply a small dab of hot glue over this knot and press it firmly against the grapevine to prevent any slippage.
Step 6: Adding a Decorative Bow
A well-placed bow adds a classic finishing touch to any wreath. Create a simple yet elegant bow from your chosen ribbon. You can opt for a traditional style or a more rustic, multi-loop design. Once your bow is shaped, determine its ideal placement on the wreath, usually at the top, slightly above the snowflake, or offset to one side. Apply a generous amount of hot glue to the back of the bow and press it firmly onto the grapevine wreath until it holds securely. The ribbon’s texture and color will complement the metallic base and the snowflake’s delicate design.
Step 7: The Final Flourish with White Berries
To complete the winter wonderland look, add a few sprigs of white decorative berries. These small accents provide a lovely contrast against the metallic wreath and add an organic, frosty element. Arrange the berries artistically around the bow or subtly integrated into the grapevine texture. Use your hot glue gun to secure each cluster of berries, ensuring they are firmly attached and won’t fall off. These tiny details truly bring the entire wreath together, making it look professional and inviting.
And there you have it! Your very own elegant and simple DIY Metallic Winter Wreath is complete.
Tips for Customization and Display
This simple metallic winter wreath serves as an excellent foundation for further personalization. Feel free to experiment with different elements to match your unique home decor style:
- Color Variations: Instead of metallic silver, try gold for a warmer look, or a frosted white for a truly snowy feel.
- Ornament Alternatives: If snowflakes aren’t your preference, consider small metallic bells, pinecones, dried orange slices, or even small rustic animal figurines like deer or owls.
- Ribbon Styles: Explore different ribbon materials such as plaid for a cozy cabin feel, sheer for a delicate touch, or glittered ribbon for extra sparkle.
- Additional Embellishments: Incorporate small LED fairy lights for a magical glow in the evenings, or add faux frosted branches for more volume and texture.
Once your wreath is finished, hang it proudly on your front door, above your fireplace mantel, or on an interior wall to bring a touch of winter charm indoors. When paired with our Shanty Wreath Hangers, this DIY creation truly completes a cohesive and welcoming seasonal display. Remember, handcrafted decor adds a special warmth that store-bought items simply can’t replicate.
Conclusion: Embrace the Joy of DIY Winter Decor
Crafting your own DIY Metallic Winter Wreath is not just about creating a beautiful decoration; it’s about the joy of making something with your own hands, infusing your home with personal style, and celebrating the magic of the winter season. This project is a testament to how simple materials, a little creativity, and some metallic spray paint can come together to form an exquisite piece of home decor.
We hope this detailed tutorial inspires you to embark on your own crafting adventure. The beauty of this wreath lies in its simplicity and versatility, allowing you to adapt it to your taste and create a truly unique accent for your home. So gather your supplies, set aside some creative time, and prepare to adorn your space with this charming, handcrafted symbol of winter’s elegance. Happy crafting!