
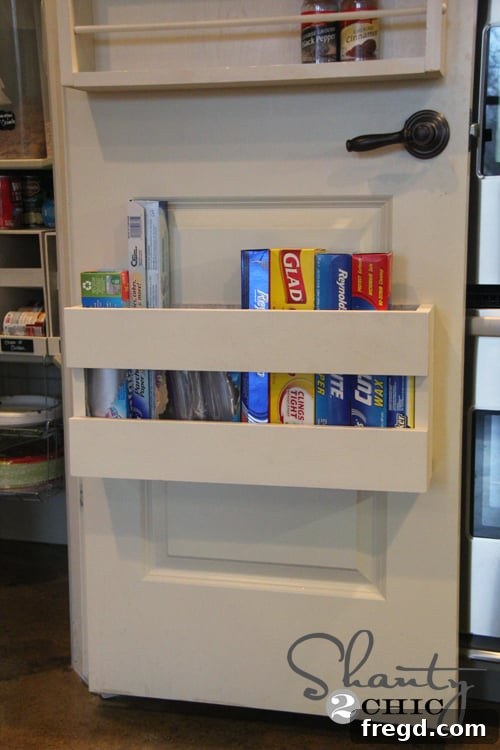
Revolutionize Your Kitchen: DIY Pantry Door Organizer for Foil, Wraps, and Baggies
Welcome back, home organization enthusiasts! With the hustle and bustle of the holidays now a pleasant memory, many of us find ourselves yearning for order and efficiency, especially in the heart of our homes – the kitchen. If you’re anything like me, you’ve probably faced the perennial challenge of cluttered kitchen drawers, overflowing with boxes of foil, plastic wrap, wax paper, and various types of storage bags. Finding a clear space for cooking utensils, dish towels, or even just a clean knife can feel like a treasure hunt. That’s precisely why I plunged headfirst into full-blown organization mode, determined to reclaim precious kitchen drawer space. The result? This incredibly simple, remarkably effective, and wonderfully affordable pantry door organizer, a true game-changer for any kitchen!
This custom-built organizer is designed specifically to neatly store my foil, wax paper, plastic baggies, and so much more, all within easy reach. Honestly, I absolutely adore it! The best part? This project took me a mere 10 minutes to build, and the total cost was under $10. Yes, you read that right – incredible functionality without breaking the bank or dedicating an entire weekend. If you’re ready to transform your kitchen and simplify your daily routine, let’s dive into creating your own efficient kitchen storage solution!
The Frustration of Cluttered Kitchen Drawers: A Universal Problem
Every home chef knows the struggle: a kitchen drawer jammed with oddly shaped boxes of aluminum foil, plastic wrap, parchment paper, and various sizes of Ziploc bags. These bulky items have a knack for taking up disproportionate amounts of space, often making it difficult to open and close drawers smoothly. Not only do they create visual clutter, but they also hinder efficient workflow. Imagine trying to quickly grab a sandwich bag for your child’s lunch, only to have to wrestle with several boxes, pulling them all out just to find the right one. It’s a common scenario that leads to wasted time and unnecessary frustration. This DIY pantry door organizer directly addresses these pain points by relocating these items to an easily accessible, often-underutilized vertical space.
Unveiling Your New DIY Kitchen Storage Solution
The beauty of this project lies in its simplicity and effectiveness. By harnessing the power of vertical space on the back of your pantry door, you free up precious real estate in your kitchen drawers and cabinets. This organizer keeps your most-used kitchen wraps and bags visible and accessible, making meal prep and cleanup significantly smoother. No more rummaging, no more wrestling with boxes – just quick, easy access whenever you need it. It’s a small change that yields a massive improvement in kitchen functionality and aesthetics.
Gathering Your Materials: What You’ll Need
One of the most appealing aspects of this DIY project is its incredibly low cost and minimal material requirements. You might even have some of these items lying around your garage or workshop already! Here’s what you’ll need to get started on your efficient kitchen organization journey:
Plywood for the Structure
The core of this organizer is simple 1×4″ plywood. This dimension is perfect for creating shelves that snugly hold standard boxes of foil, plastic wrap, and sandwich bags. If you have scrap pieces of 1×4″ plywood from previous projects, this is an excellent opportunity to put them to good use and save even more money. For those who don’t have scrap wood readily available, don’t worry! You can easily purchase a 2’x2′ piece of plywood at most hardware stores for under $5. This small sheet will provide more than enough material for this project and potentially other small DIY endeavors. The exact length of your pieces will depend on the width of your door and the number of items you wish to store, so measure your boxes of wraps and bags to ensure a custom fit.
You heard right – a 2’x2′ piece of 1×4″ plywood can be yours for less than five dollars. This makes the project incredibly accessible and budget-friendly!
Finishing Touches: Paint or Stain
While purely optional, painting or staining your organizer adds a professional, finished look that can seamlessly blend with your existing kitchen decor. For my project, I opted for Rust-Oleum Heirloom White, a beautiful, classic shade that brightens up the pantry space. This type of paint offers excellent coverage and a lovely matte finish, perfect for a chic, farmhouse-inspired look. However, feel free to choose any color or stain that matches your personal style or kitchen palette. You could go for a bold accent color, a dark stain for a rustic feel, or simply a clear coat to highlight the natural wood grain. A small can of spray paint or a sample pot of latex paint will be more than sufficient for this project.
Essential Hardware: Screws and Hollow Core Door Anchors
To securely hang your new organizer to the pantry door, you’ll need a few screws and, crucially, hollow core door anchors. I used the same type of hardware that proved so successful for my pantry door spice rack project, demonstrating their reliability and ease of use. These specialized anchors are a lifesaver for interior doors, which are often hollow rather than solid wood. Traditional screws simply won’t hold in a hollow door, but these anchors provide a strong, stable mounting point.
Many homes feature hollow core doors for interior spaces due to their lighter weight and lower cost. These anchors are specifically designed to expand and grip the inner surfaces of a hollow door, creating a robust connection point. All you do is screw the anchor directly into the door first. For optimal stability, I recommend placing one anchor on each side of where your organizer will hang. The image below illustrates how the anchor looks once it’s properly installed in the door.
Once the anchors are in place, the next step is straightforward. Simply use another screw and drive it straight through the back of the organizer you just built, directly into the pre-installed anchor. You might notice the screw head from the front of the organizer, but this is a minor detail as it will be completely covered by your boxes of foil, plastic wrap, and baggies, making it invisible once loaded. This method ensures a strong, reliable attachment that can handle the weight of your kitchen essentials.
Step-by-Step Construction Guide for Your DIY Pantry Organizer
Building this organizer is incredibly simple, making it a perfect project for DIY beginners. Here’s how to construct your new kitchen storage marvel in just a few easy steps:
Step 1: Measure and Cut Your Plywood Pieces
Begin by determining the dimensions of your organizer. Measure the width of your widest boxes (e.g., foil, plastic wrap) to establish the length of your shelves. A good general starting point is to make each horizontal shelf piece about 12-14 inches long, but adjust this to your specific box sizes. You’ll need two side pieces for the vertical supports, which should be long enough to accommodate two or three shelves with adequate spacing in between. Use a saw to carefully cut your 1×4″ plywood into the required lengths. Always measure twice and cut once!
Step 2: Assemble the Organizer Frame
With your pieces cut, it’s time to assemble the organizer. Place your two vertical side pieces parallel to each other. Then, position your horizontal shelf pieces between them, spacing them out to fit your various boxes. I found that leaving enough space to easily slide boxes in and out, while still providing a snug fit, works best. Use wood screws to attach the horizontal shelves to the vertical side pieces. Pre-drilling pilot holes will prevent the wood from splitting and make driving the screws much easier. Ensure all connections are tight and secure for a sturdy organizer.
Step 3: Sand and Finish Your Organizer
Once the basic structure is assembled, take a moment to sand down any rough edges or splinters. This not only makes the organizer safer to handle but also provides a smoother surface for painting or staining. After sanding, wipe away any dust. Now, apply your chosen paint or stain. If you’re using Rust-Oleum Heirloom White (or similar spray paint), apply several light, even coats for a professional finish, allowing adequate drying time between coats. If using brush-on paint or stain, follow the product instructions for application and drying.
Final Step: Load It Up and Enjoy the Organization!
Your final step? The absolute best part: loading that baby up! Fill your freshly built and mounted organizer with your boxes of foil, wax paper, plastic wraps, and various baggies. My absolute favorite feature of this design is that I can face my baggies forward and just pull them out one at a time without having to remove the entire box from the shelf. This simple convenience is truly liberating! When you’re a busy parent, it’s these little things that streamline daily tasks and make you smile. Agreed, ladies? It’s the small victories that contribute to a calmer, more organized household.
Here are a few more inspiring pictures of the finished product, showcasing its practicality and clean aesthetic:
Beyond the Basics: Customization and Further Organization Ideas
This DIY pantry door organizer is not just about storing foil and bags; it’s a versatile template for enhancing your kitchen’s functionality. You can easily customize its size and design to fit other items. Consider adding more shelves for a larger collection of wraps, or adjusting the depth to hold small spice jars, cleaning cloths, or even recipe cards. The beauty of DIY is the ability to tailor solutions precisely to your needs and available space. You can also experiment with different finishes, like chalkboard paint on the front of each shelf to label contents or stenciling patterns for a decorative touch.
I truly hope you love this simple yet effective kitchen organization solution as much as I do! It’s incredible how a small project can make such a significant difference in daily life, transforming a chaotic area into a hub of efficiency.
Expand Your Pantry Organization Journey with More DIY Inspiration
For those of you who are eager to continue your home organization efforts, especially within the pantry, don’t miss out on my other popular pantry posts. These projects offer even more creative and budget-friendly ways to maximize your storage space and keep your kitchen essentials in order. Explore these fantastic DIY ideas:
Transform your pantry with this clever DIY Canned Food Storage solution, making it easy to see and access all your canned goods.
Keep your spices organized and within arm’s reach with this ingenious Pantry Door Spice Rack, another great way to utilize vertical space.
Add a touch of charm and clear labeling to your pantry with these easy-to-make DIY Chalkboard Labels for jars and containers.
Share Your Success and Connect With Us!
If you found this tutorial helpful and decided to build your own pantry door organizer, I would absolutely love for you to share your creation and pin this post to your favorite Pinterest boards! Your support helps spread these simple, budget-friendly DIY ideas to more people who are looking to make their homes more organized and functional. Thank you so much for stopping by and taking the time to read. Please don’t hesitate to leave a comment below if you have any questions about the project, the materials, or the installation process. I’m always happy to help! Happy organizing!
~Whitney