
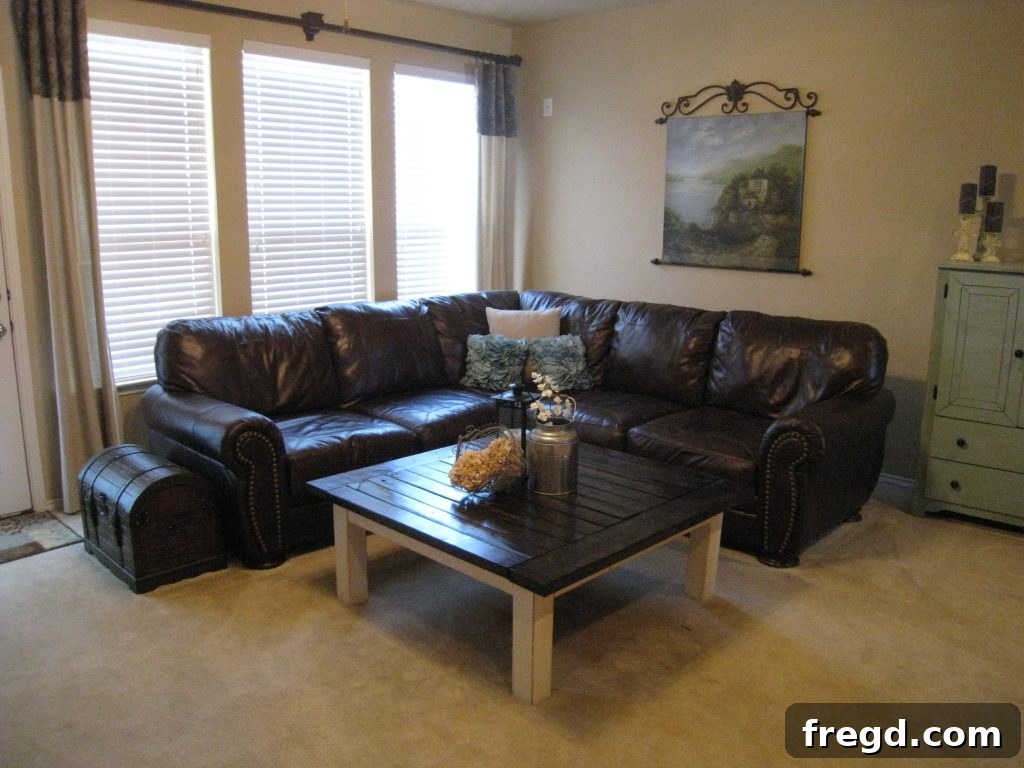
The Grand Reveal: Finishing My $40 DIY Farmhouse Coffee Table
A few days ago, I excitedly shared the journey of building my DIY Coffee Table, a project born from a desire for a custom piece without breaking the bank. Today, I’m thrilled to pull back the curtain and unveil the finishing touches that transformed a simple wooden structure into a cherished centerpiece. This isn’t just about applying paint and stain; it’s about infusing character, creating durability, and bringing a vision to life. The beauty of DIY lies not only in the creation but also in the meticulous process of refining it, making it truly your own. Get ready to dive into the details of how this budget-friendly masterpiece came to life, piece by painstaking piece.
The Vision: Crafting a Custom Centerpiece
When I embarked on this journey, my goal was clear: to create a coffee table that wasn’t just another piece of furniture, but a statement. I envisioned something substantial, a perfect blend of size and functionality that would anchor our living space. But beyond utility, I craved that elusive “old” look – a sense of history and warmth that only genuinely aged wood or a carefully crafted distressed finish can provide. The cherry on top? Achieving all of this for an incredibly modest budget of just $40. This entire project was a testament to how creative thinking and a little elbow grease can yield astonishing results, proving that high-end style doesn’t have to come with a high-end price tag. The initial build laid a strong foundation, but it was the finishing process that truly brought this vision to its full, glorious potential.
Starting with a Solid Base: Painting the Legs
Every great finish begins with meticulous preparation, and for the legs of my DIY coffee table, I opted for a timeless classic: Rust-Oleum Heirloom White spray paint. This particular shade offers a soft, creamy white that leans slightly towards an antique ivory, perfect for achieving that desired farmhouse or shabby chic aesthetic without being overtly stark. When spray painting, technique is key. I made sure to apply several thin, even coats, rather than one thick one, to prevent drips and ensure a smooth, professional-looking finish. Holding the can about 10-12 inches away and moving it steadily back and forth, I covered all surfaces of the legs. Proper ventilation is also crucial when working with spray paint, so I made sure to work in a well-aired area. Allowing ample drying time between coats not only improves adhesion but also allows you to assess the coverage and build up the color gradually. This initial layer provided a beautiful, clean canvas against which the rustic stained top would later contrast perfectly, setting the stage for the table’s overall character.
Deepening the Character: Staining the Tabletop
With the legs beautifully painted, it was time to turn my attention to the tabletop – the expansive canvas that would truly define the table’s rustic charm. For this, I chose Minwax Dark Walnut Stain, a personal favorite for its rich, deep brown tones that evoke a sense of heritage and warmth. The application process is straightforward but requires patience for optimal results. Using a simple foam brush, I generously applied the stain across the entire surface of the table. The trick is to let the stain penetrate the wood fibers, allowing it to develop its full color. I let each coat sit for approximately 15 minutes. This dwell time is essential; too short, and the color won’t be as deep; too long, and it can become difficult to wipe off evenly. After the allotted time, I used an old, clean cloth to wipe off the excess stain, moving with the grain of the wood. This step not only removes any unabsorbed stain but also helps to even out the color and prevent a blotchy finish. To achieve the desired depth and richness of color, I applied a second coat, repeating the same process, after allowing the first coat to dry completely for a full 24 hours. The waiting period is crucial for proper adhesion and uniform color development, ensuring a professional and lasting finish that truly highlights the natural beauty of the wood.
Protecting Your Masterpiece: The Polycrylic Topcoat
After the laborious process of staining and achieving the perfect dark walnut hue, the next critical step was to protect my hard work with a durable topcoat. For this, I turned to Minwax Polycrylic Gloss. Polycrylic is an excellent choice for DIY furniture projects because it’s water-based, low odor, and dries quickly to a crystal-clear finish that won’t yellow over time, unlike some oil-based polyurethanes. The “gloss” finish provides a beautiful, subtle sheen that enhances the rich tones of the stain without being overly reflective. Application is best done with a high-quality brush, and my trusty Purdy brush proved to be the ideal tool. Its bristles are designed to hold and release finish smoothly, minimizing brush strokes. I applied one generous, even coat, working in the direction of the wood grain. It’s important to avoid overworking the finish or applying too much pressure, as this can create bubbles. While some projects might benefit from multiple coats for extra durability, for this coffee table, a single, well-applied coat offered sufficient protection against daily wear and tear, sealing in the beauty of the stained wood and preparing it for its distressed transformation. After applying, another 24-hour drying period was observed to ensure the polycrylic was fully cured and ready for the next step.
Embracing Imperfection: The Art of Distressing
To achieve that coveted “worn” and aged look that perfectly complements the farmhouse aesthetic, distressing was a non-negotiable step. This technique adds character and tells a story, making a brand new piece feel like it has been loved and used for decades. I grabbed my trusty 3M sanding block – a simple yet effective tool for this purpose. The goal was not to heavily sand, but rather to gently abrade the edges and corners of all the legs. These are the natural areas where furniture would typically show wear and tear over time, through countless bumps and scrapes. By lightly sanding these specific spots, I allowed glimpses of the lighter wood beneath the Heirloom White paint to peek through. This creates a subtle contrast and an authentic, timeworn appearance. It’s a delicate balance: you want to create visible wear, but not make it look deliberately artificial. The sanding block provided just enough control to achieve this effect, removing just enough paint to hint at a deeper history without overdoing it. This selective distressing elevates the piece from merely painted to genuinely charming, adding depth and visual interest that mass-produced furniture often lacks.
Enhancing the Aged Look: Finishing Touches
After carefully distressing the edges of the coffee table legs, I took the aging process a step further by reapplying a touch of Minwax Dark Walnut stain to those newly exposed areas. This isn’t just about covering the raw wood; it’s about adding an extra layer of authenticity to the “worn” effect. When furniture naturally ages, the exposed wood might darken over time due to dirt, oils, and general use. By dabbing a small amount of the same stain onto the distressed edges, I simulated this natural darkening, making the wear look more organic and integrated with the overall finish. This subtle detail significantly enhances the illusion of a genuinely old piece. It creates a beautiful depth, ensuring the distressed areas don’t appear starkly new against the painted finish. I admit, in my eagerness to get this beautiful table into the house and enjoy it, I found myself doing this last step over my carpet! It’s a common DIYer’s dilemma – sometimes the excitement of seeing a project completed gets the better of our careful planning. But even with a slight detour in my workspace, the result was precisely the antique, storied look I was striving for, transforming a simple piece of wood into a focal point rich with character.
The Grand Reveal: A Functional and Beautiful Space
The moment of truth had arrived! Seeing the finished coffee table in its designated spot in the living room was incredibly satisfying. “Ahh! I LOVE it!” was my immediate, heartfelt reaction, and it still holds true. This isn’t just a piece of furniture; it’s a creation born from effort and vision, and it perfectly anchors the room. The blend of the creamy Heirloom White legs with the deep, rich Dark Walnut top, accentuated by the subtle distressing, creates a harmonious farmhouse aesthetic that feels both inviting and elegant. Beyond its visual appeal, this table has become a central hub in my home. It’s transformed into my primary blogging station – a comfortable and inspiring spot where creativity flows. The ample surface area provides plenty of room to spread out, making it an ideal workspace. It’s a joy to have a custom-built piece that not only looks fantastic but also caters precisely to my daily needs, making every moment spent here a little more special. This coffee table isn’t just an object; it’s a testament to the power of DIY to craft personal, functional, and beautiful spaces.
More Than Just a Table: Style Meets Utility
The beauty of this DIY coffee table extends far beyond its aesthetic appeal; it’s a true workhorse in our home. Its generous dimensions were a deliberate choice, ensuring it could accommodate a variety of needs. There’s ample room for beautifully curated decor, allowing me to switch out seasonal accents or display cherished items without feeling cramped. My laptop finds a comfortable home on its sturdy surface, making it the perfect spot for late-night blogging sessions or casual browsing. Of course, no coffee table is complete without space for a comforting coffee mug, always within easy reach. And for families, the importance of dedicated space for toys cannot be overstated! This table effortlessly juggles all these functions, proving that a handmade piece can be both incredibly stylish and immensely practical. It’s a versatile hub that adapts to our family’s dynamic needs, making everyday living smoother and more enjoyable. From morning coffee to evening work and playful afternoons, this table truly serves as the heart of our living area.
Built to Last: Unwavering Stability
One of the ultimate tests for any piece of furniture, especially a coffee table that endures daily life, is its durability and stability. And, in case you ever get a crazy urge to “sit on a coffee table,” I can proudly confirm this one passes with flying colors! Christy, this one’s for you – you know who you are and why this test matters! There’s no creaking, no wobbling, no swaying, not even the slightest hint of instability. From its foundational build to its final finish, every step of this DIY coffee table project was executed with strength and longevity in mind. The materials, though budget-friendly, were chosen for their robustness, and the construction techniques ensured a rock-solid assembly. This table isn’t just pretty; it’s built to withstand the rigors of family life, whether it’s holding a stack of books, a tray of snacks, or even providing an impromptu extra seat. It’s a testament to the fact that DIY doesn’t mean compromising on quality or structural integrity. This table is, without a doubt, built SOLID!
Your Next DIY Adventure Awaits!
Bringing this DIY coffee table project to completion has been an incredibly rewarding experience. From selecting the wood to the final distressing and sealing, every step contributed to creating a unique, functional, and aesthetically pleasing piece for our home. The satisfaction of building something with your own hands, especially one that fits your space and needs perfectly, is truly unparalleled. And achieving all of this for a mere $40 is a powerful reminder that beautiful home decor doesn’t require a hefty price tag or a professional designer. With a little creativity, patience, and the right tools, anyone can transform raw materials into cherished furnishings. I hope this detailed journey inspires you to embark on your own DIY adventures. Whether it’s a small accent piece or a major furniture build, the process of creating is just as fulfilling as the finished product. Thank you so much for joining me on this creative journey and for stopping by to witness the grand reveal of our very own, custom-made farmhouse coffee table!
~Ashley