
Hey creative friends and fellow DIY enthusiasts!
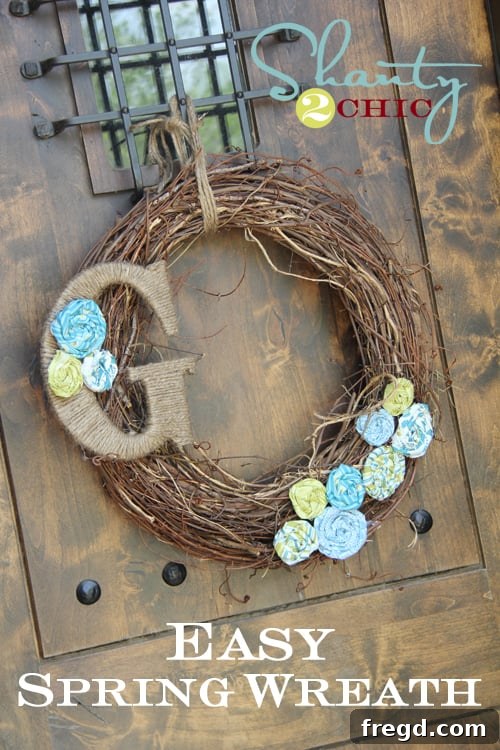
Welcome back to our little corner of creativity, where we believe that beautiful home decor doesn’t have to break the bank or require professional skills. Today, I’m thrilled to unveil a delightful project that blossomed during a quiet afternoon – a charming Spring wreath that will infuse your front door with fresh, personalized charm. You know how it goes; sometimes, a simple photo session for a *different* upcoming project reveals an unexpected truth. In my case, it was the realization that my beloved Winter pinecone wreath, while beautiful, was still holding court on my front door. Oops! With spring in full swing and new projects on the horizon, it was high time for a seasonal refresh. And so, born out of a moment of creative inspiration, this gorgeous Spring wreath came to life!
This project is a testament to affordable, accessible crafting. You’ll be amazed at how easily you can transform simple supplies into a stunning statement piece. The total cost for this lovely wreath came in at under $12, proving that chic decor can absolutely be budget-friendly. Plus, the process is incredibly straightforward, making it perfect for crafters of all skill levels, even if you’re just starting your DIY journey. Let’s dive into how you can create your very own personalized monogrammed spring wreath!
Gathering Your Essential Supplies for This Budget-Friendly Wreath
One of the best parts about this project is how few supplies you need and how readily available they are. I sourced all my materials from Hobby Lobby, a fantastic craft store known for its wide selection and frequent sales. However, you can find similar items at any major craft retailer, online craft suppliers, or even by repurposing materials you already have at home. Always keep an eye out for sales and coupons to maximize your savings – that’s how this wreath stayed so incredibly affordable!
Here’s what you’ll need:
- Grapevine Wreath Base: These natural, rustic bases are perfect for wreaths as they are sturdy, charming, and easy to embellish. I snagged mine on sale for around $3 – a fantastic starting point for any wreath project!
- MDF Initial: Choose an initial that represents your family name or a significant word. MDF (medium-density fiberboard) letters are lightweight, inexpensive, and easy to customize.
- Thick Twine: Jute twine or a similar thick string will add a lovely natural texture to your monogram. You’ll need enough to generously wrap your initial.
- Fabric Strips (Jelly Roll or By the Yard): This is where you infuse color and pattern! I opted for a pre-cut “jelly roll” of fabric strips for convenience, which is a collection of coordinated fabric strips, usually 2.5 inches wide. This saves a lot of time and effort in cutting. However, if you have fabric scraps you love, or want a very specific color palette, you can certainly buy fabric by the yard and cut your own strips. For rolled rosettes, strips about 1.5 to 2.5 inches wide and 10-15 inches long work best. My personal choice for the jelly roll was purely due to a moment of delightful laziness – and sometimes, embracing convenience is just what a crafter needs!
- Hot Glue Gun and Glue Sticks: Your trusty crafting companion for securing everything in place.
Step-by-Step Guide: Crafting Your Personalized Spring Wreath
Step 1: Transforming Your Monogram Initial with Twine
Let’s begin by adding character to your MDF initial. Take your chosen initial and a spool of thick twine. The process here is wonderfully intuitive – there’s no precise science or complex technique involved. Simply start by securing one end of the twine to the back of your initial with a small dab of hot glue. Then, begin tightly wrapping the twine around the letter, covering its entire surface. Work your way around, ensuring the twine layers are snug and consistent. To keep everything secure and prevent unraveling, apply a small dot of hot glue approximately every 5-6 wraps, especially on corners or curves where the twine might shift. This technique not only holds the twine in place but also creates a beautiful, textured, and cohesive look. Don’t worry about perfection; the handmade charm is part of its appeal! Once the entire initial is covered, trim the twine and secure the end with another dot of hot glue on the back.
Step 2: Attaching the Monogram to Your Grapevine Wreath
Now that your initial is beautifully wrapped, it’s time to integrate it into the grapevine wreath. Decide on the placement – I found that positioning it in the top corner creates a balanced and aesthetically pleasing focal point, allowing ample space for your fabric rosettes. Apply a generous amount of hot glue to the back of your twine-wrapped initial, making sure to cover the areas that will make contact with the grapevine wreath. Carefully press the initial onto the desired spot on the wreath, holding it firmly in place for a few moments until the glue sets. The rough texture of the grapevine wreath provides an excellent surface for hot glue to adhere to, ensuring your monogram stays securely attached.
Step 3: Crafting and Arranging Your Fabric Rosettes
This is where the wreath truly comes to life with a burst of color and softness! You’ll need to create a good number of rolled fabric rosettes. If you’re new to making these charming fabric flowers, don’t worry, they are incredibly easy! While I’ve linked to more detailed tutorials HERE and HERE, let me give you a quick overview of the basic method. Take one of your fabric strips, fold one end over to create a small triangle or “point,” and secure it with a tiny dot of hot glue. This will be the center of your rosette. Then, simply begin rolling the fabric strip around this center point, constantly twisting the strip slightly as you go to create the “petal” effect. Every inch or two, add a small dot of hot glue to the base of the rosette to secure the layers as you roll. Continue until you’ve reached the end of your strip, then secure the final edge to the back of the rosette with hot glue. You can vary the tightness of your roll to create different rosette sizes and looks – some tighter for a bud-like appearance, others a bit looser for a fuller bloom. Experiment with different lengths of fabric strips too for variety in size.
Make plenty of these! The more rosettes you have, the fuller and more luxurious your wreath will appear. Once you have a good collection, begin hot gluing them to your grapevine wreath. I focused on filling the lower section of the wreath, creating a cascading effect around the monogram. Start by placing larger rosettes, then fill in gaps with smaller ones, ensuring a visually balanced and appealing arrangement. Don’t be afraid to overlap them slightly to add depth and dimension. The goal is to create a soft, inviting cluster of fabric blooms that beautifully contrasts with the rustic grapevine and twine-wrapped initial.
Step 4: Adding Finishing Touches and Personal Flair
To tie the whole design together and add an extra touch of charm, consider adding a few smaller rosettes directly onto your twine-wrapped initial. This creates a cohesive look, integrating the monogram more fully into the floral arrangement and preventing it from looking isolated. Place them strategically – perhaps one in a corner, or along a curve – to enhance the overall aesthetic without obscuring the letter itself. This small detail truly makes a big difference in the finished piece, elevating it from a simple assembly of parts to a thoughtfully designed piece of home decor.
And just like that, with a few simple materials and a little creative spirit, your stunning new Spring wreath is complete! Isn’t it amazing what you can create during nap time?
Behold the Beautiful Result: Your New Spring Wreath!
It’s always incredibly satisfying to see a project come to fruition, especially when the end result is as charming and personalized as this. Imagine this vibrant wreath gracing your front door, welcoming guests with a touch of handmade elegance and the undeniable warmth of spring. The combination of the rustic grapevine, the textured twine, and the soft, colorful fabric rosettes creates a dynamic visual interest that is both eye-catching and inviting. It’s more than just a decoration; it’s a reflection of your creativity and a personal statement that makes your home uniquely yours.
This wreath isn’t just for your front door! It can also be a beautiful addition to an entryway, a focal point above a mantelpiece, or even part of a gallery wall. Its versatile design means it can complement various interior styles, from farmhouse chic to cozy cottage. The beauty of DIY projects like this lies not only in the cost savings but also in the ability to perfectly match your home’s aesthetic and express your individual style. Plus, the sense of accomplishment you get from creating something beautiful with your own hands is truly priceless.
Tips for Customization and Creative Variations
While this design offers a fantastic foundation, feel free to let your imagination run wild with customizations! Here are a few ideas to inspire you:
- Color Palettes: Experiment with different fabric colors and patterns to match any season or holiday. Think pastels for Easter, vibrant hues for summer, rich jewel tones for fall, or festive reds and greens for Christmas.
- Embellishments: Add other small elements like faux greenery, small artificial flowers, buttons, lace, or even miniature wooden shapes to further personalize your wreath.
- Twine Alternatives: Instead of twine, consider wrapping your initial with ribbon, yarn, or even thin strips of fabric that match your rosettes.
- Rosette Styles: Explore different fabric flower techniques. Beyond rolled rosettes, you could try ruffled flowers, folded petals, or even felt flowers for a different texture.
- Wreath Shapes: While a classic round grapevine wreath is shown, this concept could be adapted to square, oval, or even heart-shaped wreath forms.
I truly hope you love this simple yet impactful Spring wreath as much as I do! It’s such a rewarding project that adds a touch of bespoke charm to any home. And don’t forget, this little creation was inspired by another exciting project that I’ll be sharing with you all tomorrow, so be sure to check back in! That upcoming reveal is actually what prompted me to realize my winter decor needed an urgent update!
If you found this tutorial inspiring, I would absolutely love for you to Pin this project to your favorite decor boards on Pinterest and share it with your friends on social media! Your support helps our creative community grow, and I always enjoy seeing your unique takes on these DIY ideas. Thank you so much for taking the time to stop by and share in this crafting adventure!
Happy Crafting!
~Whitney