
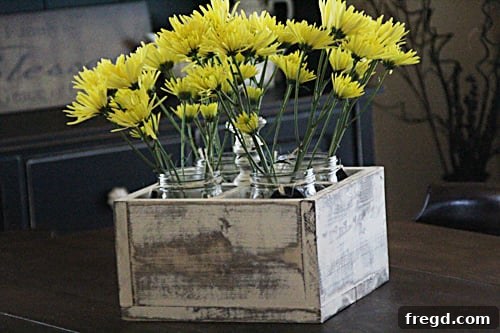
Craft Your Own Rustic Charm: A Step-by-Step Guide to Building a Vintage Soda Crate Mason Jar Caddy for Under $15
Hello fellow DIY enthusiasts and home decor lovers! Are you searching for that perfect touch of rustic elegance to enhance your living space or organize your essentials? Look no further! This week, I embarked on a delightful woodworking adventure, creating a beautiful and highly functional vintage-inspired soda crate. My primary inspiration stemmed from Ana’s fantastic designs, but I’ve introduced several modifications to truly make this piece my own – and I absolutely adore the outcome! This versatile wooden caddy, designed to perfectly house mason jars, adds a charming touch to any setting, whether it’s a bustling kitchen counter, a serene dining table, or a cozy garden nook.
One of the most exciting aspects of this project is its incredible affordability. Imagine crafting a custom, handcrafted piece that looks like it came straight out of a charming antique shop, all for a mere $12! This guide will walk you through every step, ensuring you can replicate this project with ease, even if you’re a beginner in the world of woodworking. We’ll cover everything from precise cuts and secure assembly to adding that unique decorative handle and achieving an authentic weathered finish. Get ready to transform a simple piece of wood into a functional work of art that will be a conversation starter in your home.
Why Build a Vintage Soda Crate?
Beyond its aesthetic appeal, a DIY vintage soda crate offers immense practicality. It’s an ideal solution for organizing cutlery at a BBQ, serving as a charming centerpiece filled with fresh flowers, or simply tidying up various items around your home. The timeless design fits seamlessly into farmhouse, rustic, shabby chic, or even modern industrial decor styles. Crafting it yourself means you can customize every detail, from the dimensions to the finish, ensuring it perfectly complements your personal taste and existing decor. Plus, there’s an undeniable satisfaction that comes from building something beautiful and useful with your own hands.
Gather Your Materials: What You’ll Need
The beauty of this project lies in its simplicity and minimal material requirements. For just a few dollars, you can acquire everything necessary to construct your very own vintage crate. Here’s a detailed list of what you’ll need, inspired by my own build and designed for efficiency:
- Wood: One 1×6 inch pine board, 8 feet long. Pine is an excellent choice for its affordability, ease of cutting, and workability. Its natural grain also takes stains and paints beautifully, making it perfect for achieving that desired vintage look.
- Wood Glue: A strong, high-quality wood glue like Gorilla Glue Wood Glue. This will provide robust joints, ensuring your crate is durable and long-lasting.
- Nails: Finishing nails (approximately 1.5 to 2 inches long) are perfect for securing the wood pieces. If you’re using a nail gun, make sure to get compatible nails.
- Handle Components: For a unique and stylish handle, I opted for a small candlestick and a glass knob. I found mine at Hobby Lobby, often a treasure trove for unique craft supplies. Look for knobs that are half-off – a fantastic way to save!
- Epoxy: A strong adhesive like Gorilla Glue Epoxy. This will be essential for securely attaching the glass knob to the candlestick and the assembled handle to the crate itself.
Essential Tools for the Job
This project is designed to be accessible, meaning you don’t need a workshop full of expensive tools. Here’s what will help you get the job done efficiently and safely:
- Saw: A hand saw is perfectly adequate for cutting the wood. If you have access to a miter saw or circular saw, they can make cuts faster and more precise.
- Measuring Tape & Pencil: For accurate measurements and marking your cut lines.
- Hammer: If you don’t have a battery-powered nailer, a good old hammer will work just fine with finishing nails.
- Nailer (Optional): A battery nailer can significantly speed up the assembly process and provide consistent fastening.
- Drill: Essential for drilling a pilot hole in your candlestick for the knob’s screw.
- Sandpaper: For smoothing edges and preparing the wood for finishing.
- Safety Glasses: Always protect your eyes when cutting and nailing wood.
Step-by-Step Construction Guide: Building Your Vintage Crate
Now, let’s get into the exciting part – bringing your vintage soda crate to life! Follow these detailed steps for a smooth and enjoyable build. Remember to always prioritize safety and take your time for precise results.
Step 1: Preparing Your Wood Cuts
Begin by cutting your 1×6 inch, 8-foot pine board into the following pieces. Precise cuts are crucial for a snug and sturdy crate. Use your measuring tape and pencil to mark each cut carefully before sawing.
- 2 pieces @ 11 inches: These will form the long side panels of your crate.
- 2 pieces @ 9.5 inches: These will form the short end panels of your crate.
- 2 pieces @ 11 inches: These will be your bottom slats, running along the length of the crate.
- Dividers (measure after assembly): You will need two pieces for the internal cross dividers. Their exact lengths will depend on the internal dimensions of your assembled crate. We’ll measure and cut these in a later step for a perfect, snug fit.
When using a hand saw, ensure your wood is securely clamped. Saw slowly and steadily along your marked lines for clean edges. If using power tools, follow all manufacturer safety guidelines.
Step 2: Assembling the Side Panels
Take one of your 9.5-inch short end pieces. Apply a bead of wood glue along the short edges where it will meet the long side panels. Now, carefully position one of the 11-inch long side pieces against it, ensuring the top edges are flush and the pieces are at a perfect 90-degree angle. Use your nailer (or hammer and finishing nails) to secure the joint. Drive nails through the end piece into the long side piece. Repeat this process to attach the second 11-inch long side piece to the opposite end of the 9.5-inch piece, forming a U-shape. This establishes one of the main structural frames of your crate.
Step 3: Attaching the End Panels
With one end of your crate taking shape, it’s time to complete the box structure. Apply wood glue to the ends of the two remaining 11-inch long side pieces. Carefully fit the second 9.5-inch short end piece into place, connecting the open ends of the long sides. Ensure all corners are square and flush. Use your nailer or hammer and nails to firmly secure these new joints. Work systematically around the perimeter, adding nails at regular intervals for maximum strength. Wipe away any excess glue with a damp cloth before it dries.
Step 4: Securing the Bottom Slats
Flip your partially assembled crate upside down. Take your two 11-inch bottom slats. Apply wood glue along the bottom edges of the long side panels. Position the first bottom slat, aligning it flush with one of the bottom edges. Secure it with nails, driving them through the bottom slat into the side panels. Repeat this for the second bottom slat, leaving a small, even gap between the two slats for a classic crate look, or placing them flush together for a solid bottom. This step significantly adds to the crate’s structural integrity.
Step 5: Crafting and Installing the Dividers
To create the four cubbies, you’ll need two divider pieces that form a cross. First, measure the internal length and internal width of your assembled crate. Cut one piece of wood to the exact internal length and another to the exact internal width from your remaining pine board. To create the slotted cross, mark the center of both divider pieces. On each piece, measure and mark a slot approximately half the width of your wood and half the height of your board (e.g., if your board is 0.75″ thick and 5.5″ tall, make a slot 0.75″ wide and 2.75″ deep). Carefully cut these slots using a hand saw or jigsaw. Test fit the two pieces; they should interlock to form a sturdy cross. Apply wood glue to the edges of the dividers and gently push them down into the crate. Ensure they are snug and secure, creating four evenly sized compartments. The snug fit is important for stability, so measure twice and cut once!
Step 6: Creating the Unique Handle
This is where your crate gets its distinctive vintage charm! Take your small candlestick. Using your drill, carefully bore a hole through the center of the candlestick, starting from the top. The hole should be just wide enough for the screw of your glass knob to fit through. This requires a steady hand and appropriate drill bit size. Once the hole is drilled, insert the knob’s screw through the candlestick. A little Gorilla Glue epoxy on both the base of the knob and the top of the candlestick will ensure a super strong bond once the knob is screwed on. Allow the epoxy to cure according to the manufacturer’s instructions.
Step 7: Attaching the Handle to the Crate
Locate the center of one of the 11-inch long side panels of your crate. This is where your newly assembled handle will reside. Apply a generous amount of Gorilla Glue epoxy to the base of the candlestick. Carefully center the handle on the chosen side, ensuring it’s straight and level. Press down firmly and hold for a few moments to allow the epoxy to begin setting. You may want to use painter’s tape to hold it in place while the epoxy fully cures. A strong bond here is essential for a functional handle that can withstand being lifted and moved.
Finishing Touches: Achieving that Weathered Wood Look
Your crate is now fully assembled, but to truly capture that vintage, rustic aesthetic, a proper finish is key. The raw pine, while beautiful, needs a little help to look like it has generations of stories to tell. I highly recommend giving your crate a weathered appearance, which instantly adds character and depth. This process involves specific techniques to accelerate the aging process of the wood, resulting in a charming, time-worn patina.
For a detailed walkthrough on how to achieve this stunning effect, be sure to check out my comprehensive tutorial on how to weather wood. This guide will provide all the tips and tricks you need to transform your new pine into beautifully aged timber, completing the vintage look of your soda crate.
Styling Your Vintage Soda Crate: Endless Possibilities
Once your vintage soda crate is complete and beautifully weathered, the fun truly begins: styling it! This versatile caddy is much more than just a storage box; it’s a decorative accent that can be adapted for countless uses around your home, adding charm and functionality wherever it goes.
One of its most popular applications is as a delightful centerpiece. Fill the four cubbies with 32 oz. wide-mouth mason jars, which fit perfectly, and then let your creativity flow! Here are some inspiring ideas:
- Elegant Floral Display: Showcase a stunning array of fresh flowers. Use different varieties or stick to a monochromatic theme for a sophisticated look.
- Rustic Utensil Caddy: What a fantastic way to “shanty up” silverware for a backyard cookout or a buffet spread! Each cubby can hold a different type of utensil (forks, knives, spoons) or even napkins.
- Craft Room Organizer: Keep your art supplies, brushes, or yarn neatly organized and easily accessible.
- Desk Companion: Store pens, pencils, rulers, and other office essentials, bringing a touch of vintage flair to your workspace.
- Bathroom Storage: Perfect for holding toiletries, rolled hand towels, or bath bombs, adding a spa-like feel to your bathroom.
- Garden Helper: Use it to carry small gardening tools, seed packets, or freshly picked herbs.
- Kitchen Organizer: Tidy up spice jars, cooking utensils, or even small recipe cards.
The possibilities are genuinely endless. Experiment with different items, colors, and textures to create a look that is uniquely yours. This DIY vintage soda crate is not just a project; it’s an invitation to infuse your home with personality and practical beauty.
Conclusion: Your Handcrafted Charm Awaits
And there you have it – a beautifully handcrafted, vintage-looking soda crate for your mason jars, brought to life with a modest budget and your own creative spirit! This project proves that achieving high-end, custom home decor doesn’t require deep pockets or advanced woodworking skills. It’s about vision, a few simple tools, and a willingness to create. The satisfaction of seeing your completed crate, ready to organize, decorate, and charm, is truly rewarding.
I hope this detailed guide inspires you to pick up your tools and embark on your own DIY journey. Remember to share your unique creations and how you choose to style your vintage soda crate – I’d love to see them! Happy crafting!
~Ashley