
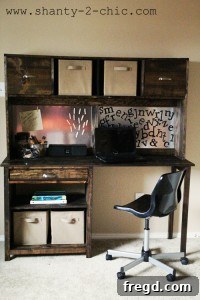
Hey there, fellow DIY enthusiasts and home decor lovers! It’s no secret that the elegant, timeless aesthetic of Pottery Barn furniture holds a special place in my heart. Their designs effortlessly blend sophistication with comfort, often inspiring countless home improvement projects. So, when my 8-year-old son, with a keen eye for design, pointed out a captivating desk in the latest Pottery Barn Teen catalog and asked if I could build something similar for his room, I simply couldn’t resist the challenge. The idea of crafting a custom piece that perfectly matched his style, while also being incredibly functional, was an opportunity I eagerly embraced. This wasn’t just about saving money; it was about creating a cherished piece of furniture with my own hands, tailored to his needs and infused with personal meaning.
The Quest for the Perfect Plan: Unleashing DIY Potential
My first thought, as with many of my woodworking ventures, immediately turned to the incredible resource that is Ana White. Her website is a treasure trove of free, detailed, and incredibly user-friendly furniture plans, empowering DIYers of all skill levels to create beautiful pieces. I knew, without a shadow of a doubt, that she would have plans for something closely resembling the Pottery Barn desk my son admired. And sure enough, a quick search led me straight to her renowned Channing Desk plans – a design that perfectly captured the sophisticated yet practical essence of the original inspiration. This discovery ignited my excitement, transforming a daunting task into an achievable and enjoyable project.
Gathering Inspiration: A Glimpse into the Building Journey
Embarking on a new woodworking project is always an adventure, filled with anticipation and the satisfaction of watching raw materials transform into a functional piece of art. To give you a taste of the hands-on process and the dedication involved, I’ve included a few snapshots taken during the construction phase. These images offer a visual diary, highlighting key stages and showcasing the progression from basic cuts to a more complete structure. They serve as a testament to the methodical steps required and the satisfying evolution of the desk as it began to take shape.
I kicked off this exciting build by meticulously following Ana White’s expertly crafted plans for her Channing Desk. These plans are renowned for their clarity and precision, guiding you through each cut and assembly step with ease. They provide not just dimensions, but also practical advice that helps avoid common pitfalls, making the entire building process much smoother for both novice and experienced builders alike. Having a reliable set of plans is truly the cornerstone of any successful DIY furniture project, and Ana White’s designs consistently deliver on that promise.
The initial stages of construction involved cutting the various components and assembling the main frame of the desk. Precision in cutting is paramount at this stage, as it ensures that all subsequent joints fit together snugly and accurately. This particular image captures the emerging structure, showcasing how the carefully measured pieces begin to interlock, forming the sturdy foundation of the desk. It’s a moment where you start to see your hard work literally coming to life, moving from abstract plans to a tangible form.
Moving forward, this image provides a closer look at the joinery, highlighting the robust connections that will give the desk its strength and longevity. Employing techniques like pocket holes, which we’ll discuss in more detail shortly, creates incredibly strong and stable joints while keeping them hidden for a clean, professional finish. Paying attention to these structural details is what separates a good DIY project from a truly exceptional one, ensuring the furniture piece will withstand years of use.
Here, you can see the side panels being attached to the main desk frame. This step significantly contributes to the structural integrity and aesthetic completeness of the piece. As the panels go into place, the desk begins to shed its skeletal appearance and take on its final, familiar form. It’s a critical moment where the overall dimensions and silhouette of the desk become fully apparent, confirming that the initial measurements and cuts were accurate and setting the stage for the top and drawer components.
This particular image offers a peek at the underside of the desk’s top, specifically highlighting the meticulously drilled pocket holes. These strategically placed holes are integral to securely attaching the front and back trim pieces, providing a robust connection while remaining completely invisible from the finished surface. This attention to detail in hidden joinery is a hallmark of quality craftsmanship and contributes immensely to the clean lines and durable construction of the desk. The Kreg Jig, as you’ll see, plays a vital role in achieving these perfect pocket holes.
The Indispensable Kreg Jig: A Woodworker’s Best Friend
Honestly, I could not have built this desk, or indeed many other furniture pieces, without the incredible Kreg Jig. Every single time I use this tool, I fall more in love with its simplicity, efficiency, and the professional-quality results it consistently delivers. For anyone looking to get into DIY furniture building, especially projects that require strong, hidden joints, a Kreg Jig is an absolute game-changer. It allows you to quickly and accurately drill angled holes, known as pocket holes, which are then used to join wood pieces with specialized screws. This method creates incredibly strong joints that are perfect for everything from desk frames to cabinet construction, providing a robust alternative to traditional joinery methods that often require more specialized skills and tools. It truly demystifies the process of creating durable and aesthetically pleasing furniture.
Mastering the Drawers: Euro Style Slides Demystified
The construction of the desk drawers is a critical component for functionality and adds to the overall polished look. This image illustrates the meticulous process of assembling the drawer box, ensuring squareness and strength before the slides are introduced. Proper assembly at this stage prevents issues with alignment and operation later on. Attention to detail here is key, as a well-constructed drawer slides smoothly and operates flawlessly for years to come.
For this desk’s drawer, I opted for the Euro style drawer slides, precisely as Ana White suggests in her plans. I’ll admit, at first glance, these modern slides can seem quite intimidating with their seemingly complex instructions and various components. However, I quickly discovered that they are actually super easy to install once you get past the initial apprehension! My personal trick? Don’t get bogged down in over-analyzing the verbose directions. Instead, adopt a more practical, hands-on approach: simply screw the drawer-side brackets onto the bottom edges of the assembled drawer box. Then, slide the cabinet-side brackets onto the corresponding drawer slides, position the drawer within the cabinet opening, and mark exactly where the cabinet brackets need to be mounted. This “chunking” method of installation simplifies what can appear overwhelming, making the process intuitive and quick. The result is a wonderfully smooth-gliding drawer that operates effortlessly, a significant upgrade from traditional drawer runners.
Building the Hutch: Extending Functionality and Style
To maximize the utility and aesthetic appeal of the student desk, incorporating a hutch was a natural extension of the project. I again turned to Ana White’s plans for the Channing Desk Hutch, which were, much like the desk plans themselves, incredibly straightforward and easy to follow. The hutch provides valuable vertical storage, perfect for books, supplies, or decorative items, keeping the desk surface clutter-free and organized. Its construction mirrors the desk’s sturdy design principles, ensuring a cohesive and durable unit. For the hutch doors, I utilized Euro style hinges as well. I’ve used these hinges on previous projects, and they continue to be my absolute favorite choice for cabinet doors. Their adjustability, durability, and sleek, concealed design make them superior to conventional hinges, providing a clean look and perfectly aligned doors every time.
The Finishing Touch: Staining and Sealing for Enduring Beauty
With the desk and hutch structurally complete, the next exciting phase was the finishing process. This stage is where the raw wood truly comes to life, taking on character and depth. To achieve a rich, sophisticated look that emulated the high-end Pottery Barn aesthetic, I chose a deep, dark walnut stain. The process involved careful sanding to prepare the wood, ensuring an even absorption of the stain and a smooth final finish. Applying the dark walnut stain transformed the wood, bringing out its natural grain and imparting a luxurious, warm tone that I absolutely adore. It’s amazing how a quality stain can elevate a piece of furniture from a simple wood project to a stunning focal point in a room.
This close-up beautifully captures the depth and richness of the dark walnut stain. The careful application ensures an even, consistent color that highlights the wood’s natural beauty without obscuring its unique patterns. A well-chosen finish is not just about color; it’s about protecting the wood and enhancing its inherent characteristics, making the furniture piece both durable and visually appealing for years to come. This particular hue added a touch of classic elegance that perfectly complemented the Pottery Barn inspired design.
Here it is, fully stained and ready to adorn my son’s room. The dark walnut finish ties the entire piece together, from the sturdy desk base to the functional hutch, creating a cohesive and polished look. The combination of the classic design and the rich stain truly makes this DIY desk appear as though it came straight from a high-end furniture showroom. It’s a testament to how accessible professional-looking results can be with the right plans, tools, and a little patience.
The Transformation: Before and After
One of the most satisfying aspects of any DIY project is the dramatic before-and-after comparison. It truly underscores the power of vision, planning, and hands-on effort. Here’s a look at the inspiration – the original Pottery Barn desk that sparked this entire project.
And now, for the grand reveal: the incredible “after” shot, showcasing our very own Pottery Barn inspired Channing Student Desk!
Unveiling the DIY Advantage: Savings and Satisfaction
The entire process, from making the initial cuts to the final assembly and staining, took approximately 6-8 hours of dedicated work. In terms of materials, I spent a mere $140. When you compare this modest investment to the cost of a similar desk from Pottery Barn, which often exceeds $500-$600, the savings are truly staggering—over $400! This financial advantage is undoubtedly a huge motivator for DIY projects. However, the true reward extends far beyond monetary savings.
The immense satisfaction of crafting something beautiful and functional with your own two hands is immeasurable. My son absolutely adores his new desk; it’s a space tailored just for him, fostering productivity and creativity. Of course, the success of this project has only fueled his entrepreneurial spirit, and he’s now diligently working on convincing us to add a mini-fridge to his room. For now, however, we’re politely sticking with the ample shelf space provided by the hutch! Perhaps that’s a project for another day, but the joy of seeing him use and appreciate this handmade piece is truly priceless.
A Heartfelt Thank You to Ana White
This project, and so many others, would simply not be possible without the incredible generosity and expertise of Ana White. Her dedication to providing amazing and completely free woodworking plans has democratized furniture building, making it accessible to anyone with a desire to create. Her detailed instructions, helpful tips, and inspiring designs empower countless individuals to take on projects they once thought were beyond their capabilities. A huge, sincere thank you to Ana for making dreams like my son’s Pottery Barn inspired desk a beautiful reality.
I’ll be back later to share more details about the fun backing I incorporated into this desk, adding another layer of personalized style, as well as information on the accessories that complete this functional and beautiful workspace. Stay tuned for more tips and inspiration to help you on your own DIY journey!
~Ashley