
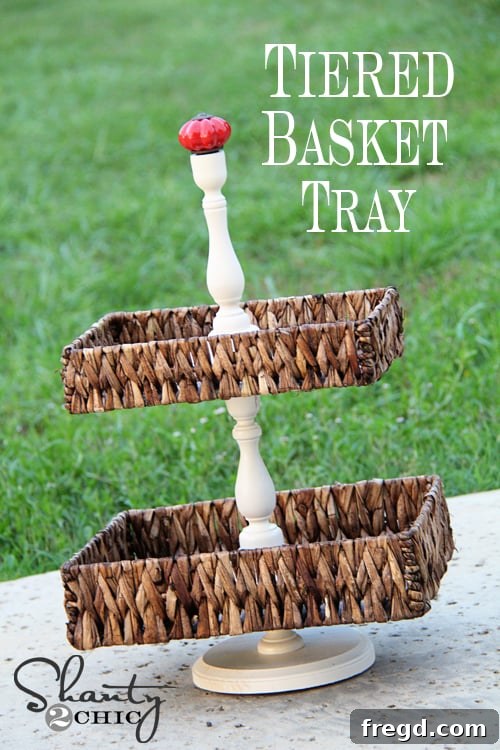
DIY Tiered Basket Tray: An Easy No-Power-Tools Project for Stylish Storage
Hey there, fellow DIY enthusiasts! I hope you’re all having a fantastic week and are ready for some crafting inspiration. As many of you know, my mom’s birthday is just around the corner, and I wanted to create something special and handmade for her. She’s always admiring the projects we share, so I knew a unique piece made with love would be the perfect gift. This time, I’ve crafted a beautiful and functional tiered basket tray – and the best part? You don’t need any power tools to make it!
This project is not only incredibly easy, but it also results in a versatile decor piece that can be used in countless ways around the home. Whether for organizing, displaying, or serving, a tiered tray adds a touch of rustic charm or elegant farmhouse style to any space. Let’s dive into how this stunning creation came to life!
Why a DIY Tiered Tray? Versatility Meets Style
Tiered trays have become a staple in home decor, and for good reason. They offer vertical storage, making them perfect for smaller spaces, and provide an excellent platform for seasonal decorations, everyday essentials, or even entertaining. My mom, for instance, frequently hosts gatherings and is always looking for stylish ways to present snacks or hold utensils. This handmade tiered basket stand fits that need perfectly, offering both elegance and practicality.
One of the biggest advantages of this specific project is its simplicity. No intimidating saws or drills are required, making it ideal for beginners or anyone looking for a quick and satisfying craft. All you need are a few basic supplies, readily available at craft stores like Hobby Lobby, and a strong adhesive to bring your vision to life. The ability to customize the paint and finish also means you can perfectly match it to any home aesthetic, from a modern minimalist look to a cozy farmhouse vibe.
Gathering Your Supplies: Everything You Need for Your Basket Tiered Stand
Finding the right materials is the first step to any successful DIY project. For this no-power-tools tiered tray project, I sourced everything from Hobby Lobby, taking advantage of their fantastic sales. Keep an eye out for discounts; you’d be surprised what treasures you can find at a great price!
The Baskets: The Foundation of Your Tiered Design
I found two lovely shallow baskets that were half-price, costing me only $9 for both! When choosing your baskets, look for ones with a relatively flat bottom for easy adhesion. The shallow depth is perfect for a tiered tray, allowing for visibility and easy access to items. Hobby Lobby often has a wide selection of various sizes and styles, so you can pick what best suits your taste and intended use.
The Support Structures: Unfinished Wood Pieces
To create the tiered effect, you’ll need sturdy support pieces. I opted for unfinished wood candlesticks, which are wonderfully versatile for DIY projects. I used one small candlestick for the base and two additional pieces to create the tiers. These are typically sold in multi-packs, making them very economical. You can usually find them in the unfinished wood craft section of Hobby Lobby, and they’re also available for purchase online. Their simple design allows for easy painting and customization.
In addition to the candlesticks, I grabbed two thin wood ovals for just $0.79 a piece from the same section. These will serve as stable bases for attaching the baskets to the candlesticks. I also picked up a large wood circle and two smaller ones. These circular pieces provide a flat surface for the epoxy to bond securely, ensuring your tiers are stable and well-supported.
The Secret Weapon: Gorilla Glue Epoxy
The absolute key ingredient for this no-power-tools craft is Gorilla Glue Epoxy. This stuff is phenomenal! It boasts the consistency of hot glue, but with an incredibly strong, permanent hold that’s essential for a durable tiered tray. While it does have a distinct smell when first mixed, this completely dissipates once it dries and cures. It’s truly a game-changer for projects requiring a powerful, lasting bond.
Step-by-Step Assembly: Building Your DIY Tiered Basket Tray
Now that we have all our supplies, let’s get to the fun part: assembly! The process is straightforward, but patience during drying times is crucial for a sturdy finish.
Step 1: Preparing and Mixing the Epoxy
The Gorilla Glue Epoxy comes in two separate tubes. To activate it, simply squeeze equal parts from both tubes onto a disposable surface, such as a small plastic tray or a “professional” paper plate, and mix them thoroughly. You’ll want to work relatively quickly once mixed, as the epoxy starts to set.
Step 2: Assembling the Candlestick Supports
Using the mixed epoxy, attach your candlestick pieces to the wood ovals and circles as shown. These wooden pieces provide a flat, stable surface for the epoxy to adhere to, ensuring a strong connection between the baskets and the candlesticks. Apply a generous amount of epoxy to one end of a candlestick and press it firmly onto the center of a wood circle/oval. Repeat for all support pieces, allowing ample drying time between each attachment. This is a crucial step for the stability of your entire tiered structure.
For the very base of the tiered tray, I attached a larger wood circle to the bottom of the designated base candlestick. This provides a wider, more stable footprint for the entire structure. Ensure all connections are centered and straight before the epoxy sets.
Step 3: Painting for a Cohesive Look
Once your candlestick support pieces are fully dry and securely bonded, it’s time for painting! This step unifies all the wooden elements and gives your tiered tray a polished, finished look. I chose my absolute favorite: Rust-Oleum Painter’s Touch in Heirloom White. This color offers a beautiful, soft, antique white finish that perfectly complements the rustic charm of the baskets and gives the project a classic farmhouse feel. Apply a thin, even coat, allowing it to dry completely before applying a second coat if needed. Make sure to get into all the nooks and crannies of the candlesticks for a professional appearance.
Step 4: Attaching the Bottom Basket
After the paint has dried thoroughly, it’s time to attach the baskets. Start with the largest basket, which will form the base tier. Mix a fresh batch of Gorilla Glue Epoxy and apply a generous amount to the top of your painted base candlestick piece. Carefully center your larger basket on top, ensuring it’s level. This step is critical, so take your time to align it perfectly. Once placed, apply gentle pressure and, importantly, place something heavy like a stack of books on top of the basket while the epoxy cures. This ensures maximum contact and a strong, lasting bond. Allow at least several hours, or even overnight, for complete drying.
Step 5: Adding the Middle Tier
Once the base basket is firmly attached, proceed to the next tier. Repeat the epoxy process: mix a new batch, apply it to the top of your first painted candlestick piece (which already has its wood circle/oval attached), and then center and attach your smaller basket. Again, ensure proper alignment and apply pressure. If possible, use clamps or weight to hold it in place while it dries. Patience here will pay off with a stable and beautiful DIY tiered stand.
Step 6: Finishing the Top Tier (Optional Knob Accent)
The final step in assembly involves attaching your last candlestick piece. Apply epoxy to the top of the second small basket and securely bond the candlestick. For a fun pop of color and an added decorative touch, I decided to top this last candlestick with a colorful knob. If your knob requires a screw, you might need to carefully drill a pilot hole into the top of the candlestick before securing it with epoxy. Alternatively, you can simply epoxy a flat-backed decorative element or a small finial. This personal touch makes your handmade decor truly unique!
The Final Reveal: A Beautiful and Functional Piece
And just like that, your stunning DIY tiered basket tray is complete! It’s truly an easy project with impressive results. The combination of the rustic baskets, the elegant Heirloom White finish, and the strong epoxy bond creates a durable and beautiful piece that looks far more complicated than it actually is. It’s a testament to what you can achieve with a little creativity and the right materials, all without the need for cumbersome power tools.
This tray is perfect for so many uses. As I mentioned, my mom needed something for party utensils, and this fits the bill perfectly. Imagine it holding plastic forks, spoons, and napkins for a buffet, or displaying a variety of snacks. The possibilities are endless!
Creative Uses for Your New Tiered Tray
Beyond party essentials, here are just a few ideas for how you can style and use your new farmhouse tiered tray:
- Kitchen Counter Organizer: Store fruits, vegetables, coffee pods, tea bags, or small spice jars.
- Bathroom Vanity: Organize toiletries, cotton balls, small towels, or even display decorative soaps and candles.
- Craft Room: Keep small craft supplies, ribbons, or threads neatly organized and easily accessible.
- Entryway Decor: Hold keys, mail, sunglasses, or small decorative accents.
- Holiday Display: Decorate with mini pumpkins for fall, ornaments for Christmas, or pastel eggs for Easter.
- Dessert Stand: Present cupcakes, cookies, or small appetizers at your next gathering.
- Office Space: Keep pens, paper clips, sticky notes, and other desk necessities tidy.
Its charming appearance makes it a focal point in any room, and its practicality helps keep clutter at bay. Whether your style is rustic, shabby chic, or modern farmhouse, this adaptable piece will blend seamlessly into your existing decor.
Final Thoughts & Happy Birthday!
I really hope you enjoyed this tutorial for creating your own easy tiered basket tray! It’s a rewarding project that yields a beautiful and functional piece of home decor. I certainly love how it turned out, and I have a feeling my mom will too!
To my wonderful Mama, Happy Birthday! We love you so very much, and I hope this handmade gift brings a smile to your face and a touch of organization to your home. It’s a small token of our immense appreciation for everything you do.
If you enjoyed this project, please consider pinning it and sharing it with your friends and fellow crafters! Your support means the world to us. Thank you for stopping by and happy crafting!
~Whitney