
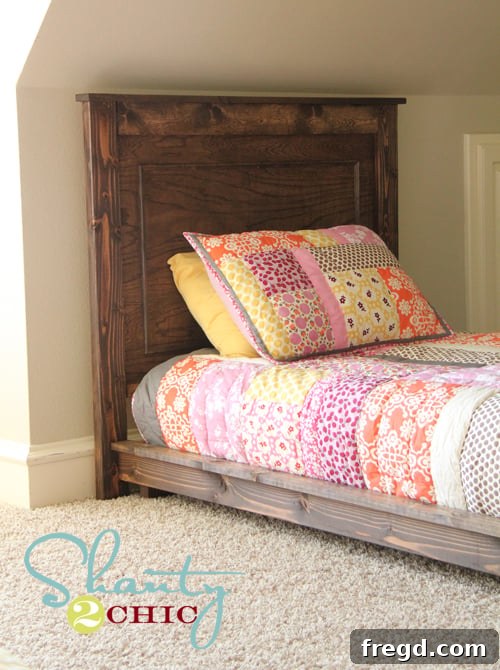
DIY Platform Beds: Crafting Pottery Barn Inspired Dream Beds on a Budget!
Hello fellow DIY enthusiasts and home decor lovers!
If you’ve been following along, you might recall the custom platform bed I recently built for my oldest son. It was a fantastic project, offering a sturdy and stylish solution that perfectly fit his room. Little did I know, this single project would spark an immediate demand for bedroom makeovers from the rest of the household!
Indeed, it took less than two days for my girls to decide they, too, were ready for new beds. But this wasn’t just about updating their decor; I saw it as a brilliant opportunity to design and build them beds that offered more than just comfort—beds that would also help combat the endless accumulation of toys and clutter! The vision was clear: platform beds, elevated but without the gaping space underneath that often becomes a black hole for forgotten treasures. Yes, a practical, stylish, and clutter-resistant solution was precisely what we needed!
To bring this vision to life, I enlisted the incredible talent of my good friend, Ana White, a guru in creating beautiful and accessible woodworking plans. Together, we scoured for inspiration and instantly fell in love with the classic elegance of the Fillmore Platform Bed from Pottery Barn Kids. It struck the perfect balance of sophistication and child-friendly design, promising beds that would gracefully grow with my girls through the years. Ana, with her signature ingenuity, quickly drafted some super easy-to-follow plans, and just like that, I was ready to dive into another exciting DIY project. And let me tell you, these beds were surprisingly simple to build, but you absolutely won’t believe the final cost!
Get Started: Your Journey to a Custom Bed Begins Here!
Before we delve into the build, make sure you grab the detailed, step-by-step instructions. The comprehensive plans for crafting this stunning headboard are available directly on Ana White’s website. Don’t miss out on this invaluable resource!
You can access the free plans for this beautiful Fillmore-inspired headboard on Ana’s site right HERE!
Let’s take a peek at the initial stages of construction. Here’s one of the headboard panels coming together:
Essential Tools and My Go-To DIY Companions
As with any successful woodworking project, having the right tools makes all the difference. I’m excited to share some crucial insights and practical tips I gained throughout this rewarding build.
For the entirety of this robust build, I relied heavily on Gorilla Wood Glue. This product is, hands down, one of our absolute favorites in the workshop. Its incredible strength and durability ensure that every joint is rock-solid, creating furniture that’s built to last. When you’re crafting pieces for active kids, you need adhesive you can trust, and Gorilla Wood Glue consistently delivers top-tier performance.
Another indispensable tool that saw extensive use on this project was my Kreg Jig™. I genuinely cannot overstate how amazing and transformative this tool is for DIY furniture making. If you’re serious about woodworking or simply want to create professional-looking pieces with ease, a Kreg Jig is an absolute must-have. It simplifies the assembly process dramatically, allowing you to join pieces securely and precisely with hidden pocket holes. This not only results in significantly sturdier furniture but also maintains a clean, aesthetically pleasing finish by concealing all screw heads. It has effortlessly earned its place among my top five favorite tools, and I urge anyone embarking on a furniture project to invest in one. You’ll be thanking yourself (and us!) for years to come!
The Building Journey: Step-by-Step Excellence
Crafting these beds was a journey of careful steps and smart shortcuts. Here’s a closer look at some key moments in the construction process.
Preparing the components for assembly is crucial. Here, I’m drilling the pocket holes with my Kreg Jig, a fundamental step for strong, concealed joints. To effectively support the headboard panel during this process, I employed a simple yet highly effective trick: a scrap piece of wood. Yes, it might look a little “shanty,” but it worked like an absolute charm, holding the panel perfectly steady while I drilled with precision. Sometimes, the simplest solutions are the best!
For the main headboard panel, I opted for beautiful oak hardwood plywood. This choice provides both durability and a lovely grain pattern that takes stain exceptionally well. To save time and ensure precise cuts, I had Lowe’s rip my plywood down to the exact specifications provided in Ana’s plans. This step is a fantastic way to utilize professional tools for accuracy, especially with larger sheets of plywood. I was thrilled to discover that I could construct both headboards from a single 4×8 sheet, even leaving me with some generously sized scraps – perfect for future small projects! Here’s the panel after I meticulously drilled all the necessary pocket holes with my trusted Kreg Jig™, ready for assembly:
With the pocket holes drilled, the next step was attaching the side pieces. This is where the headboard truly began to take its structural form. The Kreg Jig makes these connections incredibly strong and flush, providing a solid foundation for the entire bed frame.
And just like that, with the main components assembled and securely fastened, the headboard was structurally complete and poised for its transformation. It’s always exciting to reach this stage, knowing that the hard work of cutting and assembling is done, and the creative process of finishing is about to begin.
Bringing Color to Life: The Staining Process
One of the trickiest parts of working with different types of wood, especially when combining plywood with solid wood elements, is achieving a uniform stain. I initially had a slight concern that the various wood grains and compositions might lead to uneven staining, but I’m absolutely thrilled with how they turned out!
For these beds, I chose my absolute favorite stain to give them that rich, natural “tree colored” look that is both timeless and versatile. The choice was clear:
Rust-Oleum Premium Wood Stain in Dark Walnut.
This particular shade is incredibly forgiving and penetrates beautifully, enhancing the natural wood grain without overpowering it. It provides a deep, warm tone that evokes a sense of comfort and classic style, perfect for any bedroom. The consistency of this stain made application smooth, and with careful preparation, it indeed minimized any discrepancies between the different wood pieces, resulting in a cohesive and stunning finish.
The Grand Reveal: Custom Beds, Happy Kids!
And now, for the moment we’ve all been waiting for—the stunning results! Please excuse the empty room in some of these shots; I’m still busy crafting the coordinating nightstands and other goodies to perfectly complement these beautiful new beds!
What do you think of their new custom-built beds? I’m absolutely delighted with how they turned out, exceeding all expectations in terms of both aesthetics and functionality. These beds aren’t just pieces of furniture; they’re a testament to what can be achieved with a little creativity, determination, and Ana White’s incredible plans!
One of the most heartwarming reactions came from our littlest family member. The slightly elevated height of these new platform beds means she can finally climb up onto her sisters’ beds all by herself! It’s these small moments of independence and joy that truly make all the effort worthwhile. Seeing her beaming smile and newfound confidence is priceless!
The Unbeatable DIY Advantage: Savings That Speak Volumes!
Now, for the truly exciting part—the cost comparison! These beautiful Fillmore Platform Beds, if purchased directly from Pottery Barn, would set you back approximately $400 *per bed* before even factoring in shipping costs. For a pair, you’re looking at a grand total close to $1000. That’s a significant investment, especially when furnishing multiple rooms or sticking to a budget. WOW indeed!
But guess what? By embracing the power of DIY and following Ana’s fantastic plans, I built both of these gorgeous platform beds for an astonishing total of just $150! That’s an incredible saving of over 85% compared to retail prices. Woohoo! This dramatic difference highlights the incredible value and satisfaction that comes with building your own furniture. You get high-quality, custom-built pieces without the hefty price tag.
I sincerely hope you love these beds as much as we do. They represent not just a successful project, but a more organized and stylish space for my girls. I’ll be back soon to share some additional tips, including how you can build a single twin bed version of this design for an incredible $30! Imagine furnishing an entire room beautifully and affordably.
Once again, don’t forget to visit Ana White’s website for the full plans and to start your own woodworking adventure!
Make sure to get the detailed plans for the headboard on Ana’s site HERE and embark on your own successful DIY journey!
Get ready for another exciting update! We will be back tomorrow with details on another fantastic giveaway. This time, it’s from one of our absolute favorite products, so be sure to check back with us to learn how you can enter to win. You won’t want to miss it!
Wishing you all a wonderful and productive week ahead, full of creative projects and joyful moments!
~Whitney