
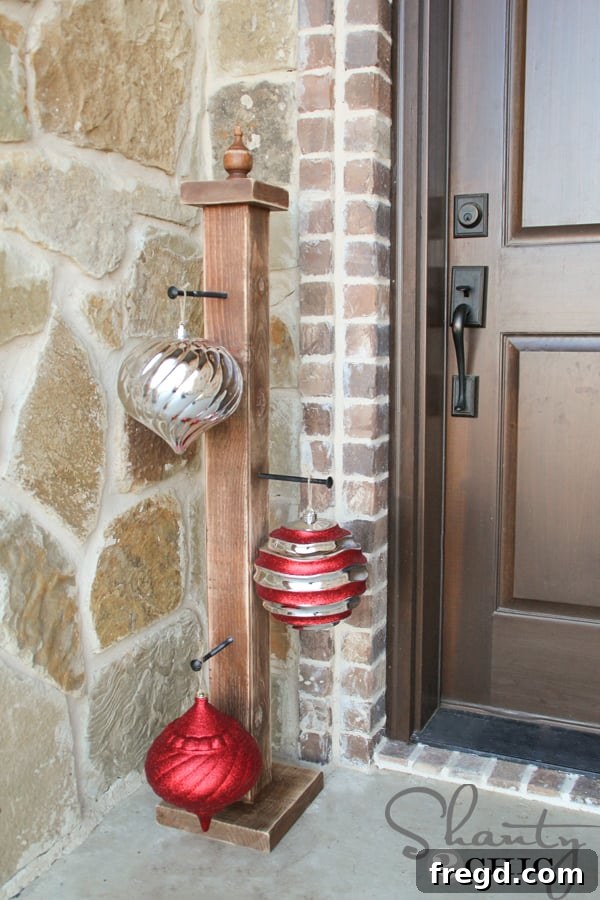
Welcome, dear readers, to Day 10 of our enchanting “12 Days of Christmas” series! As the festive season twinkles brighter, we’re thrilled to unveil a project that promises to add a touch of handcrafted charm and elegance to your outdoor holiday display. Today, we’re diving into the creation of a beautiful and incredibly easy-to-build Outdoor Ornament Stand – a delightful twist on some of our most beloved outdoor DIYs.
Imagine a festive focal point right by your front door, greeting guests with shimmering ornaments and a warm, inviting glow. This DIY outdoor ornament stand is not only a breeze to construct but also incredibly budget-friendly, costing you less than $15 in materials. It’s the perfect way to infuse your outdoor space with personalized holiday spirit without breaking the bank or spending countless hours on complex projects. Let’s transform your front porch or garden into a winter wonderland with this charming and unique holiday decoration!
Why Choose a DIY Outdoor Ornament Stand for Your Holiday Decor?
The magic of the holidays extends far beyond the confines of our homes, spilling into our gardens, porches, and front yards. An outdoor ornament stand offers a unique and sophisticated alternative to traditional wreaths or garland, creating a vertical display that captures attention and adds a whimsical touch. It’s perfect for those looking to add a personalized flair to their outdoor Christmas decorations. Beyond its aesthetic appeal, this project is:
- Affordable: Crafted primarily from standard lumber and a few hardware pieces, it’s incredibly cost-effective.
- Quick to Build: You can assemble the core structure in just an afternoon.
- Customizable: Easily adapt the stain, paint, and ornaments to match your existing holiday theme.
- Durable: With proper weatherproofing, it will withstand the elements and serve you for many seasons.
- Versatile: While perfect for Christmas, it can also be adapted for other seasonal displays throughout the year.
Gather Your Materials and Tools for This Festive Project
Before you begin building your stunning outdoor ornament stand, ensure you have all the necessary materials and tools at hand. A little preparation goes a long way in making any DIY project smooth and enjoyable. Here’s what you’ll need:
Materials:
- Wood Post: One 8-foot 4×4 lumber post (commonly found at home improvement stores like Home Depot).
- Top Piece: A scrap piece of 2×6 lumber, cut to 5.5 inches in length.
- Base Piece: A scrap piece of 2×10 lumber, cut to 9.25 inches in length.
- Wood Finial: A decorative wood finial (available at craft stores or the lumber section of home improvement stores).
- Screws: Wood screws suitable for outdoor use.
- Wood Glue: If your finial does not have a screw attachment.
- Wood Filler: To conceal screw holes and imperfections for a smooth finish.
- Wood Stain: Varathane Early American stain (or your preferred color).
- Spar Varnish: A durable clear coat specifically designed for outdoor wood protection (e.g., Rust-Oleum Spar Varnish).
- Bolts: Three decorative bolts (check the hardware aisle for suitable sizes and styles).
- Spray Paint: Black spray paint (or a color to match your decor) for the bolts.
- Ornaments: Large, shatter-proof outdoor ornaments for hanging.
- Clean Cloths: For applying stain and varnish.
Tools:
- Saw: A miter saw or circular saw capable of cutting a 4×4 post. (Alternatively, many home improvement stores offer cutting services.)
- Drill: A power drill for pilot holes and driving screws.
- Drill Bits: Various sizes, including one for pilot holes (slightly smaller than your finial screw) and a 1/2-inch drill bit for the bolt holes.
- Measuring Tape: For accurate measurements.
- Pencil: For marking cuts and drill points.
- Safety Glasses: Always wear appropriate safety gear when working with power tools.
Step-by-Step Guide: Building Your DIY Outdoor Ornament Stand
Step 1: Preparing Your Main Wood Post
The foundation of your ornament stand is a sturdy 4×4 wood post. Begin by purchasing an 8-foot 4×4 post from your local home improvement store. Using your saw, carefully cut this post down to a length of 3.5 feet. If you don’t have a saw capable of cutting through such thick lumber, don’t hesitate to ask the helpful associates at the store to cut it for you. This not only saves you a step but also makes transporting the wood much easier. This 4×4 will serve as the central column from which your beautiful ornaments will hang.
Step 2: Attaching the Top Decorative Piece
Next, take a scrap piece of 2×6 lumber and cut it to a precise length of 5.5 inches. This piece will be attached to one end of your 4×4 post, forming a cap or a decorative top. Align the 2×6 scrap centrally on the end of the 4×4 post and secure it firmly with wood screws. Ensure the screws are driven flush with the surface for a clean look. This top piece will not only add structural integrity but also provide the perfect platform for attaching your decorative finial in a later step.
Step 3: Creating a Sturdy Base for Stability
To ensure your ornament stand remains stable and upright, especially outdoors, you need a solid base. Cut a 2×10 scrap piece of lumber down to 9.25 inches. This wider piece will serve as the base of your stand. Attach it to the opposite end of the 4×4 post (the bottom) in the same manner you attached the top piece, using sturdy wood screws. A well-secured base is crucial for preventing your stand from tipping over in windy conditions or under the weight of ornaments.
Step 4: Adding the Decorative Finial
Now, let’s add an elegant touch with a wood finial. Flip your stand so the top piece is facing upwards. Using your drill, create a pilot hole in the center of the 2×6 top piece. The pilot hole should be slightly smaller than the screw on your finial; this prevents the wood from splitting when you twist the finial in. If your finial doesn’t come with a screw, you can securely attach it with a strong outdoor wood glue. Finials are readily available at most craft stores or the decorative wood section of home improvement centers, offering various styles to match your personal aesthetic.
Step 5: Securing the Finial and Filling Imperfections
Once the pilot hole is drilled, carefully screw the finial into place until it’s snug and secure. Next, it’s time to achieve a professional, seamless look. Apply wood filler to all visible screw holes – on the top piece, the base, and anywhere else you’ve used screws. This step is essential not only for aesthetics but also for weather protection, preventing moisture from entering the wood. Allow the wood filler to dry completely according to the manufacturer’s instructions. Once dry, you can lightly sand any excess for a perfectly smooth surface.
Step 6: Staining for a Rich and Elegant Finish
With the wood filler dry and sanded, your stand is ready for staining. We recommend using Varathane Early American stain for a classic, warm, and inviting look. Using a clean cloth, wipe an even coat of stain over the entire piece. Allow the stain to penetrate the wood for approximately 5 minutes. Then, with a separate clean cloth, gently blend and wipe off any excess, ensuring an even and consistent finish. This technique helps avoid blotches and creates a beautiful, rich color that will highlight the wood grain. Let the stain dry completely as per the product’s instructions, usually for several hours.
Step 7: Applying Weather Protection with Spar Varnish
Since your ornament stand will be displayed outdoors, protecting it from the elements is paramount. Once the stain is completely dry, apply one generous coat of spar varnish to the entire piece. Spar varnish is specifically formulated for outdoor use, providing excellent resistance against UV rays, moisture, and temperature fluctuations. This protective layer will ensure your stand remains beautiful and durable throughout the holiday season and for years to come. Allow the varnish to dry thoroughly according to the product guidelines.
Step 8: Drilling Pilot Holes for Ornament Hooks
With your stand stained and protected, it’s time to create the points for hanging your ornaments. Using a 1/2-inch drill bit, drill three pilot holes into the main 4×4 post. To create a visually appealing and balanced display, we’ll stagger the holes.
- Drill the first hole 5.5 inches down from the top of the post on one side.
- Rotate the post to the adjacent side and drill the second hole 12 inches down from the first hole.
- Rotate back to the original side and drill the third hole 12 inches down from the second hole.
These carefully measured and staggered holes will allow your ornaments to hang beautifully without crowding each other.
Step 9: Preparing and Attaching the Decorative Bolts
Select three decorative bolts from your local hardware store. To ensure they complement your stain color and resist rust, give them two coats of black spray paint, allowing each coat to dry thoroughly. Once the paint is dry, simply twist these bolts into the pre-drilled pilot holes. The pilot holes will guide the bolts smoothly, ensuring a snug and secure fit. These bolts will serve as the sturdy hooks for your cherished outdoor ornaments.
Step 10: The Finishing Touch: Hanging Your Ornaments
The final and most exciting step is to adorn your new outdoor ornament stand! Select large, shatter-proof ornaments – essential for outdoor displays, especially if you have children or pets, or live in a windy area. Hang one ornament from each bolt, letting them dangle and shimmer in the light. Consider mixing colors, textures, and sizes of ornaments for an even more dynamic and captivating display. With your ornaments in place, your magnificent DIY Outdoor Ornament Stand is complete and ready to bring festive cheer to your home!
Customization Ideas for Your Unique Ornament Stand
One of the joys of DIY is the ability to personalize your creations. Your outdoor ornament stand can be a canvas for your unique holiday vision:
- Color Palette: Instead of stain, consider painting your stand a vibrant red, a crisp white, or an elegant charcoal gray to match your existing outdoor decor.
- Lighting: Wrap a battery-operated string of LED fairy lights around the post for a magical nighttime glow. Solar-powered lights are another excellent, energy-efficient option.
- Garland and Ribbons: Drape a simple garland or festive ribbons around the post to add more texture and traditional holiday charm.
- Ornament Variety: Don’t limit yourself to just spherical ornaments. Incorporate novelty shapes, oversized snowflakes, or even small, weatherproof signs.
- Seasonal Adaptations: This stand isn’t just for Christmas! In spring, hang small birdhouses or floral accents. For Halloween, spooky lanterns or lightweight pumpkins could adorn it.
Placement and Display Tips
Where you place your outdoor ornament stand can significantly impact its overall effect.
- Front Porch Entryway: Position it prominently near your front door to warmly welcome guests.
- Garden or Walkway: Place it along a pathway or amidst your garden beds to add unexpected sparkle.
- Securing the Stand: While the base is sturdy, if you live in a particularly windy area, consider placing the stand in a heavy planter filled with rocks or sand for extra stability.
- Grouping: For a grander display, consider building two or three stands of varying heights to create a dynamic cluster.
Embrace the Spirit of DIY Holiday Decor
Crafting your own holiday decorations, like this outdoor ornament stand, offers immense satisfaction. It’s an opportunity to save money, unleash your creativity, and make your home uniquely yours for the festive season. Each handmade piece tells a story, adding character and warmth that mass-produced items simply can’t replicate. Gather your family, put on some holiday music, and make this project a cherished part of your annual holiday traditions!
Thank you so much for joining us on Day 10 of our “12 Days of Christmas” series! We hope this project inspires you to get out there and build something beautiful. Don’t forget to check out the incredible Day 10 projects from our talented friends below. Each day, one of us is hosting a fantastic giveaway, so you absolutely won’t want to miss out on those festive opportunities!