
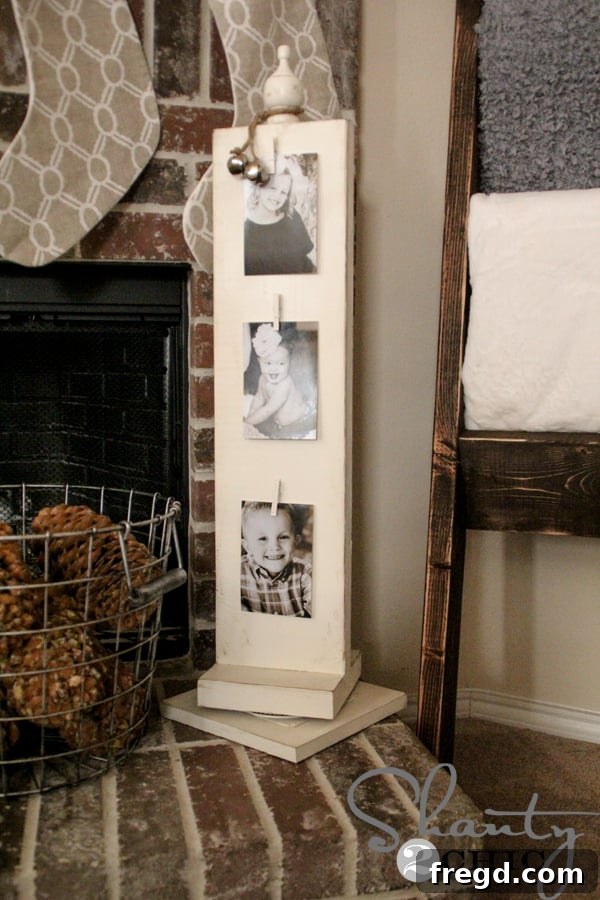
Craft Your Own DIY Photo Carousel: A Charming & Affordable Display for Every Season!
Welcome back, fellow DIY enthusiasts! We’re thrilled to present Day 5 of our festive “12 Days of Christmas” series, and today’s project is an absolute gem you won’t want to miss. For continuous inspiration and to stay updated on all our latest creations, be sure to follow us on Instagram and Facebook. We love connecting with our amazing community and seeing your incredible DIY journeys!
Today’s featured project is one that holds a special place in my heart due to its incredible versatility and undeniable charm. Imagine a single piece of decor that not only showcases your cherished memories but also adds a rustic, handmade touch to any room. This DIY Photo Carousel is exactly that—a functional and beautiful addition to your home, perfect for displaying family photos, holiday greeting cards, motivational quotes, or even recipes!
What makes this wooden photo carousel even more appealing? It’s remarkably simple to construct and incredibly budget-friendly! I managed to put this entire piece together for approximately $10, proving that beautiful home decor doesn’t have to break the bank. Its rotating design allows for a dynamic display, making it a fantastic centerpiece for your kitchen island, living room coffee table, or even a cozy entryway.
Ready to create your own personalized photo display? Let’s dive into the step-by-step process!
Essential Materials & Tools for Your DIY Photo Carousel
Before we begin, gathering all your materials and tools will ensure a smooth and enjoyable crafting experience. Most of these items can be found at your local hardware store or craft supply shop, making this an accessible project for beginners and seasoned DIYers alike. Here’s what you’ll need:
Materials:
- Wood Planks:
- One 2×8 board, 8 feet long (or similar dimension for the vertical support)
- One scrap 1×10 board (or any scrap wood large enough to cut a 9 1/4″ square for the base)
- Lazy Susan Hardware: A small, sturdy lazy susan mechanism to allow your carousel to rotate.
- Adhesives:
- Gorilla Glue Epoxy (for strong, permanent bonds, especially for the lazy susan)
- Gorilla Glue Wood Glue (for secure wood-to-wood attachments)
- Hot Glue Gun and Hot Glue Sticks (for attaching smaller elements like clothespins)
- Decorative Finial: A wooden finial (often found in craft stores) to adorn the top.
- Wooden Clothespins: Small wooden clothespins or mini clips to hold your photos.
- Paint: Rust-Oleum Heirloom White spray paint, satin finish (or your preferred color/finish).
- Optional Embellishments: Twine, jingle bells, ribbons, stencils, etc., for decoration.
Tools:
- Tape Measure
- Pencil or Marker
- Saw (miter saw, circular saw, or handsaw for cutting wood)
- Safety Goggles and Gloves
- Clamps (to hold wood pieces while glue dries)
- Sandpaper (medium and fine grit)
- Protective Drop Cloth or Cardboard (for painting)
Step-by-Step Construction Guide
Step 1: Preparing Your Wood Pieces
The foundation of your photo carousel starts with precise cuts. Begin by taking your 8-foot 2×8 board. From this, you will cut two pieces: one piece at 28 inches long (this will be your main vertical support) and another piece at 7 1/4 inches long (this forms the upper rotating platform). For the base, you’ll use a scrap 1×10 board, which you will cut into a perfect 9 1/4-inch square. If you don’t have a 1×10 scrap, any piece of wood that can be accurately cut to a 9 1/4-inch square will work perfectly. Always double-check your measurements before making cuts, and remember to wear your safety goggles!
Step 2: Attaching the Lazy Susan Mechanism
Next, it’s time to add the rotating magic. Take your lazy susan hardware and center it meticulously on the 9 1/4-inch square base piece. Then, attach the other side of the lazy susan mechanism to the 7 1/4-inch piece of wood that will form the top platform. For this crucial connection, I recommend using Gorilla Glue Epoxy. Epoxy creates an incredibly strong and durable bond, essential for a mechanism that will be frequently turned. Follow the epoxy instructions carefully for mixing and application, and allow ample time for it to cure completely before moving on. This ensures your carousel spins smoothly and reliably.
Step 3: Assembling the Main Structure
Once the epoxy holding the lazy susan is fully dry and secure, it’s time to integrate the main vertical support. Apply a generous amount of Gorilla Glue Wood Glue to the center of the 7 1/4-inch board (the piece now attached to the lazy susan). Carefully center the 28-inch vertical piece on top of it. Ensure it’s perfectly aligned to keep your carousel balanced. Clamp the pieces together firmly and allow the wood glue to dry according to the manufacturer’s instructions. Patience during this step ensures a robust and stable structure for your photos.
Step 4: Adding the Decorative Finial
To give your photo carousel a refined, finished look, we’ll add a wooden finial to the very top. These charming wooden craft finials are readily available at most craft supply stores and come in various shapes and sizes. Choose one that complements your aesthetic. Apply wood glue to the bottom of the finial and firmly attach it to the center of the top of the 28-inch vertical board. Hold it in place for a few moments or use a small clamp until the glue begins to set. This small detail adds a touch of elegance and completeness to your project.
Step 5: Attaching the Photo Clips
Now for the part that makes it a photo display! Using a hot glue gun, carefully attach three small wooden clothespins to each of the four sides of the 28-inch vertical piece. Space them evenly for a balanced look. The hot glue provides a quick and strong bond for these smaller elements. These clothespins will be the perfect holders for your photos, cards, or notes. You can experiment with different types of clips, such as decorative metal clips, depending on the look you’re going for.
Step 6: Painting and Finishing
With all the pieces assembled and the glue dry, it’s time to bring your photo carousel to life with color! Place your carousel on a protective drop cloth or old newspaper in a well-ventilated area. I chose our favorite Rust-Oleum Heirloom White spray paint in a satin finish for a classic, elegant look. Apply two thin, even coats, allowing sufficient drying time between each coat as per the product instructions. This careful application ensures a smooth, professional-looking finish. If you prefer a more rustic aesthetic, consider distressing the edges lightly with sandpaper after the paint dries, or opt for a wood stain instead of paint.
Your Beautifully Finished Photo Carousel!
And just like that, your charming DIY Photo Carousel is complete! The final step is to personalize it. Since I’m creating these as thoughtful Christmas gifts, I added a festive touch by tying some cheerful jingle bells to twine and gently wrapping it around the top finial. This simple embellishment instantly transforms it into a holiday-ready piece, perfect for spreading cheer.
There you have it—a beautifully crafted, simple, and incredibly inexpensive DIY project that will not only help you organize and display your precious memories but also add a warm, handmade touch to your Christmas decor or everyday home styling. We genuinely appreciate every pin and share; your support helps us continue bringing you fresh and exciting DIY ideas!
Discover More Holiday Inspiration from Our Talented Friends!
But the creativity doesn’t stop here! As part of our “12 Days of Christmas” series, we’re thrilled to shine a spotlight on some incredibly talented friends who are also sharing their amazing Day 5 projects. Prepare to be inspired by their unique ideas and masterful craftsmanship. You won’t want to miss seeing what they’ve been up to!
Michael of Inspired by Charm brings us his delightful DIY Festive Rainbow Wreath, adding a vibrant splash of color to traditional holiday decor.
Marianne from Songbird shares her fantastic ideas for 3 Easy Christmas Decorations, perfect for quick and impactful holiday styling.
Cassity from Remodelaholic showcases her beautiful “JOY” String Art Tutorial, a wonderful way to personalize your holiday message.
KariAnne from Thistlewood Farms offers enchanting Front Door Decorating Ideas for Christmas, ensuring a grand welcome for all your holiday guests.
Donna from Funky Junk Interiors demonstrates how to create unique Christmas Kindling Stars in minutes, perfect for adding rustic charm.
Catch Up on Our 12 Days of Christmas Series!
In case you’ve missed any of our previous festive projects, don’t worry! You can easily catch up on all the amazing DIY tutorials we’ve shared so far in our “12 Days of Christmas” series. Each day brings a new idea to help you craft, decorate, and celebrate the holiday season.
Day 1 brought us the incredibly stylish and functional DIY Blanket Ladder, perfect for keeping throws organized and adding a touch of rustic elegance.
On Day 2, we showed you how to craft a beautiful DIY Bow Picture Frame, an adorable and personal gift for loved ones.
Day 3 featured our clever DIY Stocking Holders, combining practicality with personalized photo display for your mantelpiece.
And on Day 4, we created charming Picture Frame Ornaments, perfect for adding cherished memories directly to your Christmas tree.
We hope you feel inspired to pick up your tools and start crafting. Happy DIYing!