
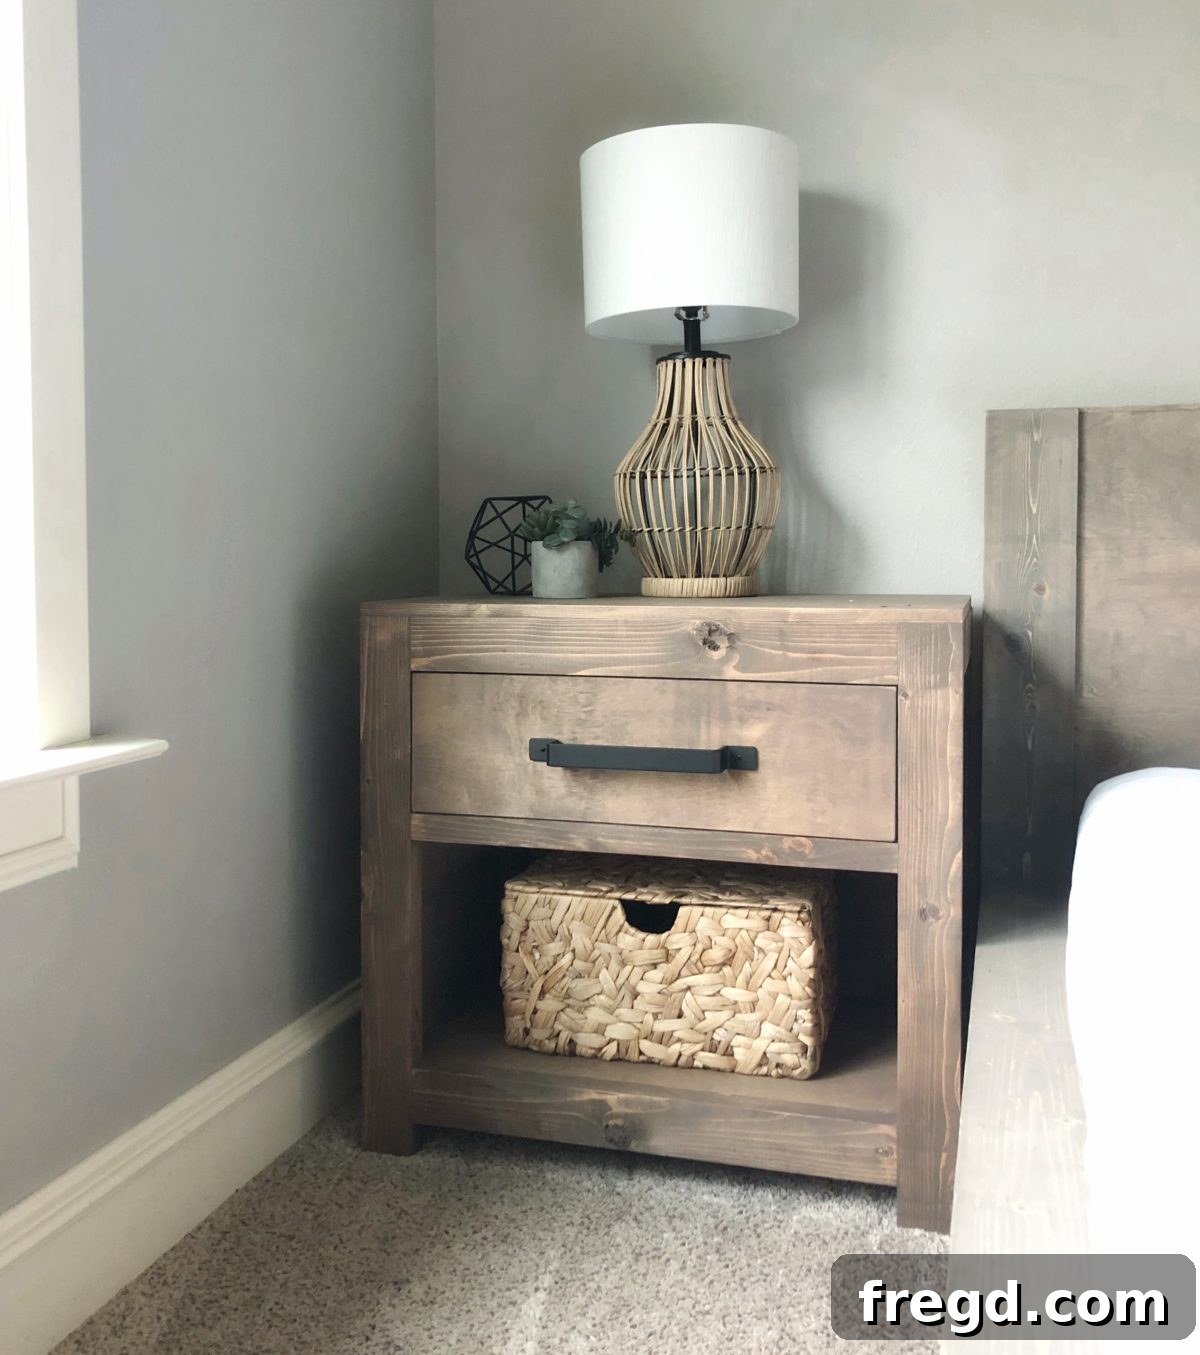
Build Your Own Modern Farmhouse Nightstand: A Comprehensive DIY Guide
Having recently completed a beautiful queen bed for my oldest daughter, it was only natural to craft a complementary nightstand. I am absolutely thrilled with the outcome of this project – a stunning DIY Modern Farmhouse Nightstand that perfectly blends rustic charm with contemporary elegance. This guide will walk you through every step, ensuring you can replicate this gorgeous piece for your own home.
Why Choose a Modern Farmhouse Nightstand?
The modern farmhouse aesthetic has captivated interior design enthusiasts with its unique blend of comfort, functionality, and timeless appeal. It combines the warmth and character of traditional farmhouse style with the clean lines and contemporary finishes of modern design. Building your own nightstand allows for complete customization, ensuring it perfectly matches your existing decor and meets your specific needs. This project is not only rewarding but also a fantastic way to add a touch of handcrafted elegance to any bedroom, especially when paired with a matching bed frame.
Download Your Free Plans!
Before diving into the build, make sure you have all the necessary blueprints. For detailed measurements and cut lists, you can download and print the FREE PLANS by clicking HERE! These plans are indispensable for ensuring accuracy throughout your build.
Materials You’ll Need
To construct this modern farmhouse nightstand, gather the following materials. Always consider purchasing a little extra to account for any mistakes or future touch-ups.
- Wood:
- 2×4 boards (for face frames, ripped to 3″ wide)
- 2×2 boards (for drawer frame and side supports)
- 3/4″ hardwood plywood (for sides and base)
- 1/2″ hardwood plywood (for drawer sides)
- 1/4″ hardwood plywood (for drawer base and back panel)
- Laminated pine project panel (for the top, e.g., 24″ x 36″ or sized to fit)
- Hardware:
- Wood glue (Titebond or similar high-quality wood adhesive)
- 2.5″ pocket hole screws
- 2″ pocket hole screws
- 1.25″ pocket hole screws
- 2″ Spax screws
- 1.25″ nails (for drawer assembly)
- 3/4″ staples or nails (for drawer base and back panel)
- 1.25″ brad nails (for trim and top panel)
- Drawer slides (appropriate length for your drawer depth)
- Drawer pull/handle (style of your choice)
- Finish:
- Wood stain (e.g., Briarsmoke)
- Wood sealer/topcoat (polyurethane or similar for durability)
- Sandpaper (various grits from 120 to 220)
- Clean rags for staining
Essential Tools for the Project
Having the right tools makes all the difference in a woodworking project. Here’s what you’ll need:
- Miter saw or Circular saw (for cutting boards to length)
- Table saw (essential for ripping 2x4s and plywood accurately)
- Pocket hole jig (e.g., Kreg Jig)
- Drill/driver (cordless is highly recommended)
- Tape measure
- Pencil
- Clamps (bar clamps, C-clamps, or specialized pocket hole clamps)
- Safety glasses and hearing protection
- Sander (orbital or block sander)
- Brad nailer and air compressor (or hammer and finish nails)
- Stapler (manual or pneumatic, for 1/4″ plywood)
- Wood chisels (optional, for minor adjustments)
- Square (speed square or framing square)
Step-by-Step Construction Guide
Let’s begin building your beautiful modern farmhouse nightstand. Remember to always double-check your measurements and ensure your cuts are precise for the best results.
1. Building the Back Face Frame
The foundation of your nightstand begins with the back face frame. This will provide structural integrity and establish the overall dimensions. Start by taking your 2×4 boards and carefully ripping them down to 3 inches wide each using a table saw. Precision here is key for a professional finish.
On the horizontal boards, create 1.5-inch pocket holes. These strategic holes will allow for strong, hidden joinery. Apply a generous amount of wood glue to the ends of the horizontal boards where they will meet the vertical boards. Then, attach them securely using 2.5-inch pocket hole screws. Ensure the frame is square before the glue sets.
2. Constructing the Front Face Frame
Next, you’ll build the front face frame, which is very similar to the back, but with an important addition. This frame will also define the opening for your drawer. Again, rip 2×4 boards to 3 inches wide. Create 1.5-inch pocket holes on the horizontal boards. Apply wood glue and attach them to the vertical boards using 2.5-inch pocket hole screws.
The crucial difference here is the integration of a 2×2 board. This 2×2 board will create the bottom edge of the drawer opening. Measure carefully according to your plans, and attach this 2×2 board within the frame using pocket holes and screws, ensuring it’s perfectly level and square to form the drawer’s face frame. This step is vital for the smooth operation of your drawer later on.
3. Preparing the Side Panels
Now it’s time to prepare the side panels of the nightstand. These will be crafted from 3/4-inch hardwood plywood, providing sturdy and durable sides for your furniture piece. Cut your plywood to the exact dimensions specified in your plans.
Next, add 3/4-inch pocket holes to both sides of each plywood piece. Pay close attention to the placement of these pocket holes – they should be strategically located so that they will be hidden or covered during a later assembly step, ensuring a clean finished look. Additionally, attach a 2×2 board to each side panel using wood glue and 2-inch Spax screws. These 2×2 boards will act as crucial supports and attachment points.
4. Attaching the Side Panels to the Back Frame
With the side panels ready, it’s time to bring the first major components together. Carefully position each side panel against the back face frame. Apply wood glue along the edges where they will meet. Then, using the pre-drilled pocket holes on both sides of each panel, secure them to the face frame with 2-inch pocket hole screws.
It is crucial to ensure that the top edges of the side panels are perfectly flush with the top edge of the back face frame. Use clamps to hold the pieces tightly together while driving in the screws, and always check for squareness after each attachment to maintain the overall integrity of the nightstand structure.
5. Installing the Nightstand Base
The base of your nightstand, also made from 3/4-inch hardwood plywood, provides a sturdy bottom and contributes to the overall stability. Cut this piece to the precise dimensions outlined in your plans.
Along all edges of the bottom side of this board, add 3/4-inch pocket holes. These holes should face downwards, meaning the screws will be driven up into the sides and face frame. Apply wood glue to the contact points. Attach the base to the sides and face frame using 2-inch pocket hole screws into the face frame and 1.25-inch pocket hole screws into the sides. It is essential that this board lines up perfectly flush with the bottom edges of the side panels and the back face frame, creating a neat and level foundation.
6. Securing the Front Face Frame
Now, bring the front face frame into position. This frame, which includes the drawer opening, will be attached similarly to how you connected the back face frame. Apply wood glue along the contact edges of the front face frame where it meets the side panels and the newly installed base.
Utilize pocket hole screws (2-inch into the sides, 1.25-inch into the base) through the pre-drilled holes in the face frame to securely fasten it. Ensure proper alignment and squareness before the glue dries. This step completes the main structural box of your nightstand, revealing the opening for the drawer.
7. Building the Drawer Box
A functional drawer is key to any nightstand. This drawer will be constructed from 1/2-inch hardwood plywood for the sides and a 1/4-inch hardwood plywood for the base. Begin by ripping your 1/2-inch plywood to create the four sides of your drawer box (two long, two short).
Apply wood glue to the joining edges and attach each side to each other using 1.25-inch nails. A brad nailer makes this quick and easy. Once the box is assembled, measure and cut your 1/4-inch hardwood plywood for the drawer base. Apply wood glue along the bottom inside edges of the assembled drawer box, then attach the base using 3/4-inch staples or small nails. This creates a strong and durable drawer box.
8. Installing Drawer Slides and Drawer Face
Installing drawer slides can sometimes feel intimidating, but with careful measurement and patience, it’s straightforward. Attach the cabinet-side portion of your drawer slides to the inside of your nightstand, ensuring they are level and parallel. Then, attach the drawer-side portion of the slides to your newly built drawer box. Test the drawer for smooth operation, making any necessary adjustments.
Once the drawer slides smoothly, it’s time to attach the drawer face. This piece, typically cut from 3/4-inch hardwood plywood, provides the aesthetic front of your drawer. Align the drawer face evenly with the nightstand’s opening, ensuring even gaps around all sides for a professional look. Secure it by applying wood glue to the front of the drawer box and then driving nails through the inside of the drawer box into the back of the drawer face. This method conceals the fasteners for a clean exterior. For more in-depth guidance on drawer slide installation, you can refer to this detailed post.
9. Attaching the Side Trim Pieces
Adding trim pieces elevates the look of your nightstand, providing a finished and refined appearance. Cut your trim pieces to fit along the sides of the nightstand, top and bottom, as per your plans. Apply wood glue to the back of each trim piece, then carefully position them. Secure the trim using 1.25-inch brad nails driven through the trim and into the top and bottom edges of both sides of the nightstand. The brad nails should be nearly invisible, especially after finishing.
10. Installing the Nightstand Top
The top of the nightstand is a key visual element. For this project, a laminated pine project panel was used. These panels are readily available at most hardware stores in various sizes, often found alongside dimensional pine lumber. Select a panel (e.g., 24″ x 36″) and cut it to the exact dimensions required for your nightstand using a table saw for clean, straight cuts. Ensure the top has a slight overhang on all sides for a classic look.
Once cut, apply wood glue generously to the top edges of the nightstand frame. Carefully place the laminated pine panel on top, ensuring it’s perfectly centered with an even overhang on all sides. Secure the panel by driving 1.25-inch brad nails through the panel and into the base of the nightstand frame below. These nails will hold the top securely while the glue dries, providing a strong and seamless bond.
11. Attaching the Back Panel
The final structural step for building the nightstand is attaching the back panel. This piece is made from 1/4-inch hardwood plywood, which helps to square up the entire unit and prevents dust from collecting inside. Cut the plywood to precisely fit the back opening of your nightstand.
Apply wood glue along the edges of the back frame where the plywood will attach. Carefully position the 1/4-inch plywood panel. Secure it firmly to the back of the nightstand using 3/4-inch staples or small nails. Drive the fasteners every few inches around the perimeter for a tight and secure fit. This completes the physical assembly of your nightstand.
Finishing Touches: Staining and Hardware
With the nightstand fully assembled, it’s time for the aesthetic transformation. Begin by thoroughly sanding the entire piece, starting with a medium-grit sandpaper (e.g., 120 or 150) to smooth out any imperfections, then moving to a finer grit (e.g., 220) for a silky-smooth finish. Wipe away all dust with a tack cloth before staining.
For this nightstand, a beautiful Briarsmoke finish was used, which perfectly complements the modern farmhouse style. Apply the stain according to the manufacturer’s instructions, usually wiping it on with a rag and then wiping off the excess. Allow proper drying time between coats and before applying a topcoat.
Once the stain is dry, apply several coats of a durable clear topcoat, such as polyurethane, to protect the wood and enhance its beauty. Lightly sand between coats with a very fine-grit sandpaper (e.g., 320) for the smoothest finish, ensuring you remove all sanding dust before the next coat.
Finally, attach your chosen drawer pull. This inexpensive yet stylish drawer pull adds the perfect touch of character. The drawer slides used for this project can be found here (Note: this link appears to be for a miter gauge, please ensure you use appropriate drawer slides for your project).
Share Your Creation!
Building your own furniture is an incredibly rewarding experience. We encourage you to share your finished modern farmhouse nightstand with us on social media! Use the hashtag #shanty2chic so we can admire your craftsmanship and potentially feature your beautiful project!
Happy Building!