
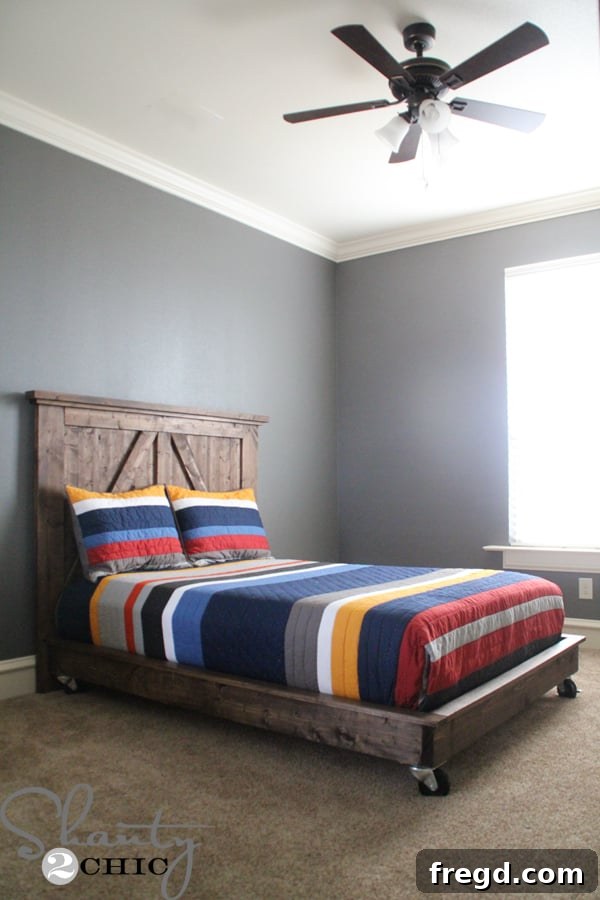
Build Your Own DIY Platform Bed on Wheels: A Beginner-Friendly Woodworking Project
Embarking on a new chapter in a new home often means starting fresh, especially when it comes to furniture. Rather than painstakingly moving, storing, and then eventually replacing old pieces, many homeowners seize the opportunity to fill their new space with custom-built furniture. This personal approach not only saves on moving costs and storage hassles but also allows for the creation of unique, tailor-made items that perfectly suit the new environment and personal style. It’s an exciting journey of transformation, turning an empty house into a warm, inviting home one handcrafted piece at a time.
Among the many essential furniture items, a comfortable and stylish bed is paramount. For those looking to dive into woodworking, this DIY platform bed on wheels presents an ideal starting point. Designed with beginners in mind, this project promises an achievable build that can be completed and finished in a single afternoon, leaving you with a functional and aesthetically pleasing piece for your home. Follow along as we detail the steps inspired by excellent resources like shanty-2-chic.com and Ana White, transforming simple lumber into a standout bed frame.
Why Choose a DIY Platform Bed on Wheels?
The decision to build a platform bed with the added feature of wheels offers a myriad of advantages, making it a popular choice for modern homes and dynamic lifestyles. Firstly, platform beds eliminate the need for a bulky box spring, offering a sleek, minimalist aesthetic that complements contemporary interior designs. This simplified structure often translates to lower material costs and a less complex build process, perfect for novice woodworkers.
Adding casters, or wheels, takes the functionality of a platform bed to a new level. The mobility they provide is invaluable for several reasons: effortless room rearrangement, simplified cleaning under and around the bed, and the flexibility to transform a bedroom into a multi-functional space. For children’s rooms, like the one our oldest son received, the wheels add a playful, industrial touch while maintaining practical benefits. Moreover, incorporating locking casters ensures that the bed remains stable and secure when desired, preventing unwanted movement.
This project is particularly rewarding because it allows for significant customization. From the choice of wood species and stain color to the style of casters, every element can be tailored to match your personal taste and existing decor. The ability to create a piece that perfectly fits your space and needs, all while gaining valuable woodworking skills, is what makes DIY furniture so appealing.
Getting Started: Essential Planning for Your Bed Build
Before any sawdust starts to fly, careful planning is crucial for a smooth and successful DIY project. This platform bed build, while beginner-friendly, still benefits from a methodical approach, ensuring you have all the necessary materials and tools on hand, along with a clear understanding of the steps involved. Proper preparation not only saves time but also minimizes frustration and potential errors.
Gathering Your Materials
For this full-sized platform bed with an industrial twist, you will primarily need lumber. Common choices include pine or spruce for their affordability and ease of working. You’ll also require specific hardware:
- Lumber: Various dimensions for the frame, cleats, and trim.
- Wood Screws: Specifically 2 1/2″ pocket hole screws and general wood screws for cleats.
- Wood Glue: For reinforced joints and attaching trim and caster blocks.
- Brad Nails: 1 1/4″ for securing trim.
- Casters: Four locking casters (choose a style that complements your desired aesthetic).
- Hex Screws: To attach the casters securely.
- Stain or Paint: Such as Rust-Oleum Dark Walnut stain, along with application tools (foam roller, clean cloths).
- Sanding Supplies: Sandpaper of various grits (e.g., 120, 220).
Essential Tools for the Job
This project introduces you to some fundamental woodworking tools that will become staples in your DIY arsenal:
- Miter Saw or Circular Saw: For precise cuts of your lumber.
- Kreg Jig K5 (or similar pocket hole jig): Indispensable for creating strong, concealed joints.
- Drill/Driver: For pre-drilling holes and driving screws.
- Kreg Right Angle Clamp: Extremely helpful for holding boards square during assembly.
- Brad Nailer (e.g., Ryobi Airstrike Nailer): For quick and efficient trim attachment.
- Hex Bit: Specifically for driving hex screws to attach casters.
- Tape Measure, Pencil, Safety Glasses, Ear Protection: Always prioritize safety!
It’s important to familiarize yourself with the operation of each tool before starting. Always wear appropriate safety gear, including eye protection, and ensure good ventilation when working with stains or paints.
Before making any cuts, thoroughly review the detailed plans. We highly recommend consulting the original full platform bed plans from Ana White HERE and the headboard plans HERE for comprehensive measurements and diagrams. These resources provide the backbone for this modification, ensuring a solid and functional bed.
The Foundation: Building the Bed Frame with Precision
The bed frame is the skeletal structure of your project, and building it correctly is essential for stability and longevity. This step involves accurate cutting, precise joinery using a Kreg Jig, and careful assembly.
Precision Cutting and Pocket Hole Joinery
Begin by cutting all your lumber to the specified dimensions according to the plans. Accuracy here is key, as misaligned cuts can lead to a wobbly frame. Once your pieces are cut, it’s time to introduce the magic of the Kreg Jig K5. This tool is a beginner’s best friend, allowing you to create strong, concealed pocket holes quickly and easily. Pocket holes involve drilling a discreet angled hole into one piece of wood, through which a screw is driven into an adjoining piece, forming a robust joint without visible fasteners on the exterior.
Following the instructions for your Kreg Jig, drill the necessary pocket holes into the designated pieces of your bed frame. Pay attention to the settings on your jig to match the thickness of your material, ensuring the screws will achieve maximum grip without blowing out the other side.
These strategically placed pocket holes are the secret to a professional-looking and incredibly sturdy bed frame. They allow you to join boards at perfect right angles, creating a rigid structure that will withstand daily use.
Assembling the Frame and Adding Support Cleats
With your pocket holes drilled, it’s time for assembly. Apply a thin, even layer of wood glue to the ends of the boards that will be joined. Wood glue significantly strengthens the joint, making it more resistant to racking and movement over time. Then, bring the pieces together. The Kreg Right Angle Clamp is invaluable here, holding the boards perfectly square while you drive in the 2 1/2″ pocket hole screws.
Repeat this process for all corners, ensuring each joint is flush and square. Take your time to measure diagonals to confirm the frame is perfectly rectangular before the glue sets. A square frame is critical for the stability of the entire bed.
Once the main frame is assembled and the glue has had some time to cure, the next step is to attach the 2×2 cleats. These cleats will provide the essential support for the mattress slats. Position them evenly along the inside perimeter of the bed frame, at a height that allows the mattress to sit flush with or slightly recessed into the frame. Secure each cleat using 2 1/2″ wood screws and a generous amount of wood glue. The combination of screws and glue creates a robust connection that will reliably hold the weight of the mattress and its occupants.
Adding Aesthetic Appeal: Trim and Finishing Touches
With the structural integrity of the bed frame established, it’s time to enhance its visual appeal and prepare it for its final finish. This involves adding decorative trim and applying a protective and beautiful stain.
Applying Decorative Trim
Adding trim pieces to the bed frame elevates its design, giving it a more finished and polished look. The trim can hide any exposed raw edges of the plywood or lumber, contributing to a cleaner aesthetic. For this project, a simple trim provides a subtle yet significant detail. Apply wood glue along the edges where the trim will be placed, then secure it using a brad nailer with 1 1/4″ brad nails. The nailer makes this step quick and efficient, leaving minimal holes that can be easily filled later.
Once all the trim is attached, take a moment to inspect your work. Fill any visible nail holes with wood putty and allow it to dry. The entire frame should then be thoroughly sanded, starting with a coarser grit (e.g., 120-grit) to smooth out any imperfections, and finishing with a finer grit (e.g., 220-grit) for a silky smooth surface. This step is crucial for achieving a professional finish, as it allows the stain or paint to absorb evenly and without blotches.
Staining for a Rich, Rustic Look
The choice of finish can dramatically alter the perception of your DIY project. For this bed, a single coat of Rust-Oleum Dark Walnut stain was applied, providing a deep, rich, and rustic character that complements the industrial feel of the casters. Staining is a straightforward process, even for beginners, but requires attention to detail for the best results.
To apply the stain, use a foam roller for broad, even coverage on flat surfaces. For corners and edges, a brush can be more effective. Apply a thin, consistent coat across the entire bed frame. After approximately 5 minutes, use a clean, lint-free cloth to gently wipe and blend the stain. The goal isn’t to remove the stain entirely but to ensure an even distribution and prevent any pooling or uneven absorption. This blending technique helps achieve a consistent color and enhances the wood grain.
Always work in a well-ventilated area when staining, and wear gloves to protect your hands. Allow the stain to dry completely according to the manufacturer’s instructions, which typically takes several hours. For added durability and protection, you might consider applying a clear topcoat like polyurethane or a water-based sealant once the stain is fully cured. This extra layer will guard against scratches, spills, and general wear and tear, ensuring your bed remains beautiful for years to come.
The Mobile Upgrade: Installing Functional Casters
The distinctive feature of this platform bed is its mobility, achieved through the addition of locking casters. This step involves creating secure mounting points for the wheels and then attaching them firmly to the bed frame.
Preparing and Attaching Caster Blocks
To ensure the casters are mounted securely and can bear the weight of the bed, mattress, and occupant, you’ll need to create sturdy mounting blocks. Scrap 2×4 lumber is perfect for this purpose. Cut eight pieces of 2×4 to 3.5″ lengths. These blocks will be stacked and attached to the inside corners of the bed frame, providing ample depth for the caster screws.
Apply a generous amount of wood glue to the center of one side of each 2×4 block. Then, attach the first block at each corner of the bed frame, on the inside. Position it flush with the bottom edge of the frame. Secure it firmly with 2 1/2″ wood screws, ensuring the screws pass through the bed frame and into the block, creating a strong connection.
Once the first set of blocks is in place, repeat the process by adding a second 2×4 block on top of each of the first blocks. Apply wood glue between the two blocks and then secure the second block to the first using more 2 1/2″ wood screws. This stacked arrangement provides significant material thickness for mounting the casters, distributing the weight effectively and preventing screw pull-out.
Mounting the Casters
With the caster blocks firmly in place, it’s time to attach the casters. Flip the bed frame upside down to easily access the blocks. Position each caster centrally on its corresponding stacked block. For optimal stability and to utilize the full depth of the blocks, use sturdy hex screws to attach the casters.
A hex bit attached to your drill/driver will make driving these screws much easier and more secure. Ensure each caster is oriented correctly (if directional) and screwed in tightly to prevent any wobbling or detachment.
The chosen casters for this project are locking casters. This feature is a game-changer, allowing you to lock the wheels in place when you want the bed to remain stationary. This is particularly useful in children’s rooms or on slick flooring, providing an extra layer of safety and stability. Once all casters are attached, carefully flip the bed back over.
Finally, as per the original plans, install the 1×3 slats across the cleats. These slats provide essential, breathable support for your mattress, distributing its weight evenly and promoting airflow, which helps prolong the life of your mattress. Space them according to the plans, usually a few inches apart, and optionally secure them with small screws or brad nails to prevent shifting.
The Final Reveal: A Stylish and Functional Platform Bed
And just like that, your DIY platform bed on wheels is complete! The transformation from raw lumber to a finished piece of furniture is incredibly rewarding, especially when the final product is as practical and stylish as this one.
The industrial aesthetic imparted by the casters, combined with the rich Dark Walnut stain, gives this bed a modern yet timeless appeal. It’s not just a bed; it’s a statement piece, meticulously crafted and customized to fit your home. This particular bed, destined for our oldest son’s room, combines rugged charm with practical functionality, demonstrating that DIY doesn’t mean sacrificing style.
Beyond the bed frame itself, consider the complementary elements that complete the room. The headboard, for instance, adds another layer of character. This specific headboard is also a DIY project, and a tutorial for it will be shared very soon, offering another opportunity to expand your woodworking skills. For bedding, the MVP Stripe Quilt from Pottery Barn Teen was chosen, perfectly complementing the bed’s aesthetic. The wall color also plays a significant role in setting the room’s mood; details on the paint color used in this room can be found HERE.
Completing this project marks a significant milestone in furnishing a new home from scratch. Each piece built adds a story, a personal touch, and a sense of accomplishment that store-bought furniture simply can’t replicate. With one bed down, it’s on to the next child’s room, eager to continue filling our home with handcrafted creations!
Beyond the Bed: Expanding Your DIY Journey
Building this DIY platform bed on wheels is often just the beginning of a rewarding woodworking adventure. The skills learned and the confidence gained from completing one project naturally lead to an eagerness to tackle more. Furnishing an entire home with custom pieces is a fulfilling endeavor, allowing for truly unique and personalized spaces.
If you’ve enjoyed building this bed and are looking for more projects to enrich your home, you’re in good company. Many enthusiasts find joy in creating functional and beautiful items that reflect their personal style. Have you been following the various pieces we’ve built for our home so far? Each project, whether large or small, contributes to the overall character and comfort of the space.
For instance, a Kitchen Table can transform the heart of your home, offering a sturdy and inviting gathering spot for meals and memories. Imagine the satisfaction of knowing your family dines at a table you crafted with your own hands. The process of building such a table, often for a fraction of the cost of retail versions, also offers further opportunities to refine your joinery and finishing skills.
Another fantastic project, perhaps for adding a touch of industrial chic to your kitchen or living area, is an Industrial Display Rack. These pieces not only provide practical storage but also serve as stylish focal points, showcasing your personal style and craftsmanship. Such projects often involve working with different materials, like metal pipes, broadening your DIY expertise and tool knowledge.
To follow our entire home-building and furnishing journey, and to gather more inspiration for your next DIY endeavor, you can click HERE to see our home building process from start to finish. Each project presented is an opportunity to learn, create, and personalize your living space. What will you build next?
Conclusion: The Joy of Handcrafted Home Furnishings
There’s an undeniable satisfaction that comes from transforming raw materials into functional and beautiful pieces for your home. This DIY platform bed on wheels is more than just a place to sleep; it’s a testament to creativity, resourcefulness, and the joy of hands-on work. It proves that even beginners can achieve impressive results with a clear plan, the right tools, and a little patience.
We hope this detailed guide has inspired you to pick up your tools and embark on your own woodworking adventure. Whether it’s a bed, a table, or a decorative rack, each DIY project adds character and a unique story to your living space. Thank you so much for stopping by and joining us on this journey of creating a home, one build at a time!
~Ashley 🙂