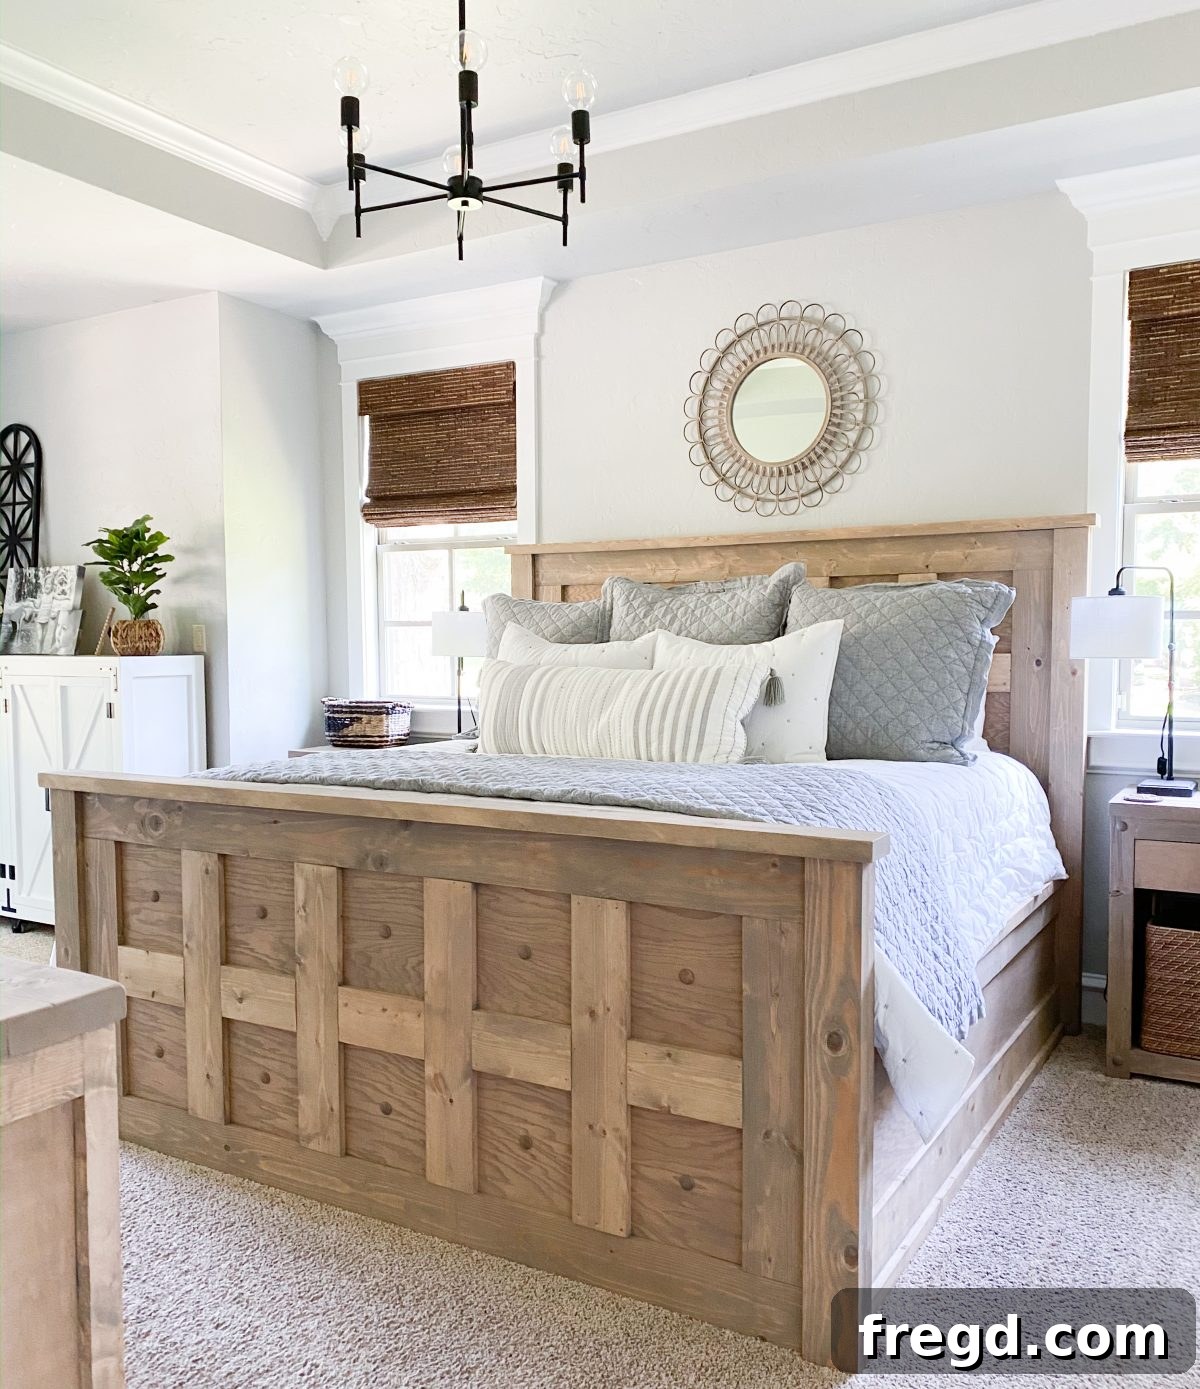
Build Your Dream King Panel Bed: A Comprehensive DIY Guide
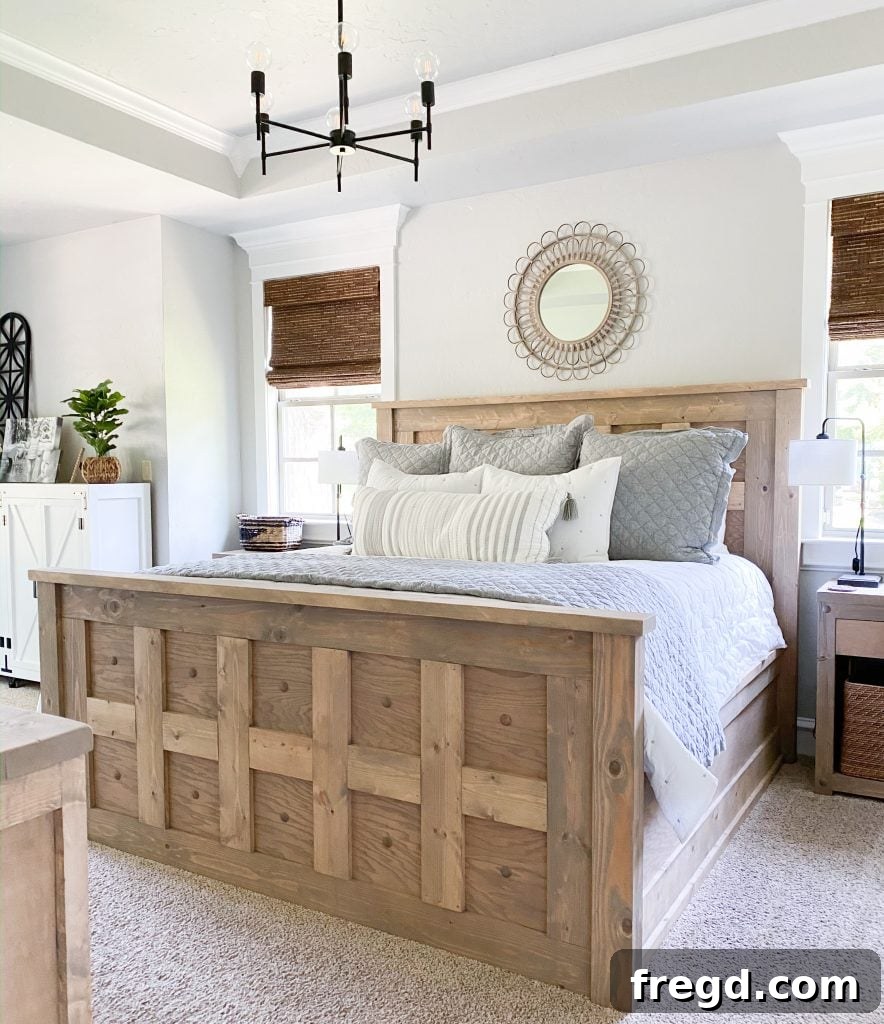
Are you ready to transform your bedroom with a magnificent, custom-built king panel bed that exudes elegance and saves you a significant amount of money? This DIY King Panel Bed project is not just a piece of furniture; it’s a statement of craftsmanship and personal style. While it may appear to be a formidable undertaking due to its size, the construction process is remarkably straightforward, making it an achievable goal for enthusiastic DIYers. From selecting your lumber to applying a unique custom finish, this guide will walk you through every step.
Building your own king-size bed offers unparalleled advantages, especially when compared to the cost and often generic designs of retail alternatives. With this project, you’re not just constructing a bed; you’re creating a focal point for your bedroom that is both durable and perfectly tailored to your taste. We’ll dive into the detailed instructions, a clever custom finish, and links to all the essential tools and resources you’ll need. Prepare to be amazed by what you can accomplish!
Why Choose to Build Your Own King Panel Bed?
The allure of a DIY king panel bed extends far beyond the satisfaction of a job well done. It’s a strategic choice for homeowners looking for quality, customization, and significant savings. When considering store-bought king beds, prices can easily soar into the thousands, often for designs that don’t quite capture your vision or offer the robust construction you desire. This DIY alternative provides a solution that is both budget-friendly and superior in quality.
For a project of this scale, the lumber costs for this entire king panel bed came in under $350. This is an incredible saving when you compare it to the price tags of comparable king-size beds on the market. By investing your time and effort, you gain not only a stunning piece of furniture but also the knowledge that it was built to last, often with better materials than what’s found in mass-produced items. Furthermore, the ability to choose your exact finish, from the wood stain to the overall aesthetic, ensures your new bed integrates seamlessly with your existing bedroom decor, creating a cohesive and personalized sanctuary.
Watch the Build: Your Visual Guide to Crafting This King Bed
Before we delve into the step-by-step written instructions, seeing the construction process in action can provide invaluable insights and boost your confidence. Below, you’ll find a detailed video that visually demonstrates how I built this magnificent king panel bed. This visual guide complements the written plans, offering clarity on techniques, measurements, and general workflow, ensuring you’re well-prepared for each stage of your project.
Essential Tools and Materials for Your King Panel Bed
Before you begin any woodworking project, having the right tools and materials is paramount to success. While the full list can be found in the printable plans, here’s a quick overview of some key items you’ll need for this DIY king panel bed:
- Table Saw: Absolutely essential for accurately ripping down larger boards.
- Miter Saw (or Circular Saw with a guide): For precise crosscuts.
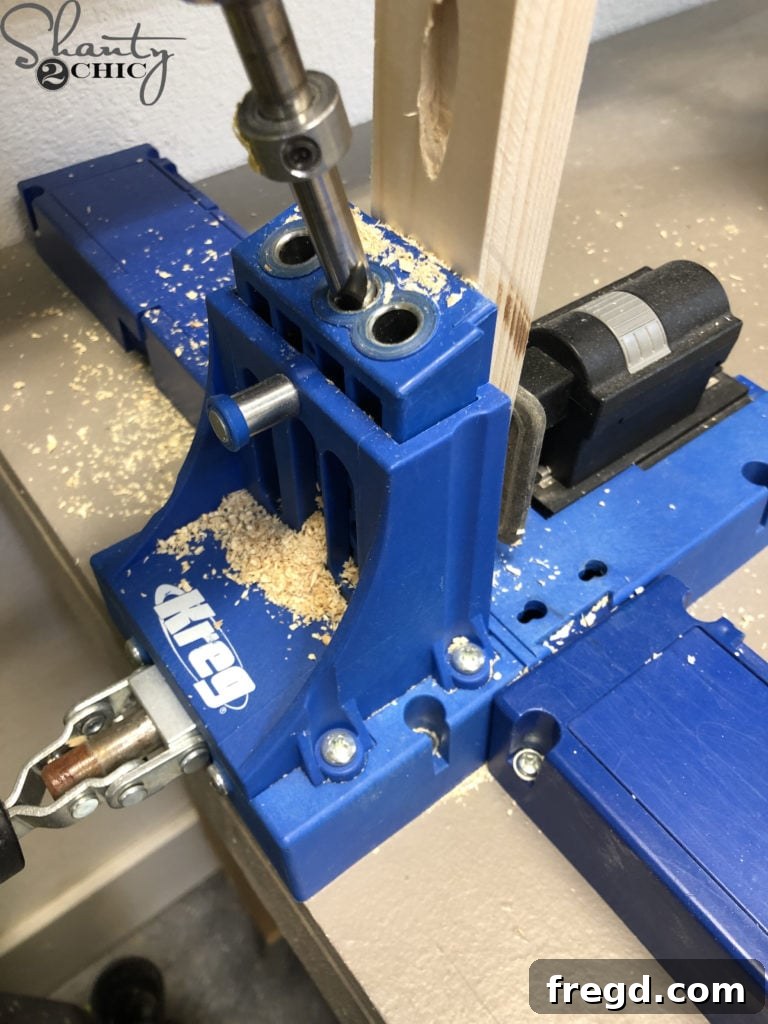
- Kreg Jig (K5 recommended): For creating strong pocket hole joints.
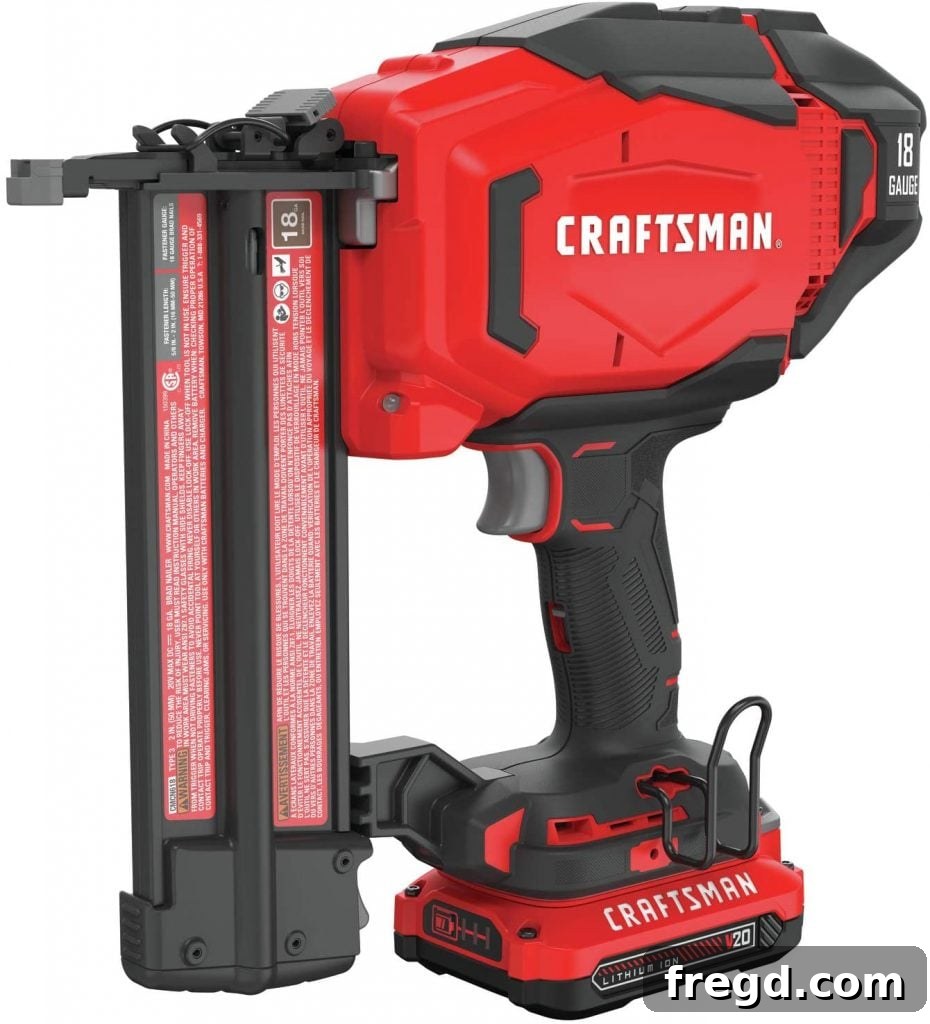
- Brad Nailer (18g): For attaching trim pieces cleanly and efficiently.
- Forstner Bit: For creating clean, flat-bottomed holes for decorative elements.
- Wood Glue: For permanent, strong joints where indicated.
- Wood Screws & Pocket Hole Screws: Various sizes as specified in the plans.
- Brad Nails (1.25”): For trim work.
- Lumber: Primarily 2x6s, 1x6s, 2x4s, and 3/4” hardwood plywood.
- Clamps: Essential for holding glued pieces securely while drying.
- Safety Gear: Eye protection, hearing protection, and gloves are a must.
Step-by-Step Construction Guide for Your King Panel Bed
This detailed guide will take you through each stage of building your DIY king panel bed. Remember to always refer to the free printable plans for precise measurements and cutting lists, which are crucial for a successful build.
1. Building the Foundation: Headboard and Footboard Legs
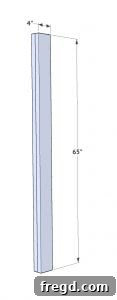
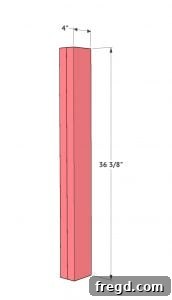
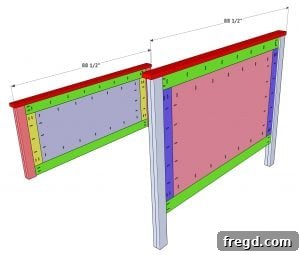
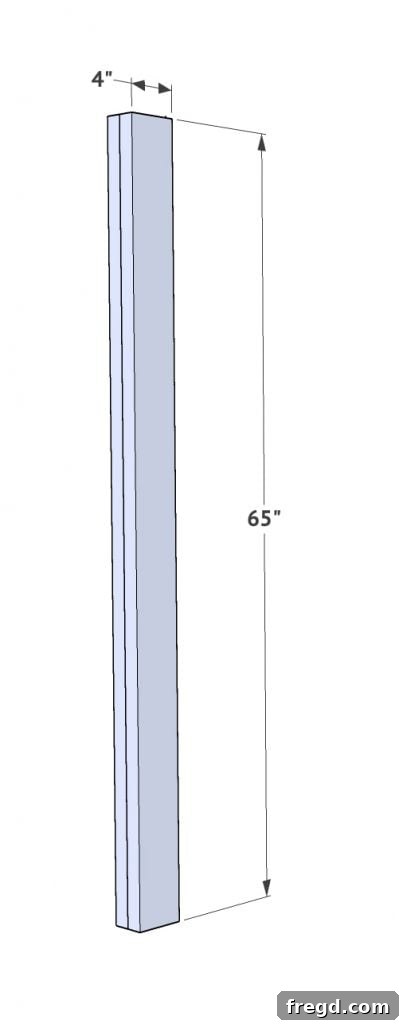
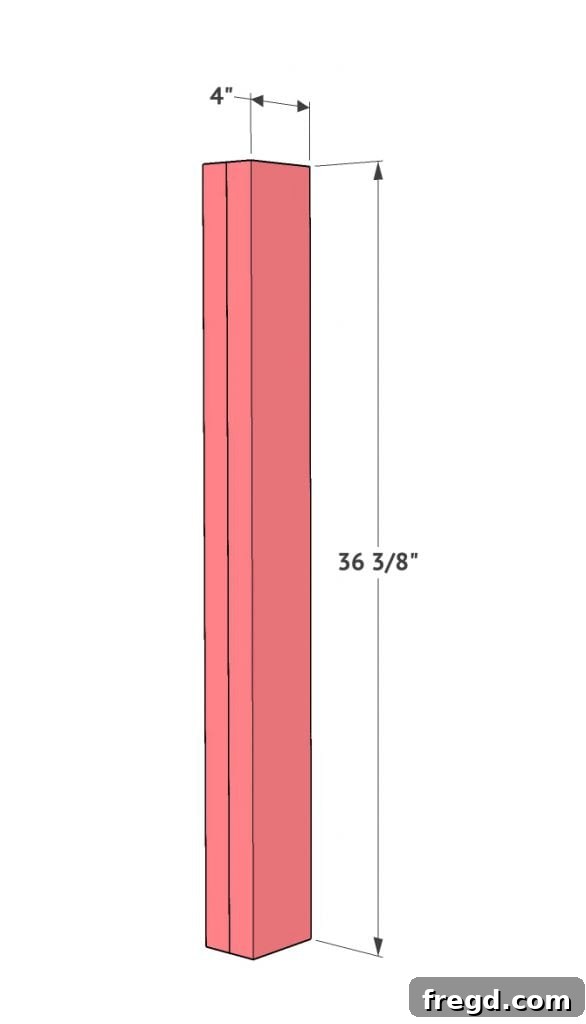
The first crucial step involves constructing the sturdy legs for both your headboard and footboard. These foundational pieces will support the entire bed structure. Start with 2×6 boards, which will be ripped down to a precise 4 inches wide using a table saw. The table saw is indispensable here for achieving perfectly straight and consistent cuts, which are vital for stability and a professional finish. You will need to create two headboard legs and two footboard legs, each constructed from two of these ripped 2x6s.
To assemble each leg, apply a generous amount of wood glue between the two ripped boards. Align them perfectly and clamp them together very tightly. Adequate clamping pressure ensures maximum surface contact and a strong bond. Allow the glue to dry completely according to the manufacturer’s instructions. While the leg assemblies are drying, you can begin preparing other components of the bed to optimize your building time.
2. Constructing the Headboard Panel and Frame
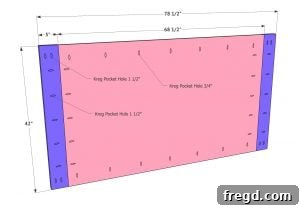
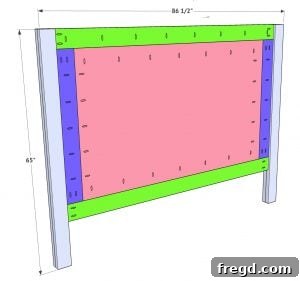
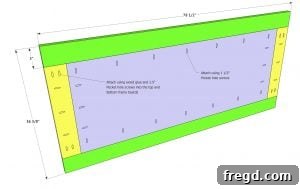
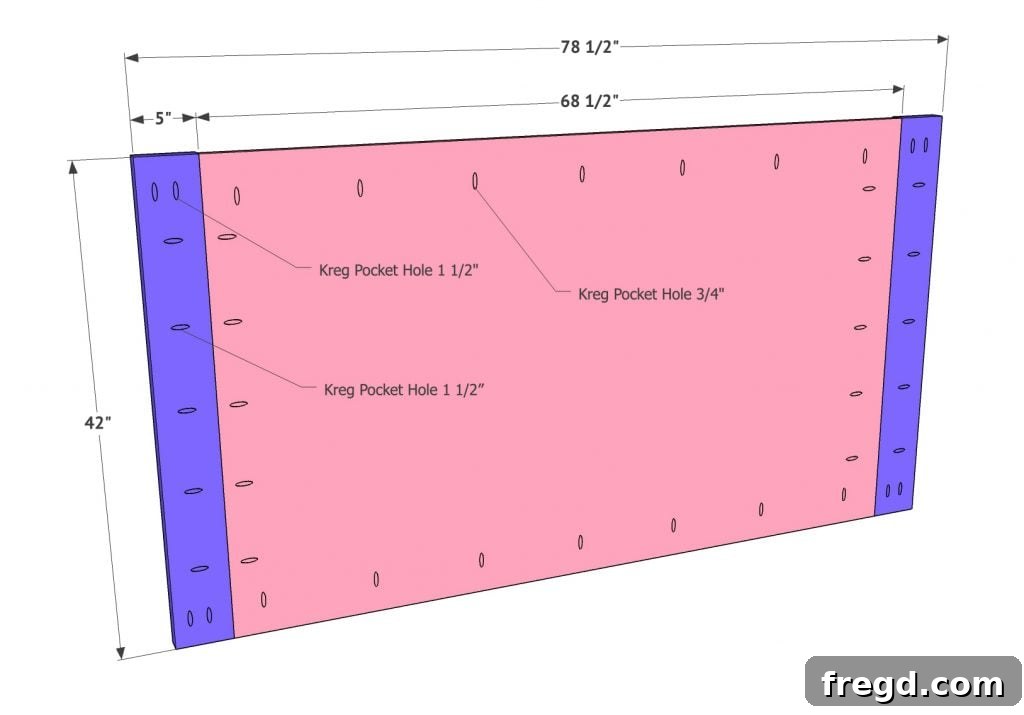
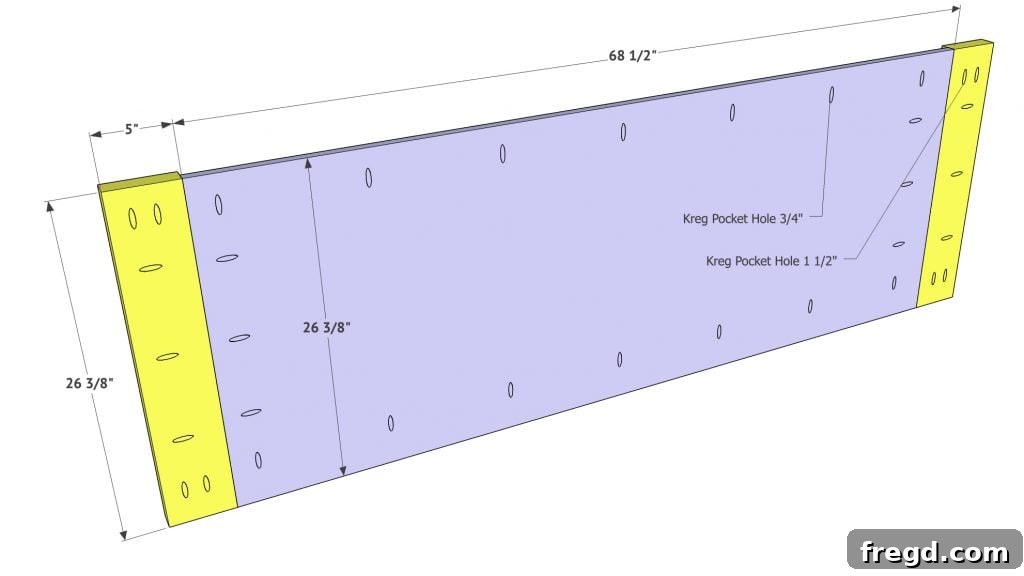
Next, focus on the headboard’s central plywood panel. Begin by drilling 3/4-inch pocket holes around all four sides of this panel. These pocket holes are strategically placed to face the back of the headboard, ensuring they will be hidden from view in the final assembly. For the vertical headboard frame pieces, drill 1.5-inch pocket holes down one side of each board. These will be used to attach the frame to the plywood panel.
Now, carefully attach the plywood panel to its frame boards. Apply wood glue to the edges of the frame where it meets the plywood. Secure the connection using 1.5-inch pocket hole screws through the pocket holes you just drilled. It’s critical to ensure that the tops and bottoms of the frame boards are perfectly flush with the top and bottom edges of the plywood. Similarly, the backs of the frame boards should be flush with the back of the plywood, creating a seamless and sturdy panel.
3. Securing Horizontal Frame Boards
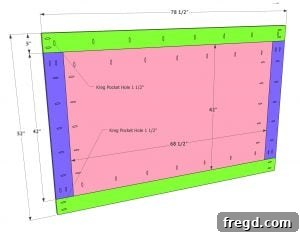
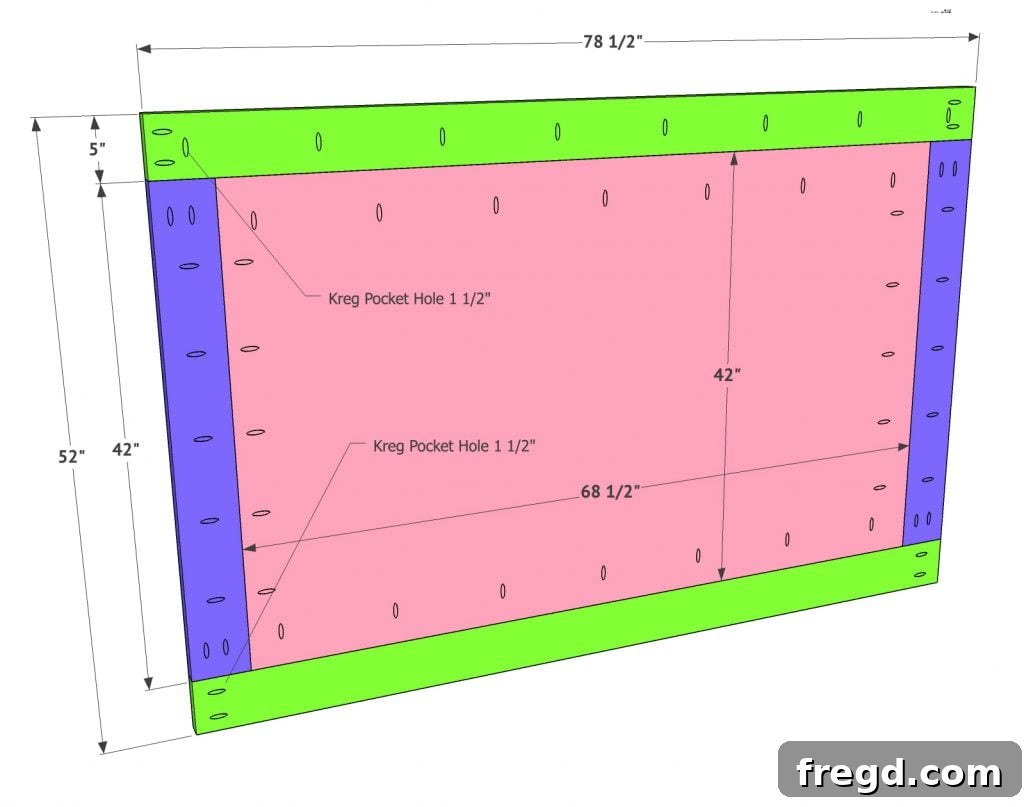
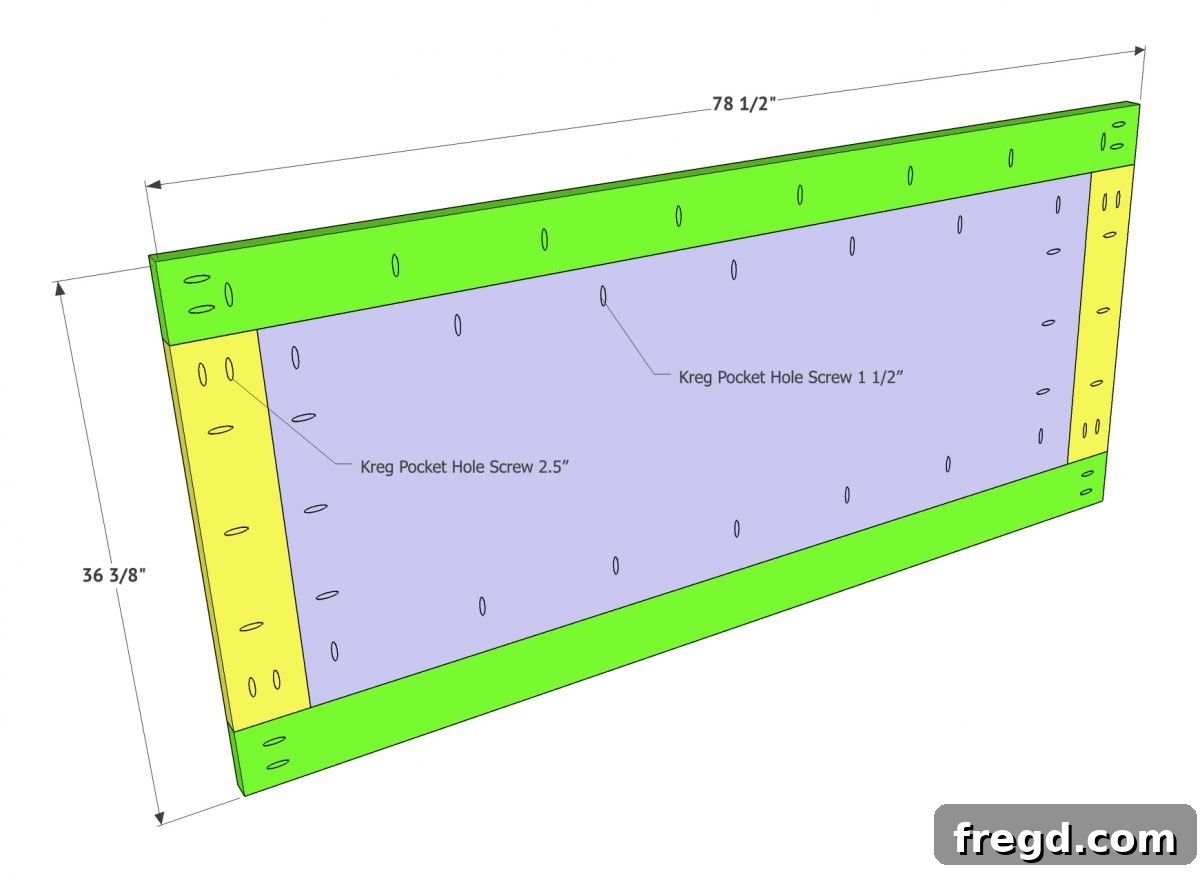
With the vertical components in place, it’s time to add the horizontal frame boards to further strengthen the headboard structure. Drill 1.5-inch pocket holes along the top horizontal frame board. Additionally, drill 1.5-inch pocket holes into the ends of both the top and bottom horizontal frame boards. These pocket holes facilitate a robust connection from multiple directions.
Attach these horizontal boards to the plywood using 1.5-inch pocket hole screws, driving them through the plywood and into the frame boards. For extra strength and stability, also use 2.5-inch pocket hole screws. Drive these screws through the vertical frame boards and into the ends of the top and bottom horizontal frame boards. This dual-screw approach creates an incredibly strong and durable headboard frame capable of withstanding years of use.
4. Adding Decorative Trim to the Headboard
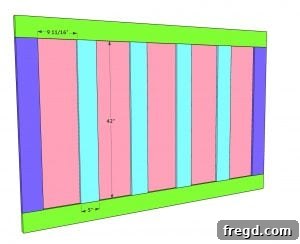
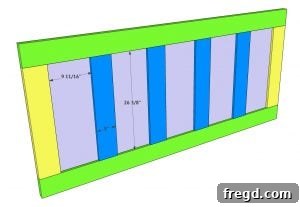
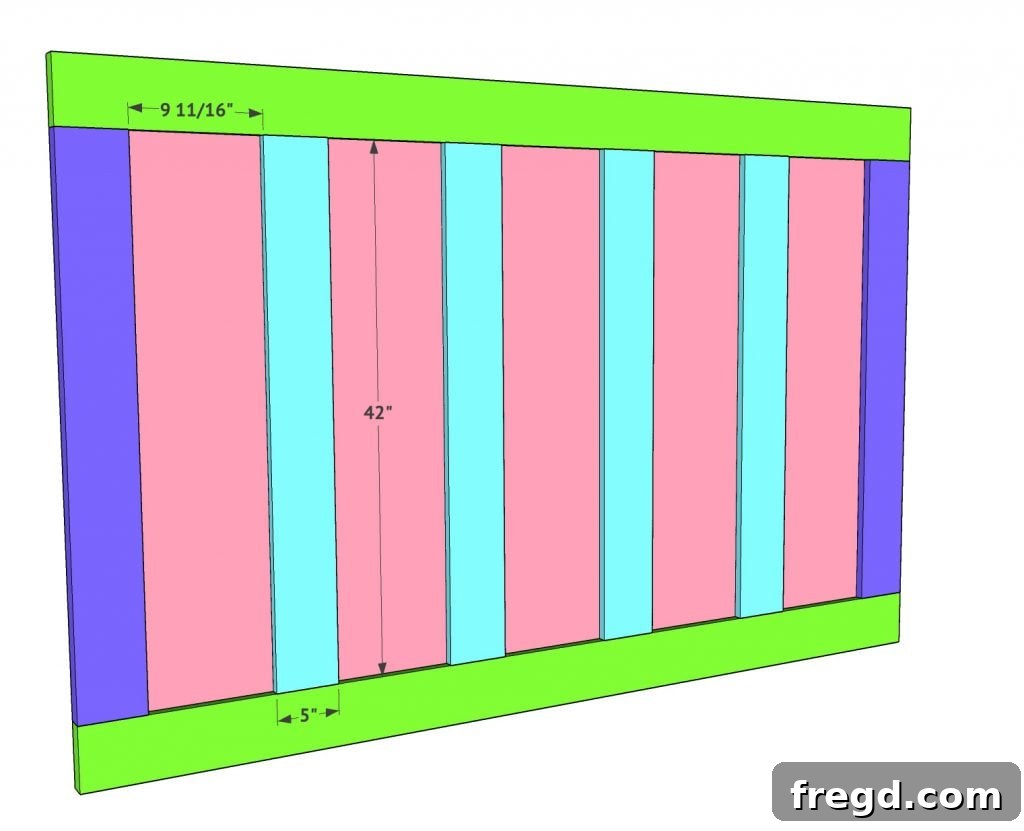
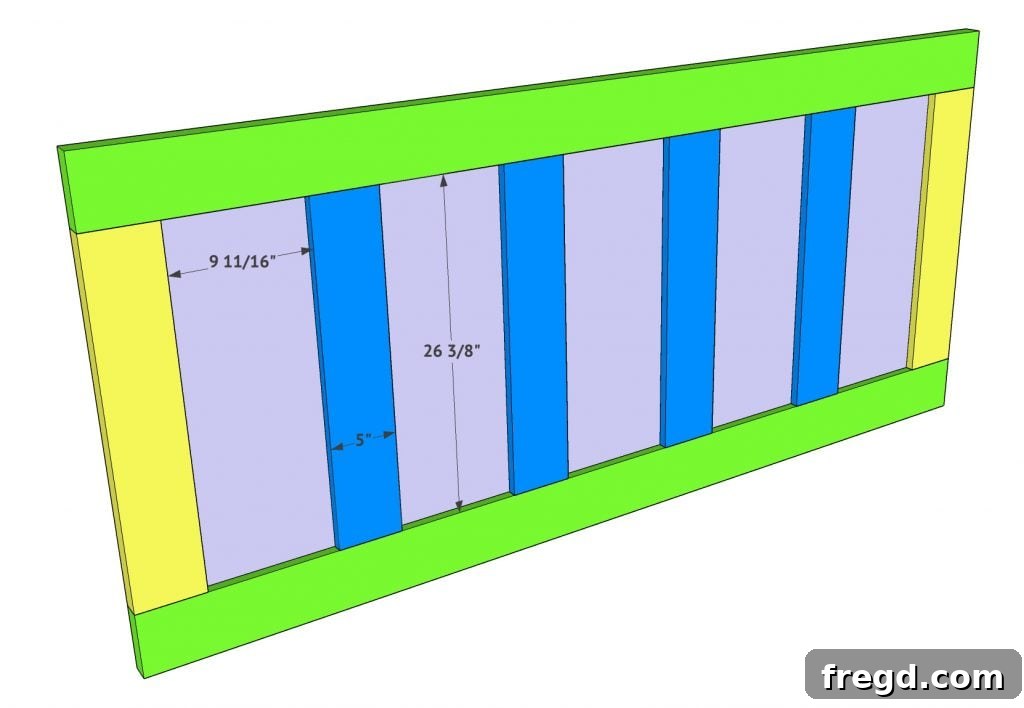
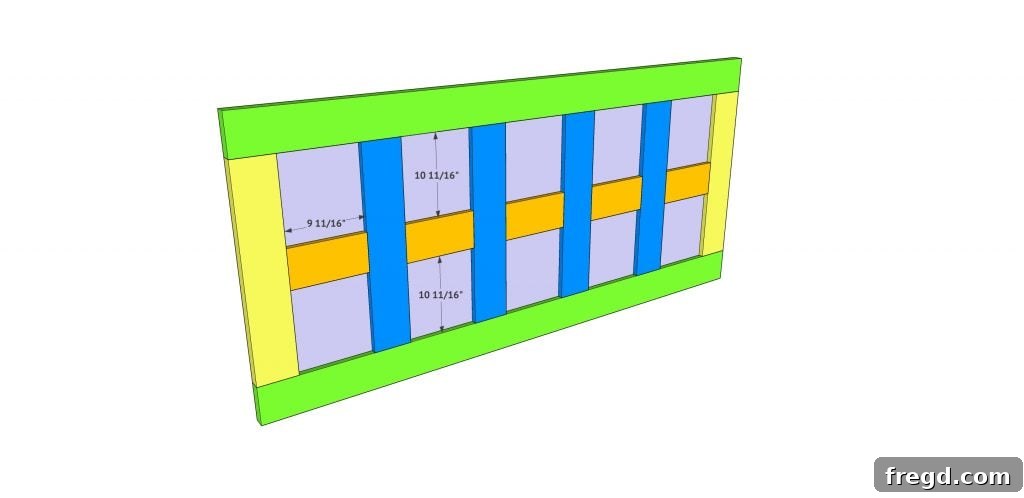
Now for the aesthetic touches that truly define the panel bed look. Add the vertical trim pieces to the headboard panel. These are made from 1×6 boards that have been ripped to a consistent 5 inches wide. Carefully measure and cut each trim piece to size, ensuring they fit perfectly within your headboard design.
Before attaching, plan out the spacing for your trim pieces. They should be spaced equally across the plywood panel for a balanced and visually pleasing effect. Apply wood glue to the back of each trim piece and firmly attach them to the plywood using 1.25-inch brad nails. The brad nails will hold the trim in place while the glue dries, creating a strong and invisible bond.
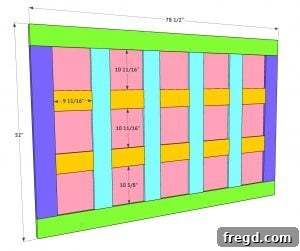
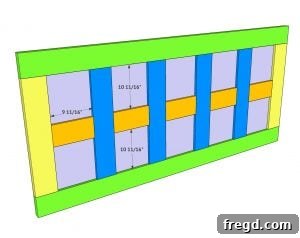
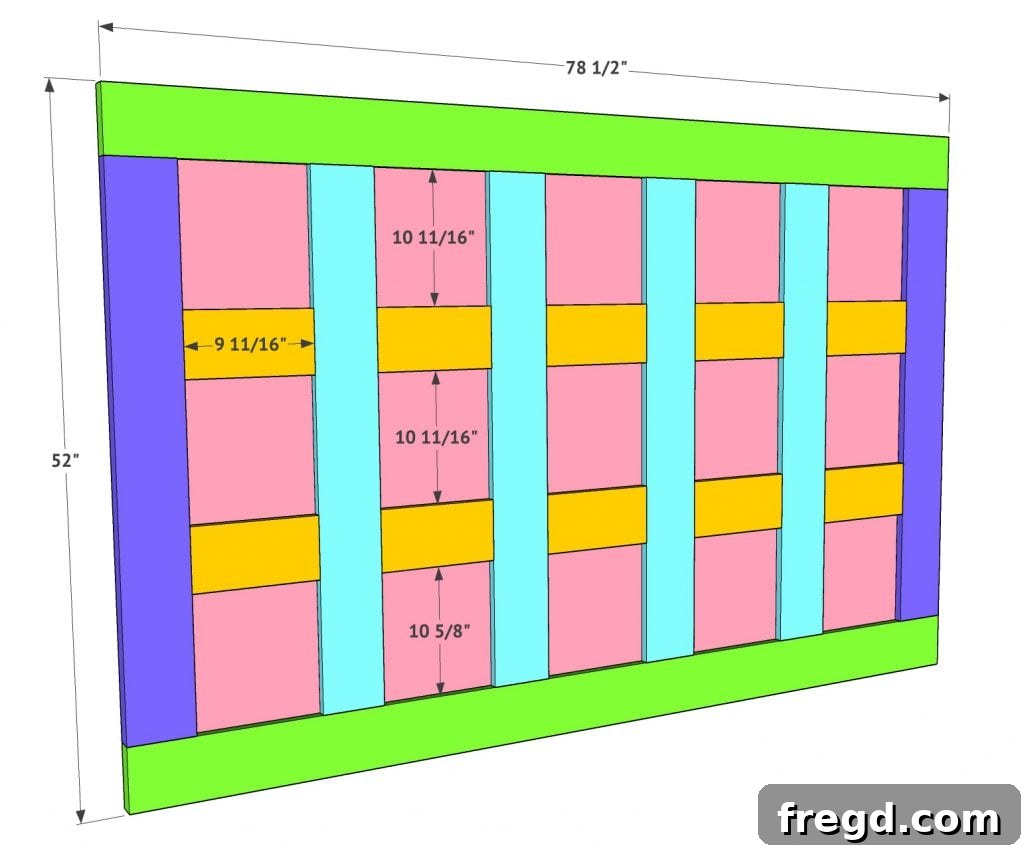
Continue by adding the horizontal trim pieces. Just like the vertical trim, these are also 1×6 boards ripped to 5 inches wide. Cut each piece to the required length and attach them to the plywood panel using wood glue and 1.25-inch brad nails. Ensure these horizontal pieces are also evenly spaced to maintain a harmonious design across the headboard. The combination of vertical and horizontal trim creates the classic panel look, adding depth and character to your bed.
5. Attaching Headboard Legs to the Panel
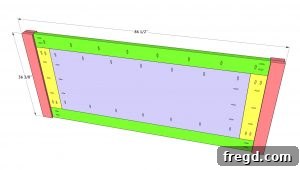
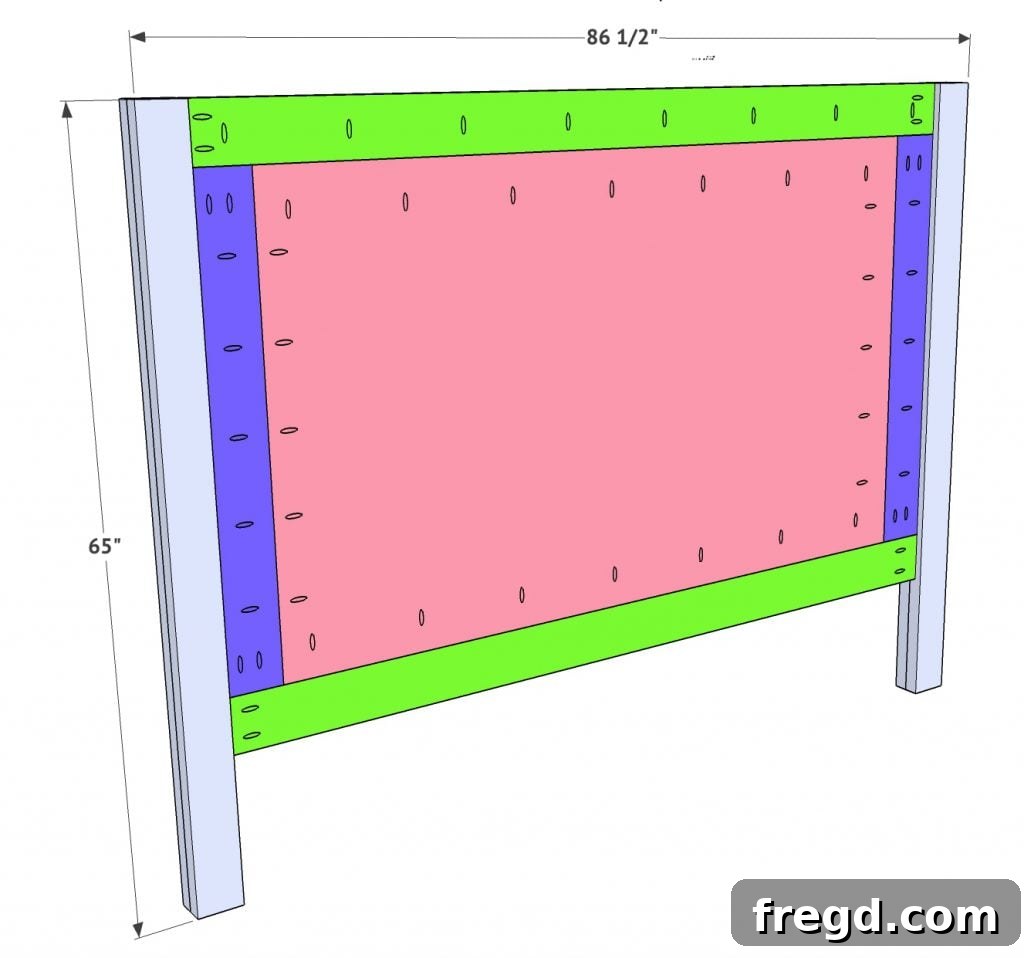
Before proceeding, double-check that the legs you built in Step 1 are completely dry and the glue has fully cured. This ensures maximum strength for the bed’s support system. To facilitate attachment, place some scrap 1x boards on the ground. Lay your assembled headboard panel face down on top of these scrap boards. This clever trick elevates the panel exactly 3/4 inches off the ground, creating the necessary clearance and perfect alignment for the legs.
Position the headboard legs against each side of the panel, carefully lining up their tops so they are flush with the top edge of the headboard panel. Apply a line of wood glue between the contact surfaces of the legs and the headboard panel. Then, secure the legs by driving 2.5-inch pocket hole screws through the headboard panel and into each leg. This method provides a strong, hidden connection that contributes to the bed’s clean aesthetic.
6. Assembling the Footboard
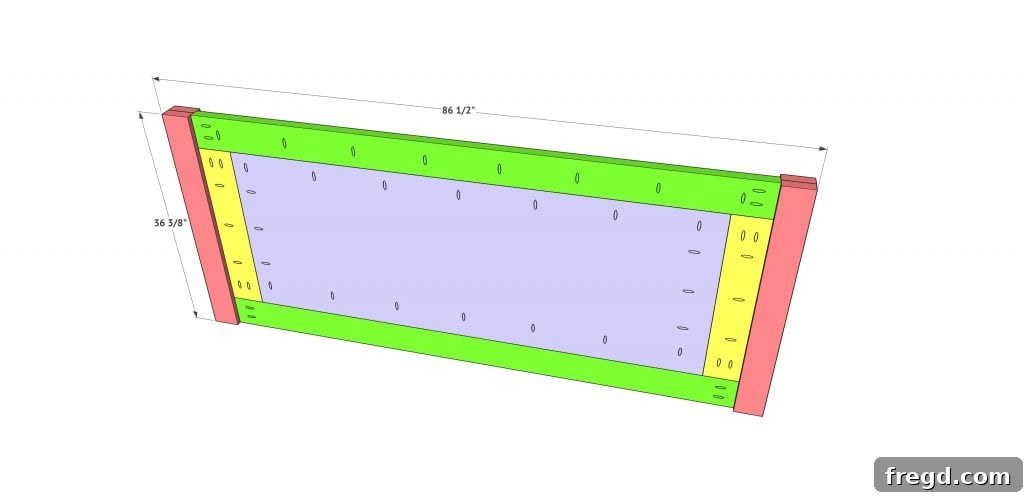
With the headboard construction complete, you’re ready to tackle the footboard. The assembly process for the footboard is nearly identical to that of the headboard, simplifying the construction significantly. The primary difference will be the specific measurements, which you will find detailed in the free printable plans.
Follow the same sequence of steps you used for the headboard: build the legs (ensuring they are dry), construct the plywood panel and its frame with pocket holes, add the horizontal frame boards, and then attach the trim pieces. Always refer to the footboard measurements provided in the plans to ensure accuracy. This mirroring of the headboard design creates a cohesive and balanced look for your panel bed.
7. Adding the Top Trim Boards
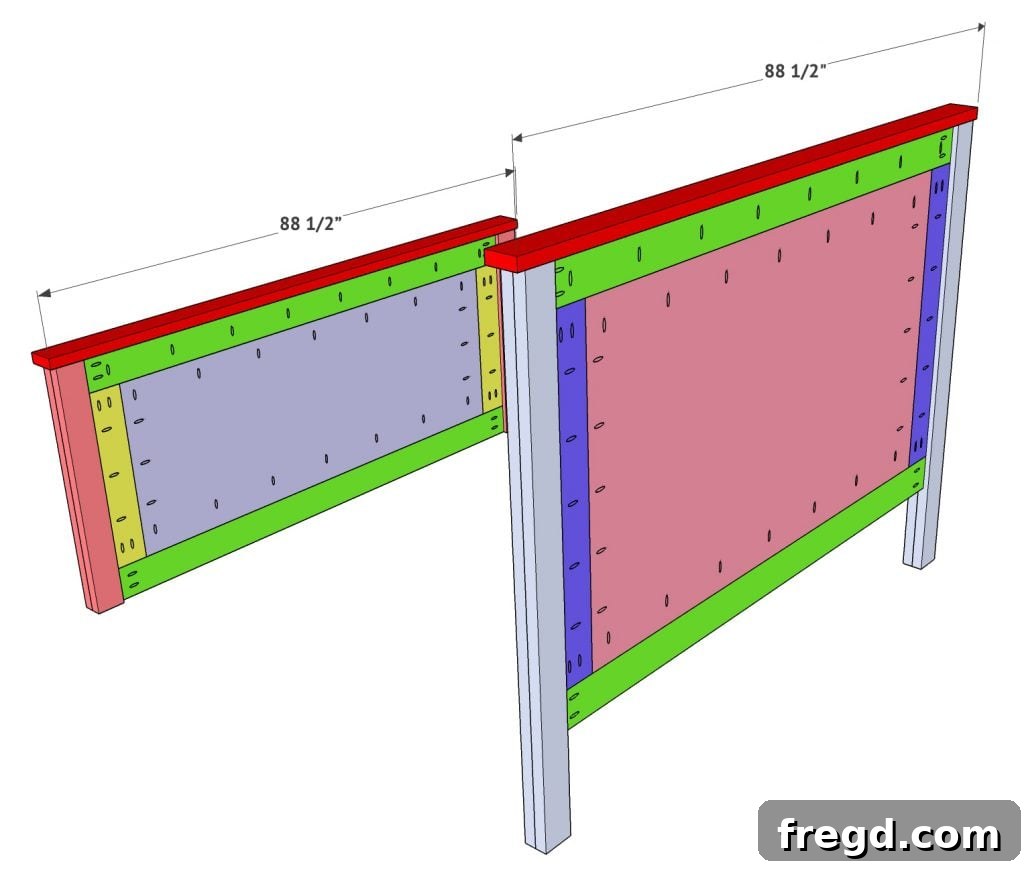
To complete the top edges of both the headboard and footboard, you will add the final trim boards. These pieces serve as a cap, providing a finished look and adding a touch of elegance. Use either 2×6 or 2×4 boards, ripped down to 2.5 inches wide each, as specified in your plans. Measure and cut these pieces to perfectly span the width of your headboard and footboard tops.
Apply wood glue to the top edge of both the headboard and footboard where these trim pieces will sit. Carefully place the trim boards and secure them in place using 2.5-inch pocket hole screws. Drive these screws through the backs of the headboard and footboard panels and into each trim piece. This method ensures a strong, concealed attachment, leaving the visible surfaces pristine.
8. Crafting the Side Rails
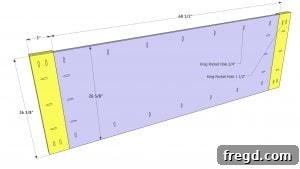
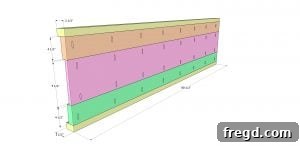
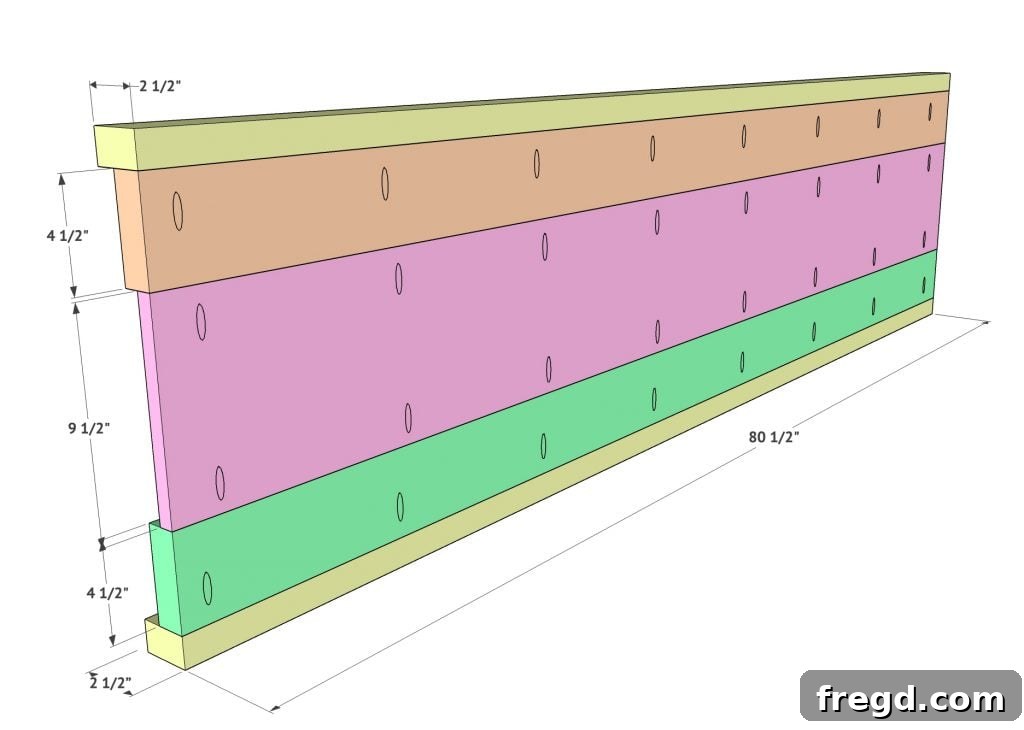
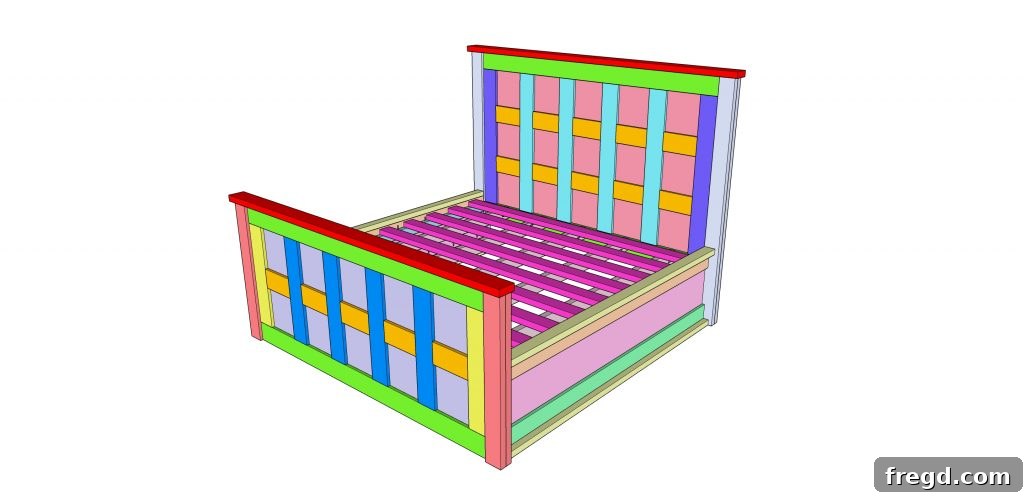
The side rails are essential for connecting the headboard and footboard and providing central support for your mattress. Each side rail is a layered assembly, designed for both strength and aesthetic appeal. You will construct two identical side rails, each comprised of five distinct boards.
The top and bottom boards of each side rail will be 2×4 or 2×6 boards, ripped to 2.5 inches wide. The “orange” and “green” boards (as color-coded in visual plans) are 2×6 boards, ripped to 4.5 inches wide. The central component is a 3/4-inch hardwood plywood piece, providing rigidity and a flat surface. Carefully cut all these pieces to their specified lengths.
Assemble each layer using wood glue for a strong, permanent bond. Additionally, use pocket hole screws to reinforce each layer’s attachment. This layered construction not only creates a substantial and visually appealing side rail but also maximizes structural integrity, ensuring your bed is robust and stable.
Achieving Your Signature Finish: A Custom Stain Blend
Before the final assembly of your bed, it’s highly recommended to stain or apply your chosen finish to all four main components: the headboard, footboard, and two side rails. Finishing these pieces individually is significantly easier and ensures complete coverage compared to trying to finish an assembled bed. Once they are dry, you are ready to move them into your desired room for final assembly.
For this project, I sought to create a unique, bright finish that would perfectly complement the room’s aesthetic. After sampling several options, I landed on a custom stain blend that is surprisingly simple to achieve, much like mixing ingredients for a recipe. This blend creates a beautiful, inviting tone that brightens any space.
My custom finish uses two specific stains. You’ll need 5 parts of a lighter, warmer stain, such as Minwax Golden Oak, available HERE on Amazon. This stain provides a classic, rich base.

To this, you’ll add 1 part of a cooler, grayish stain, like Rust-Oleum Varathane Willow Gray, which you can find HERE. The gray tone subtly mutes the warmth of the oak, creating a sophisticated and modern hue.

To mix, simply pour the desired parts into a tray or cup – for example, 1 and 1/4 cups of Golden Oak with 1/4 cup of Willow Gray – and stir thoroughly with a stick. Always test your mixture on a scrap piece of the same wood used for your bed to ensure you achieve the desired color before applying it to your main components. This custom blend is truly perfection!
Final Assembly and Mattress Support System
Once all your stained or finished pieces are completely dry, you can begin the final assembly of your king panel bed. A critical piece of advice for this stage: do not use wood glue for the final assembly! By simply screwing the pieces together without glue, you allow for easier disassembly in the future, which is incredibly helpful if you ever need to move the bed or transport it to a new home.
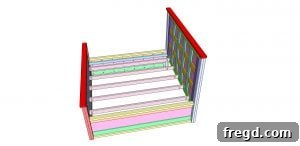
Every mattress type has specific support requirements. Before creating your mattress supports, it’s essential to research your particular mattress (e.g., memory foam, hybrid, innerspring) to ensure you provide adequate and appropriate support, which can impact its longevity and your comfort. For our hybrid mattress, a slat system proved to be the perfect solution. Here’s how I constructed it:
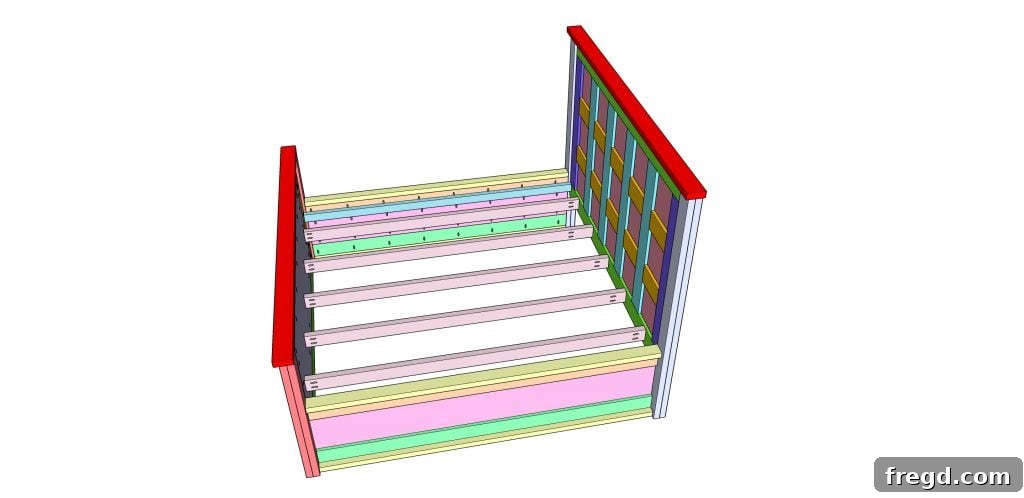
- I attached 2×4 runners to the inside of the headboard and footboard using 2.5-inch pocket hole screws. These provide the primary attachment points for the side rails and central support.
- Next, I attached cleats (small wooden strips) to the inside of each side rail using 2-inch wood screws. These cleats will support the mattress slats.
- Ensure that all runners and cleats are placed at the same level. The height you choose for these supports will determine how high your mattress sits within the bed frame, allowing for personalization based on your preference.
- Finally, I laid the individual mattress support slats (also 2×4 boards) across the bed, resting them on the cleats and runners. I then secured each end of these slats to the cleats using 2-inch wood screws, creating a robust and stable platform for the mattress.
Recommended Tools & Decor Resources
Beyond the primary lumber, certain specialized tools and decorative elements can significantly enhance your DIY experience and the final look of your king panel bed. Here are some of the exact items I used and highly recommend:
-
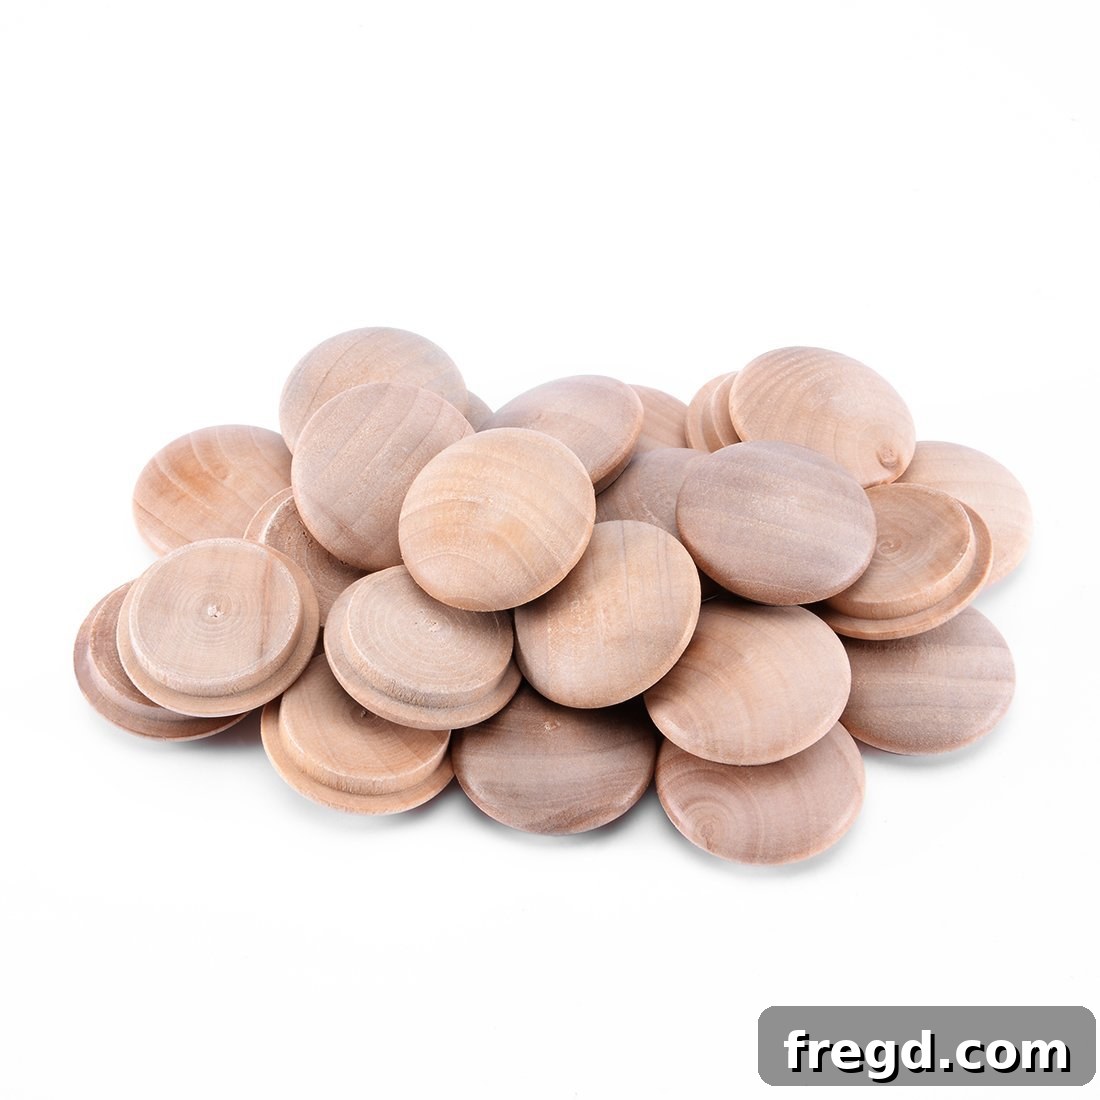
Decorative Round Pieces: To add a touch of intricate detail, I used small round decorative pieces on both the headboard and footboard. These can be found on Amazon HERE! I recommend ordering two packs, which will be sufficient for your king bed and will also give you extras for coordinating nightstands and a TV console that I’ll be sharing plans for soon.

-
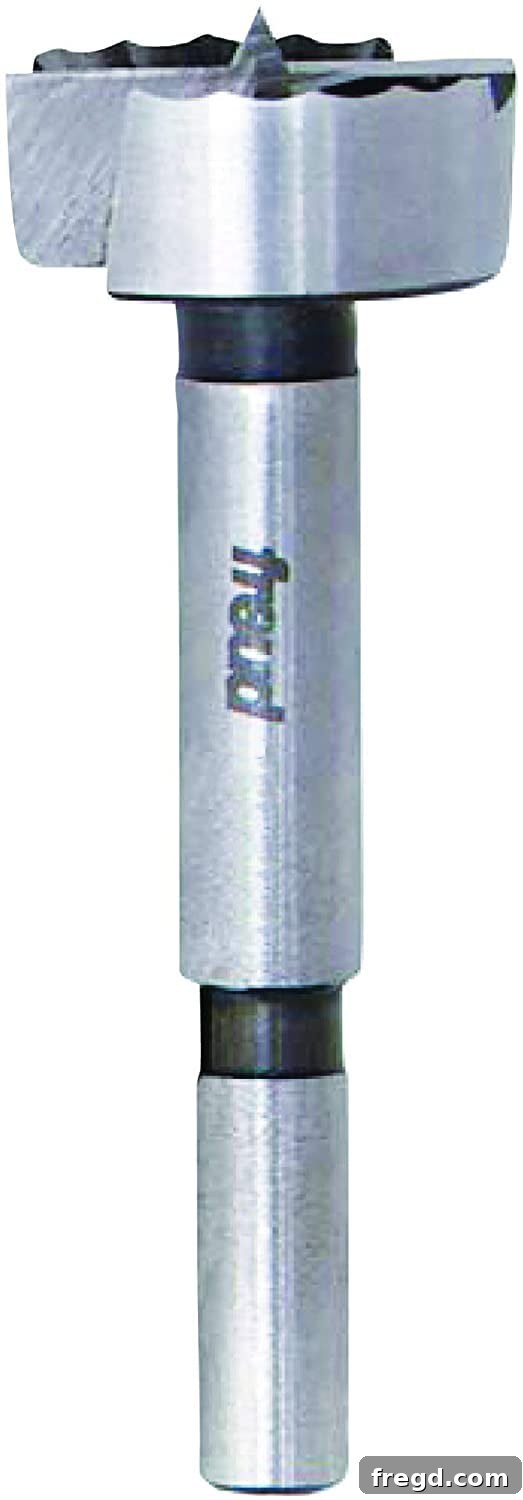
Forstner Bit: For creating perfectly clean, flat-bottomed holes to embed these decorative pieces, an excellent Forstner bit is indispensable. The one I used is amazing for its speed and precision. You can find it HERE on Amazon!
-
Craftsman 18g Nail Gun: For attaching trim and other delicate pieces, a reliable brad nailer is a game-changer. My new Craftsman 18g nail gun is a favorite for its smooth and quiet operation compared to other models. You can see it HERE on Amazon!
-
K5 Kreg Jig: For creating strong and reliable pocket hole joints, the Kreg Jig is an absolute essential in any DIY woodworker’s arsenal. I used my K5 Kreg Jig extensively for this project, and it never disappoints. Here is a link on Amazon!
Beyond the bed itself, creating a harmonious bedroom environment involves thoughtful decor choices. I sourced my bedding from high-quality retailers, and I’m particularly fond of the quilt from West Elm, which offers exceptional softness and a full look without being overly bulky. It’s often on sale, so keep an eye out for deals!
- You can find the white quilt HERE at West Elm!
- You can find the white standard shams HERE at West Elm!
- For a contrasting texture, the grey quilt from Pottery Barn is a beautiful choice. I opted for the Flagstone color. Find it HERE at Pottery Barn!
- To complete the look, the euro shams in Flagstone color are also available HERE at Pottery Barn!
- The stylish light fixture above my bed was an incredible find. It’s an affordable yet chic option that elevates the room’s ambiance. You can find it HERE on Amazon for only $100!
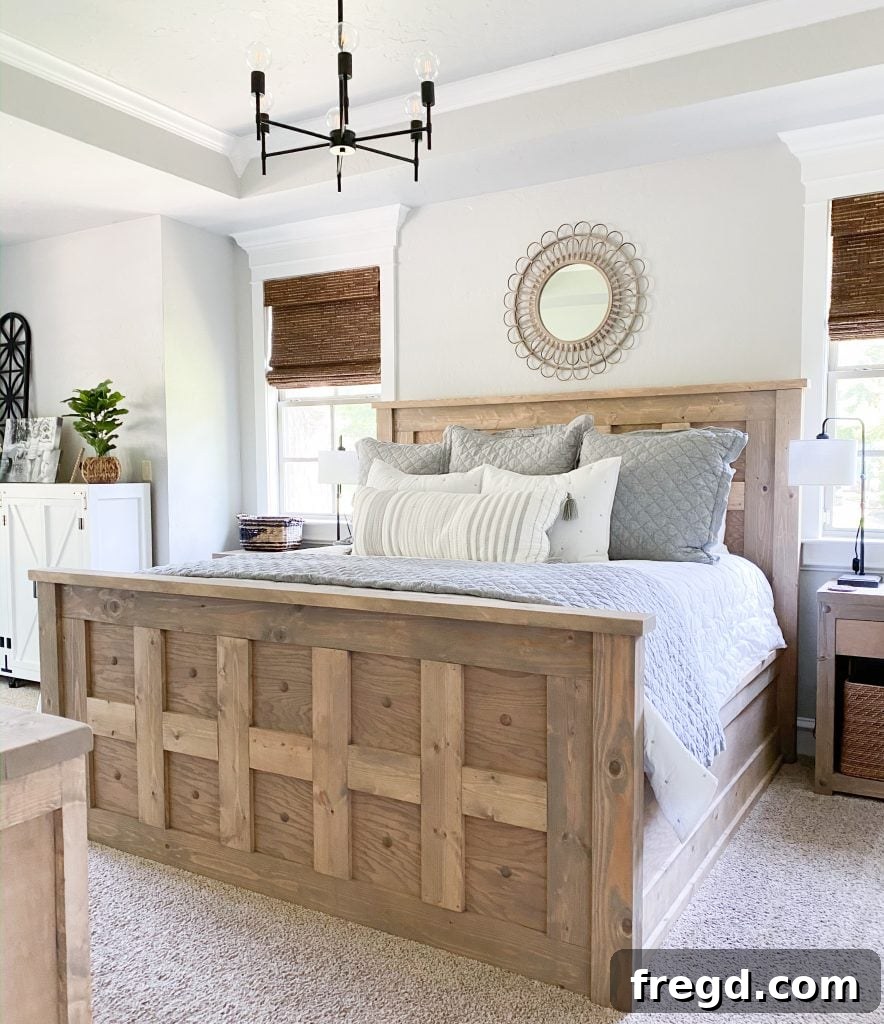
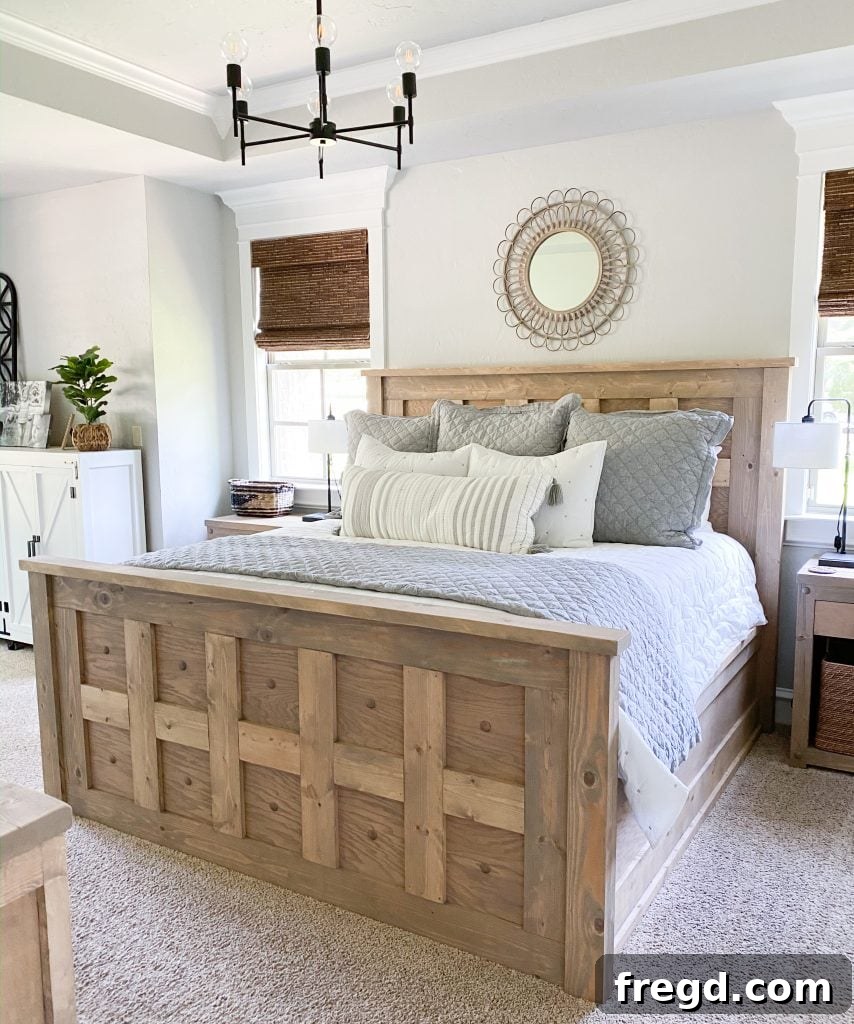
Finally, the wall color, Dolphin Fin by Behr, provides a serene backdrop, beautifully complemented by the trim color, Pure White by Sherwin-Williams. These carefully chosen elements combine to create a bedroom that is both inviting and stylish, anchored by your magnificent DIY King Panel Bed.
More Views of Your Newly Built King Panel Bed
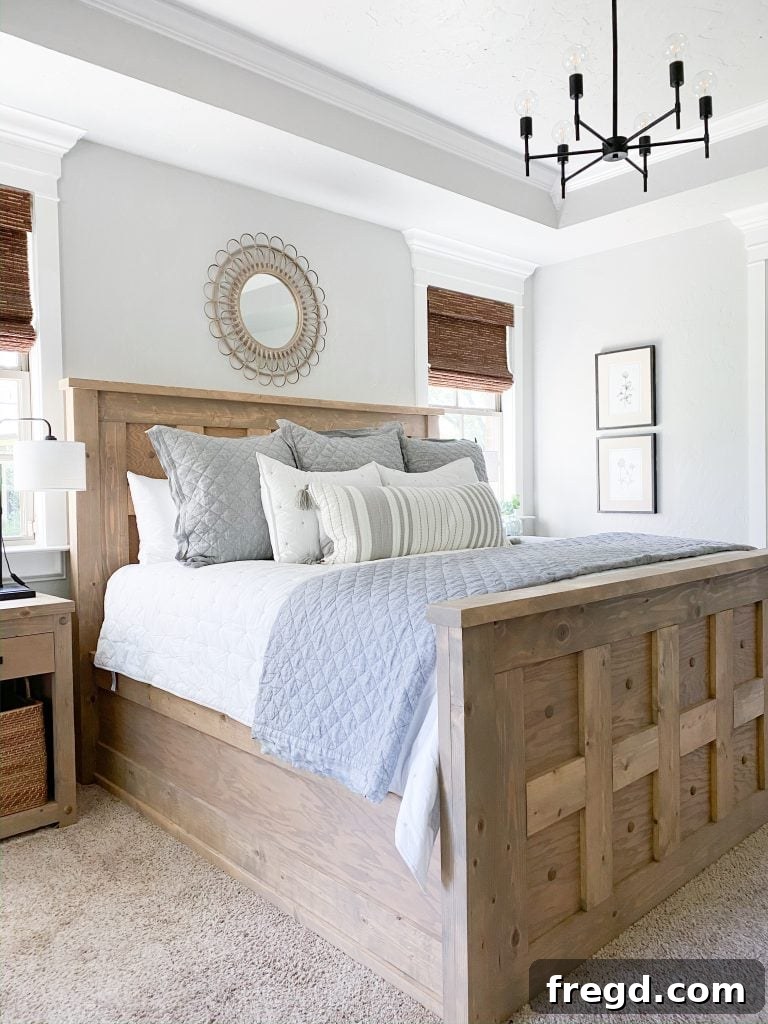
Admire the beauty and craftsmanship of the finished King Panel Bed from various angles. These images showcase the custom finish, intricate details, and overall impressive presence this DIY project brings to a bedroom. It truly becomes the centerpiece of the room, reflecting the effort and love poured into its creation.
DIY King Panel Bed – Detailed Instructions
Instructions
-
Begin by building the legs for both the headboard and footboard. Rip 2×6 boards to 4” wide each using a table saw. Apply wood glue between two ripped boards for each leg and clamp them tightly until dry. Create two headboard legs and two footboard legs.
-
Refer to the plans for the specific dimensions of the footboard legs.
-
Add 3/4” pocket holes around all four sides of the headboard plywood panel (facing the back). Add 1.5” pocket holes down one side of each vertical headboard frame piece. Attach the plywood to the frame boards using wood glue and 1.5” pocket hole screws, ensuring tops, bottoms, and backs are flush.
-
Drill 1.5” pocket holes down the top horizontal frame board and into the ends of both horizontal frame boards. Attach these to the plywood with 1.5” pocket hole screws, and to the vertical frame boards with 2.5” pocket hole screws.
-
Add the vertical trim pieces (1×6 boards ripped to 5” each) to the headboard. Cut each to size, ensure equal spacing, and attach to the plywood with wood glue and 1.25” brad nails.
-
Attach horizontal trim pieces (1×6 boards ripped to 5” wide each) to the plywood, ensuring even spacing. Use wood glue and 1.25” brad nails.
-
Ensure legs are dry. Lay the headboard panel face down on scrap 1x boards (setting it 3/4” off the ground). Place headboard legs against each side, flush with the panel top. Glue and attach using 2.5” pocket hole screws through the panel into each leg.
-
Assemble the footboard following the identical steps as the headboard, but use the specific footboard measurements provided in the plans.
-
-
-
-
-
-
Add the two top trim boards (2×6 or 2×4 ripped to 2.5” wide) to both the headboard and footboard. Attach with wood glue and 2.5” pocket hole screws through the backs into each trim piece.
-
Build the two layered side rails: top/bottom boards (2×4 or 2×6 ripped to 2.5” wide), middle boards (2×6 ripped to 4.5” wide), and a central 3/4” hardwood plywood. Cut and attach each layer using wood glue and pocket hole screws.
-
Stain or finish all four completed pieces. Once dry, move to the room for final assembly (do not use wood glue for assembly). Install 2×4 runners into the headboard and footboard with 2.5” pocket hole screws. Attach cleats to each side rail with 2” wood screws, ensuring all are at the desired mattress height.
-
Lay 2×4 mattress support slats on top of the runners and cleats. Attach each end of the slats to the cleats using 2” wood screws.