
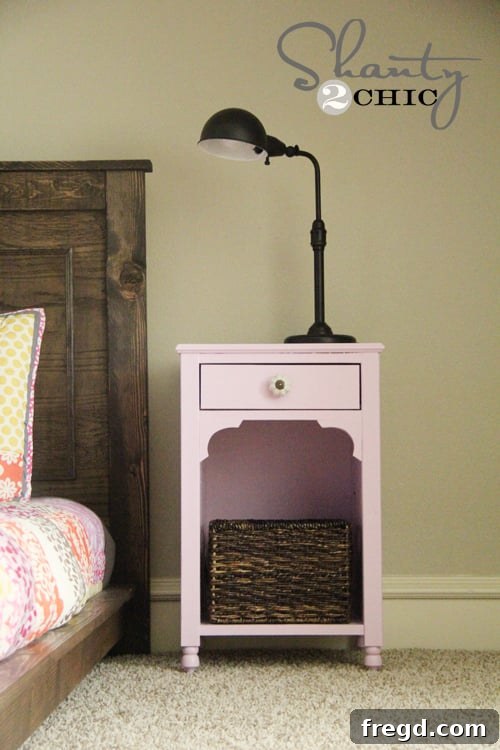
DIY Dream Nightstands: Crafting Charming Julia Nightstands with Ana White Plans
Hello fellow DIY enthusiasts and home decor lovers! I am absolutely thrilled to pull back the curtain on my latest woodworking adventure, a project that brings a touch of personalized charm to my girls’ bedroom: the incredible Julia Nightstands designed by the legendary Ana White. Many of you might recall the exquisite twin platform beds she masterfully designed for my daughters, a project I happily showcased a few months back. Following that success, I knew I wanted something equally special for their bedside companions – pieces that exuded a sweet, girly aesthetic and plenty of character. Ana White, once again, delivered beyond expectation!
These nightstands are not just pieces of furniture; they are a testament to budget-friendly creativity and the power of DIY. They perfectly complement the existing bedroom decor, adding a layer of functionality and beauty that makes the space feel truly complete. The entire process was incredibly rewarding, and the end result is something I’m immensely proud of. Are you ready to dive into the details and see these adorable creations?
Transforming a Vision into Reality: The Ana White Design
The “Julia Nightstand” plans instantly captivated me with their classic lines, delicate details, and the promise of creating a truly custom piece. What makes Ana White’s plans so exceptional is their accessibility. She breaks down complex woodworking projects into manageable steps, making them approachable for DIYers of all skill levels. Her dedication to empowering individuals to build beautiful furniture without breaking the bank aligns perfectly with my own philosophy.
When I began envisioning the perfect nightstands for my girls, I pictured something more than just a surface to hold a lamp. I wanted pieces that felt bespoke, as if they were plucked from a high-end catalog but imbued with the love and care of a handmade item. The Julia Nightstand design, with its charming silhouette and potential for personalized finishes, was the ideal match. It offers that coveted blend of elegance and practical storage, essential for any child’s room. The journey of transforming raw materials into these elegant bedside tables was an enjoyable challenge, proving once again that bespoke furniture is within reach for anyone willing to try.
Affordable Elegance: Crafting Two Nightstands for Under $60!
Now for one of the most exciting revelations about this project – the cost! You might be surprised to learn that I was able to construct not one, but two of these beautiful nightstands for less than $60. Yes, you read that correctly – under sixty dollars for a pair of custom, sturdy, and charming bedside tables! This incredible affordability is largely due to smart material choices and a bit of help from my local hardware store.
To achieve such significant savings, I opted to use a 3/4-inch sheet of Medium-Density Fiberboard (MDF) for the primary construction. MDF is an excellent, cost-effective material for painted furniture projects, offering a smooth finish and great stability. The real game-changer was utilizing Lowe’s panel cutting service. I had them rip all the necessary boards from the large MDF sheet, saving me a tremendous amount of time, effort, and ensuring perfectly straight cuts. This simple step not only streamlined the building process but also reduced waste and made handling the material much easier. It’s truly a testament to how accessible custom furniture can be when you leverage resources wisely. Take that, expensive retail furniture!
The DIY Secret Weapon: My Indispensable Kreg Jig
For anyone serious about building their own furniture, the Kreg Jig™ is an absolute game-changer, and it was the cornerstone of this nightstand build. If you’re still contemplating whether to invest in one, allow me to add my voice to the chorus of satisfied users: you absolutely need a Kreg Jig in your workshop! Over the years, this tool has provided countless reasons why it’s a must-have, making joinery incredibly simple, strong, and aesthetically pleasing. I genuinely adore mine, and it continually proves its worth in every project.
The beauty of the Kreg Jig lies in its ability to create strong pocket-hole joints quickly and efficiently. These joints are incredibly robust, providing a secure connection between wood pieces without the need for complex dadoes or mortise and tenons. This not only speeds up assembly but also results in a cleaner, more professional finish, especially on pieces like these nightstands where visible fasteners would detract from the overall look. It transforms what could be a challenging aspect of woodworking into a straightforward task, ensuring that even intermediate builders can achieve professional-quality results with confidence.
Here’s a look at the inside construction, where the Kreg Jig allowed for seamless and incredibly strong attachments. The pocket holes are strategically placed to be hidden from view once the piece is assembled, contributing to the clean aesthetic. This meticulous attention to detail in joinery is what gives the nightstands their structural integrity and polished appearance.
And here’s how perfectly clean and sturdy the outside looks! The precision offered by the Kreg Jig means that all components align beautifully, resulting in a perfectly square and robust structure. This level of finish and durability is paramount, especially for furniture destined for active children’s rooms. It’s a joy to build with tools that empower such professional outcomes.
Building to Last: The Power of Gorilla Wood Glue
Beyond mechanical fasteners, the secret to truly durable furniture lies in the intelligent use of adhesives. For this project, I relied heavily on Gorilla Wood Glue, another absolute favorite in my workshop. This adhesive is a powerhouse, forming an incredibly strong bond that reinforces every joint, ensuring the nightstands can withstand the rigors of daily use.
Applying a generous bead of Gorilla Wood Glue to each joint before securing it with Kreg screws creates a bond that is often stronger than the wood itself. It provides added stability and longevity, which is especially important for furniture used by children. The glue dries quickly and forms a solid connection that virtually eliminates any wobbling or creaking. Its reliability makes it an indispensable component for any serious woodworking project, offering peace of mind that your creations will endure for years to come.
Adding Personality: Unique Design Elements
The Charming Foundation: Decorative Finials for Feet
One of my absolute favorite details on these Julia Nightstands, and a key element that elevates their “girly charm,” are the feet. Instead of simple blocks or traditional turned legs, I opted for decorative finials sourced from Lowe’s. This seemingly small choice made a colossal difference in the overall aesthetic, giving the nightstands a refined, almost whimsical touch that perfectly suits a child’s bedroom.
These finials add a delicate elegance and a custom feel that would be difficult to achieve with standard hardware. They provide a subtle lift, making the nightstands appear lighter and more graceful. It’s a fantastic trick to personalize off-the-shelf plans and inject a unique character into your DIY furniture. This detail is a true conversation starter and an easy way to make any project stand out.
Crafting Custom Curves: Decorative Pieces with a Jigsaw
Another design element that truly defines the Julia Nightstand’s charm is the decorative apron or skirt. For these beautiful, curvy pieces, I employed my trusty jigsaw. Despite admitting that I’m not a jigsaw master, these cuts proved to be surprisingly easy and incredibly rewarding. The key was a simple, repeatable process that anyone can follow.
I started by sketching out the desired curve on one piece of MDF. Once I was happy with the design, I carefully cut it out with the jigsaw. This first piece then served as a template for the remaining three decorative sections, ensuring consistency across all sides of the nightstands. This method not only saved time but also guaranteed that all the curves matched perfectly, contributing to the cohesive and professional appearance of the finished furniture. Don’t be intimidated by power tools; sometimes, a simple approach is all you need to create stunning details!
The Final Flourish: Painting and Protection
A Touch of Sweetness: Olympic Pink Peony Paint
With the construction complete and all the charming details in place, the final step was to bring these nightstands to life with color. For my girls’ room, I chose an absolutely delightful shade: Olympic’s “Pink Peony.” Doesn’t that just sound adorable? This soft, vibrant pink perfectly encapsulates the girly, whimsical aesthetic I was aiming for, adding a cheerful pop of color to their space.
I applied two smooth coats of this beautiful paint, allowing ample drying time between applications to achieve a flawless finish. The MDF took the paint wonderfully, resulting in a uniform, professional look that truly transformed the raw wood into a finished piece of furniture. The choice of color is so crucial in reflecting the personality of a room, and Pink Peony was an ideal fit for these charming nightstands.
Durability for Little Ones: Rust-Oleum Ultimate Polyurethane
Knowing that these nightstands would be used daily by active little hands, durability was a top priority for the finish. To ensure they would stand up to inevitable bumps, spills, and general wear and tear, I added a protective topcoat of Rust-Oleum Ultimate Polyurethane. This product is a lifesaver for any furniture designed for a bustling household.
This polyurethane is remarkable for its quick-drying properties and its exceptional protective capabilities. It forms a hard, clear shield that guards against scratches, scuffs, and moisture, preserving the beautiful paint finish underneath. It’s the perfect final step to safeguard all that hard work and ensure the nightstands remain beautiful and functional for years to come, despite the adventures my kiddos put them through. This essential layer of protection provides peace of mind, knowing that these handmade pieces can withstand the test of time and spirited play.
The Perfect Finishing Touch: Knobs from Hobby Lobby
Every piece of furniture deserves the perfect hardware to complete its look, and these nightstands were no exception. To complement the “Pink Peony” paint and the overall charming aesthetic, I sourced the ideal knobs from Hobby Lobby. Their selection always offers unique and stylish options, making it easy to find that special detail that brings everything together. These knobs add a final sparkle and functionality, making the drawers a delight to open.
With the knobs in place, the nightstands were officially complete and ready for their big debut! It’s always incredible how these small elements can tie an entire project together, enhancing its character and usability.
Behold the Beauty: The Completed Julia Nightstands
After all the planning, cutting, assembling, gluing, painting, and protecting, the Julia Nightstands are finally finished and nestled perfectly beside my girls’ beds. It’s truly a fulfilling moment to see a project go from a set of plans to a tangible, beautiful, and functional piece of furniture. The transformation is remarkable, and the joy of creating something with your own hands is immeasurable. These nightstands aren’t just practical; they add a wonderful warmth and personality to the room, creating a cohesive and inviting space.
What do you think of these DIY Julia Nightstands? I am absolutely smitten with how they turned out, and more importantly, my girls adore them! They are the perfect blend of functional storage and decorative appeal, creating a cohesive and beautiful space for them to grow and play. This project truly showcases that stunning home decor doesn’t have to come with a hefty price tag.
I hope this detailed walkthrough inspires you to embark on your own DIY furniture projects! There’s an incredible sense of accomplishment that comes with building something beautiful and useful with your own hands. If you love these nightstands as much as I do, please consider sharing this post and pinning it to your favorite DIY or home decor boards below! Your support helps inspire even more creativity in the DIY community. Remember, with a little effort and the right plans, you can create custom pieces that perfectly fit your style and budget.
For the complete, step-by-step plans to build these charming Julia Nightstands, be sure to visit Ana White’s amazing site HERE. She provides all the guidance you need to make these beauties a reality in your own home. Thanks so much for stopping by and sharing in this exciting journey. Have a fantastic day!
~Whitney