
Craft Your Own Vintage Entryway Bench: An Inspiring DIY Guide to Timeless Home Decor
Welcome, fellow DIY enthusiasts! I’m thrilled to share one of my most rewarding projects to date: building a beautiful, vintage-inspired bench for my entryway. For a long time, I envisioned a piece that would add character and charm to our home’s entrance, and thanks to the incredible creativity and generosity of our friend, Ana White, that dream has now become a reality. Her ingenious plans consistently empower DIYers to create stunning furniture without breaking the bank.
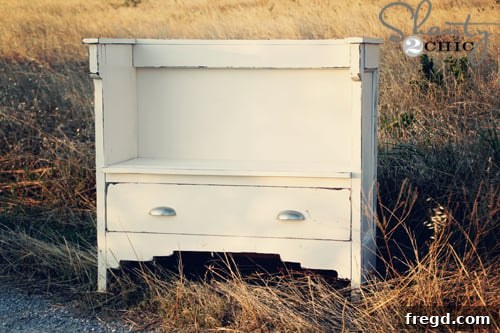
The moment Ana sent me a photo of her proposed design, I was instantly captivated. It was exactly the vintage aesthetic I had been searching for! With her detailed and easy-to-follow Vintage DIY Bench plans, I was able to meticulously recreate this magnificent bench, all for an astonishingly low cost of just $100. This project proves that achieving high-end, custom looks doesn’t require a massive budget or years of woodworking experience.
Overcoming the DIY Fear Factor: Building with Confidence
To be completely honest, the prospect of building this bench initially filled me with a sense of dread. My experience with a router was limited, and the thought of carving the intricate detailing on the bottom board – the very feature that gives this bench its distinctive vintage character – was nearly enough to make me abandon the project altogether. However, my immense love for the design ultimately pushed me to give it a try. And I’m so glad I did! What seemed daunting turned out to be surprisingly manageable. I’m excited to share a few steps and tricks that significantly simplified the process for me, along with some snapshots from my building journey, to inspire you to tackle your own ambitious DIY projects.
Once again, a massive thank you is in order for Ana White, whose comprehensive and inspiring Vintage DIY Bench plans truly made this project accessible and enjoyable.
Essential Tools and Materials for Your Vintage Bench Project
Before diving into the construction, it’s crucial to gather your materials and tools. For this vintage bench, you’ll need:
- Wood: We’ll discuss a fantastic plywood option, PureBond, that I discovered during this build.
- Router or Jigsaw: For cutting the decorative details.
- Dremel Trio (optional): An alternative for precise detail cutting.
- Sander: Your best friend for achieving smooth edges and refining cuts.
- Kreg Jig Rip Cut: A phenomenal tool for making accurate, straight cuts, especially useful for sheet goods.
- Wood Glue and Screws: For strong joinery.
- Measuring Tape and Pencil: For precise marking.
- Printer Paper: For a clever detail-transferring trick.
- Paints: Rust-Oleum Espresso spray paint (satin finish) and Rust-Oleum Heirloom White spray paint.
- Vaseline: The secret ingredient for effortless distressing.
- Decorative Pulls: To add a finishing touch to the drawer.
Crafting the Distinctive Vintage Details with Ease
Remember how I mentioned my apprehension about cutting the decorative details? Well, here’s how I simplified that step, making it much more approachable even for those with limited router experience. I started by marking one end of the board, carefully transferring Ana’s measurements and connecting the dots to create the desired pattern. This initial step sets the foundation for perfectly symmetrical detailing.
Now, for the “super, hi-tech strategy” that saved me a lot of guesswork! Once I had one side perfectly marked, I simply traced that detail onto a scrap piece of printer paper. Then, I flipped the paper over to the other end of the board and, pressing down firmly, traced the pattern again. This technique left a faint indentation in the wood, which I then reinforced by running my pen over it. The result? Perfectly matching details on both ends of the board, ensuring a professional and symmetrical finish! For cutting, I used my Dremel Trio, but any router or even a jigsaw would work effectively. After cutting, remember that a sander will be your absolute best friend. It meticulously cleans up any imperfections, leaving you with smooth, refined edges ready for the next stage.
Seamless Assembly: The “Cut-As-You-Build” Approach
One invaluable tip I picked up during this project is to cut your wood pieces as you go, rather than pre-cutting everything at once. This “cut-as-you-build” method ensures that every component fits perfectly, minimizing the frustrating need to go back and make adjustments or re-cuts later. There’s nothing worse than discovering a piece is slightly off after you’ve already invested time in its preparation!
Discovering PureBond: A Game-Changer in Plywood
Now, let’s talk about my absolute favorite discovery during this bench build: PureBond plywood. This revolutionary product is a Formaldehyde-free, decorative hardwood plywood that stands out for several compelling reasons. Not only is it significantly better for the environment, but it’s also incredibly beautiful to work with! I found that it paints and stains far superior to any other plywood I’ve used in previous projects, all while being very comparable in price. My skepticism turned into complete devotion after seeing it firsthand at the Haven conference. In fact, I was so impressed that I immediately returned the large sheet of standard plywood I had already purchased for this project and exchanged it for PureBond! For cutting, I relied on my trusty Kreg Jig Rip Cut. This nifty gadget is truly a lifesaver – it’s inexpensive and offers an excellent alternative to investing in a full-sized table saw, especially for hobbyist woodworkers.
Here she is, basking in her natural glory before a single drop of paint! Notice the inherent beauty of the birch PureBond on the backing – it truly looks stunning even before any finish is applied, a testament to its quality.
Achieving the Perfect Distressed Finish: The Vaseline Technique
The secret to this bench’s charmingly aged appearance lies in the clever Vaseline distressing technique. I began by applying one coat of Rust-Oleum Espresso spray paint in a satin finish. I was genuinely impressed by the richness and depth of this paint; typically, I prefer stain over brown paint for wood, but this Espresso shade is so exquisite, I immediately told my sister, Whit, that I wanted to use it to finish another piece of furniture! It creates such a luxurious, gorgeous base.
However, for this specific bench, the goal was an authentic, aged look. So, after the Espresso base dried, I liberally applied Vaseline to all the areas where I wanted the distressed effect to show through. There’s no precise science to this part – I simply went with my intuition, applying it to edges, corners, and areas that would naturally show wear over time. This creates a barrier, preventing the top coat from adhering fully.
Following the Vaseline application, I sprayed two coats of Rust-Oleum Heirloom White spray paint evenly over the entire bench. Once this top coat was dry, I lightly sanded the edges and any other areas where Vaseline had been applied. The magic of this technique is how easily the top coat comes off in those specific spots, revealing the rich Espresso base coat beneath. The Vaseline effectively prevents the top layer from soaking into the wood, allowing for a controlled and natural-looking distressed finish. It’s truly a fool-proof method for achieving that coveted antique look.
The Finishing Touches: Hardware and Heart
To complete the bench, I added my favorite decorative pulls to the drawer. These were a fantastic find at Home Depot for only $5, proving that small details can make a huge impact on the overall aesthetic. And just like that, the vintage entryway bench was complete!
Embrace the Challenge: You Can Build It Too!
I am incredibly excited to welcome this beautiful, handcrafted bench into my entryway and show her off! Looking back, I can’t believe how intimidated I was to start this project. However, by sticking to the plans and tackling each step methodically, I discovered that it wasn’t hard at all. I’ve only been building furniture for about two years, and I never imagined I’d be able to create a piece with such intricate detailing. If I can do it, so can you!
The key to successful DIY woodworking is having the right tools and the confidence to follow clear instructions. Think of it like following a recipe: if you can read and follow cooking steps, you can absolutely follow building plans. My very first build was a Pottery Barn-Inspired Storage System, and it’s still a cherished and functional piece in our home today. Since then, I’ve built numerous other pieces for our home, including outdoor patio furniture, elegant side tables, a practical storage bed, a rustic coffee table, and charming nightstands, to name just a few. It’s an incredibly addictive and rewarding hobby!
My advice is to start with something small, build your confidence, and then keep challenging yourself. The satisfaction of creating something beautiful and functional with your own hands is truly unparalleled. Happy building!
If you’ve found inspiration in my vintage bench project, I would truly appreciate it if you could share it by pinning it below!