
Transform Your Walls: Easy DIY Picture Frame Shelves Tutorial
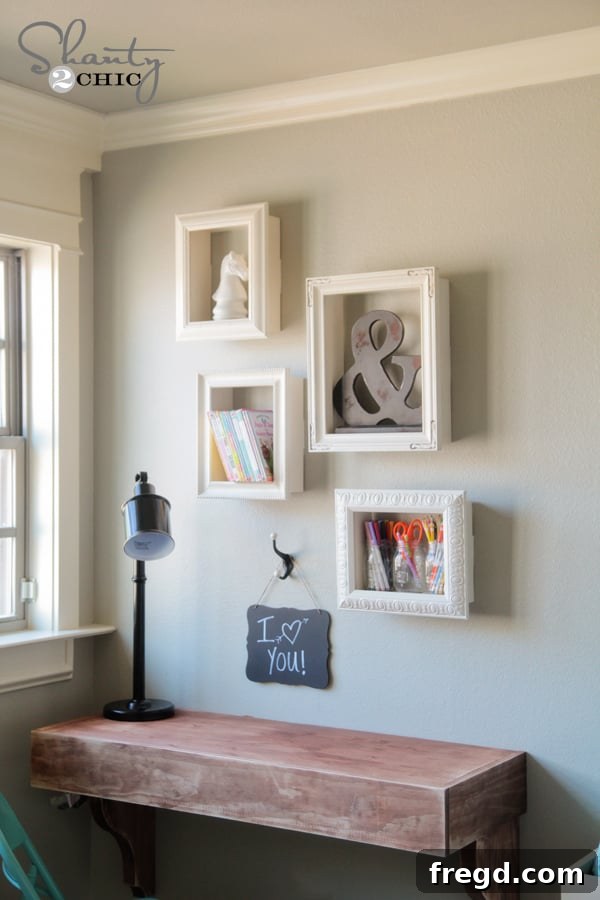
Hello, fellow DIY enthusiasts! Many of you know I’ve been immersed in a delightful project over the past several weeks: completely transforming a bedroom for one of my amazing girls. This ambitious undertaking involved closing off an upstairs loft space to create a brand-new, personalized sanctuary for her, and I’ve been diligently working on every detail to make it truly special. Just last week, I proudly showcased the DIY corbel desk I crafted for her, a stunning piece that came together for under $85. Now, with the desk in place, I faced a common dilemma: a large, blank wall space above it begging for attention. My solution? These incredibly cute, remarkably simple, and utterly charming DIY frame shelves! They’ve added such a fun and functional touch to her room, and I can’t wait to share how you can create them too.
Why DIY Frame Shelves? The Perfect Blend of Function and Style
In the world of home decor, finding pieces that are both aesthetically pleasing and highly functional can often be a challenge, especially when working on a budget. This project addresses both these needs beautifully. These DIY frame shelves are not just a simple craft; they are a fantastic opportunity to breathe new life into old picture frames or to elevate inexpensive ones into custom, eye-catching storage solutions. Imagine transforming forgotten frames from your attic or bargain finds from a local thrift store into unique shadow box shelves that reflect your personal style. This project is ideal for anyone looking to add a touch of personality and practical storage to a bedroom, living room, or even a home office without breaking the bank. It’s an accessible project for beginners, while still offering plenty of room for creative customization.
Gather Your Materials: What You’ll Need
Before diving into the construction, let’s ensure you have all the necessary components. One of the best aspects of this project is its flexibility with materials.
Essential Supplies:
- Picture Frames: This is your starting point! Look for old frames you no longer use, or pick up some affordable options from stores like Walmart, Hobby Lobby, or dollar stores. Various sizes and shapes can create an interesting display.
- 1×4 Boards: These will form the “box” part of your shelves. Scrap wood is perfect for this! I used 1×4 MDF scraps, but pine or any other suitable wood will work equally well. The key is consistency in thickness.
- Gorilla Wood Glue: A strong adhesive is crucial for the structural integrity of your shelves. Gorilla Wood Glue is renowned for its reliable bond.
- Brad Nails (1 1/4 inch): These will secure the wood pieces together.
- Wood Filler: Essential for covering nail holes and achieving a smooth, professional finish before painting.
- Spray Paint: Choose a color that complements your room’s decor. I used Rust-Oleum Painter’s Touch in Heirloom White, a beautiful classic shade available at Home Depot.
- Command Strips (Picture Hangers): These adhesive strips are fantastic for hanging your finished shelves without damaging your walls.
Tools You’ll Need:
- Measuring Tape: Accuracy is key for cutting your wood to size.
- Saw: A miter saw or a circular saw will be needed to cut your 1×4 boards. Even a hand saw can work for smaller projects if you’re careful.
- Nail Gun (e.g., Ryobi Airstrike Nail gun): While not strictly mandatory, a nail gun makes quick and secure work of assembling the box and attaching the frame. If you don’t have one, a hammer and small nails can be used, though it will require more precision.
- Sandpaper (fine-grit): For smoothing wood filler and prepping surfaces for paint.
- Pencil: For marking your measurements.
Step-by-Step Guide: Crafting Your Frame Shelves
Step 1: Preparing Your Frames
Start by taking your chosen picture frames. The first order of business is to strip them down to their bare essentials. Carefully remove the glass, the backing board, and any existing hanging hardware from the back. You want to be left with just the empty frame. This is also a good time to give your frames a quick clean, especially if they are old or second-hand. Ensure they are free of dust and grime, which can interfere with paint adhesion later on.
Step 2: Measuring and Cutting the Wood for Your Shelf Boxes
Now, grab your measuring tape. You’ll need to measure the inside dimensions of each frame – specifically, the length and width of the opening where the picture would normally sit. This measurement is crucial because the wooden box you’re about to create will fit perfectly inside this opening. Once you have your measurements, it’s time to cut your 1×4 boards. For each frame, you will need two pieces cut to the length of the opening and two pieces cut to the width of the opening. For instance, if your frame opening measures 8 inches by 11 inches, you’ll cut two 8-inch pieces and two 11-inch pieces. Remember, each frame might have different dimensions, so measure each one individually for a custom fit. Safety first when using saws!
Step 3: Assembling the Wooden Box
With your pieces cut, it’s time to form the sturdy box that will become the shelf. Apply a generous line of Gorilla wood glue along the ends of your cut 1×4 boards. Then, carefully join them to create a rectangular box. I used my Ryobi Airstrike Nail gun to secure these pieces together, placing about three nails at each corner for maximum strength. If you don’t have a nail gun, you can use a hammer and small brad nails, just be sure to clamp the pieces while the glue dries for a strong bond. The combination of glue and nails provides excellent durability.
Your finished box should resemble this, a perfect frame for your soon-to-be shelf.
You can visually confirm that the box measures perfectly to fit the opening of your chosen frame, ensuring a seamless look.
Step 4: Attaching the Frame to the Box
Now for the exciting part – bringing the frame and box together to form your shelf! Apply a continuous line of wood glue around the back edge of the picture frame. Carefully center your wooden box on top of the glue-lined frame. Ensure that the front of the frame is facing up and the box sits flush with the back edges of the frame. Once aligned, use your nail gun (or hammer and brad nails) to secure the frame to the box. I used 1 1/4-inch brad nails, driving them through the back of the frame and into the wooden box. This connection creates a robust and unified shelf unit.
At this stage, your assembled frame shelf should look something like this, ready for its finishing touches.
Step 5: Finishing and Painting Your Shelves
The next step is crucial for achieving a professional, polished look. Before painting, use wood filler to meticulously fill all the nail holes. Apply a small amount of filler, pressing it firmly into each hole. Once dry, sand the filled areas smooth with fine-grit sandpaper. This ensures a flawless surface for painting. I then painted all of the boxes and frames with my favorite spray paint: Rust-Oleum Painter’s Touch in Heirloom White. This color offers a beautiful, soft, and versatile finish that complements almost any decor. Remember to apply several thin coats for an even, drip-free result, allowing adequate drying time between coats. Spray painting outdoors or in a well-ventilated area is always recommended.
Step 6: Hanging Your Beautiful New Shelves
Once your painted shelves are completely dry and cured, it’s time to hang them up! For this part, I relied on Command Strips – these things are absolutely incredible. They make hanging items so incredibly easy, offering a strong hold without the need for tools or leaving holes in your walls. I opted to use three pairs of Command Strips per frame shelf to ensure they were securely mounted. To use them, simply attach the strips in pairs, one side to the back of the shelf and the other to the wall. Make sure to press firmly for the recommended time to activate the adhesive. Then, align your shelves and press them onto the wall. Their ease of use and damage-free removal make them an ideal choice for renters or anyone who likes to rearrange their decor often.
Step 7: Decorating and Personalizing Your Frame Shelves
With your shelves securely on the wall, it’s time for the most enjoyable part: filling them! For my daughter’s room, I filled each box with items she frequently uses for her art projects and reading – think colorful pens, small sketchbooks, a favorite small plant, or beloved trinkets. I discovered the really cute ampersand sculpture HERE at Birch Lane, which adds a charming touch. The awesome task lamp is also a fantastic Birch Lane find; you can see it HERE! Birch Lane has become one of our favorite new stores for accessories, offering such cute and unique items. These shelves are perfect for showcasing small decorative items, small books, candles, or even small potted succulents. Let your imagination run wild and create a display that truly reflects your personality or the occupant of the room.
The Beautiful Result: A Transformed Space
Here is how these DIY frame shelves turned out in the finished bedroom. The impact they have on the wall space above the desk is incredible, adding both visual interest and much-needed storage without overwhelming the room. They perfectly complement the other DIY elements in the room, tying the entire design together with a cohesive, handcrafted feel. This project truly showcases how simple materials and a little creativity can result in stunning home decor.
Aren’t they so much fun? I truly hope you and your family love these DIY frame shelves as much as my daughter does. They’ve added an incredible amount of character and utility to her newly renovated space. If you embark on this project, I would absolutely LOVE for you to PIN and share these frames with all your friends and followers! Your support and enthusiasm mean the world to me!
Explore More Room Makeover Projects
This bedroom makeover has been a journey of creativity and craftsmanship. If you’re inspired to take on more DIY challenges for your home, especially if you’re working on a full room transformation, be sure to check out the other projects I’ve completed in this very room:
DIY Corbel Desk
DIY Board and Batten Wall
DIY Built-In Daybed
DIY Floating Shelf or Mantle
DIY Barn Door Media Console
Large Wall Letters