
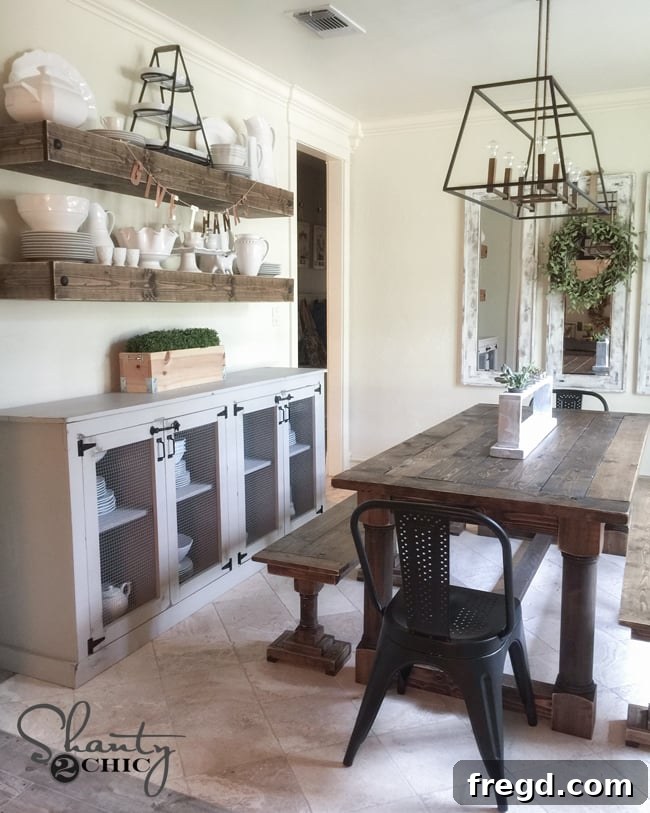
Transform Your Dining Room: Building a Stunning DIY Turned Leg Dining Table
Hello fellow DIY enthusiasts and home decor lovers! As many of you know, my home is a constant canvas for creativity and transformation. There’s a running joke in our household, often shared by my wonderful husband, that furniture in my home has a short lifespan in any single spot. It’s true – I have an insatiable desire to refresh and redecorate, and recently, that passion led me to embark on a complete dining room revamp. This ambitious project began, as many of my best ideas do, with a single spark: the undeniable itch to build a brand-new dining table. Little did I know, this one project would cascade into a full-scale room makeover, creating a dining space that truly reflects my style and passion for handmade furniture.
Today, I am absolutely thrilled to pull back the curtain and officially unveil the heart of my newly refreshed dining room: my magnificent new DIY Turned Leg Dining Table! This piece isn’t just a table; it’s a testament to the joy of hands-on creation, the satisfaction of seeing a vision come to life, and the incredible value of custom-built furniture. I poured my heart into designing and building this table, ensuring it would be a focal point that combines timeless elegance with robust functionality. Get ready to be inspired!
A Love Affair with Handcrafted Furniture
Can we just take a moment to talk about how utterly smitten I am with this table? Seriously, my affection for it runs deep. It’s more than just a piece of furniture; it’s a centerpiece that brings warmth, character, and a story to our dining experiences. The classic turned legs, the rich wood grain, and the sturdy construction all contribute to a piece that feels both luxurious and inviting. Every meal shared around this table feels a little more special, a little more ‘us’.
Your Blueprint for Success: Free Printable Plans
I understand that many of you share my passion for creating, and that’s why, as always, I am thrilled to share the entire building process with you. Below, I will meticulously walk you through every step, from selecting materials to applying the final finish. But before we dive into the nitty-gritty, I’m delighted to announce that you can download and print a complete set of FREE, detailed printable plans for this DIY Turned Leg Dining Table! Simply click HERE or on the button below to get started. These plans are designed to make your building journey as smooth and enjoyable as possible. A huge thank you goes out to our incredibly talented friend Jay from Jay’s Custom Creations. Jay tirelessly transforms our creative furniture designs into these user-friendly, professional plans, making it infinitely easier for you to bring these projects to life without having to squint at a phone screen in your workshop!
Gathering Your Essential Tools: A Smart Investment
You might be surprised at how straightforward this table is to build, even for those with intermediate woodworking skills. It does, however, require a few specialized tools that you might not currently have in your arsenal. But fear not! Consider this your perfect opportunity, your official excuse, to invest in some fantastic additions to your workshop. These tools aren’t just for this project; they’ll open up a world of possibilities for future DIY endeavors, making them invaluable assets for any aspiring builder. Trust me, you’ll thank yourself later!
Crafting the Foundation: The Elegant Turned Legs
Let’s begin with the stars of the show: those gorgeous turned legs. Oh, those legs! They truly elevate the entire aesthetic of the table. I had the pleasure of collaborating with one of my favorite companies, Osborne Wood Products, to custom-design these specific legs. Their craftsmanship and attention to detail are exceptional, making them the ideal partner for such a crucial design element.
For my wood choice, I opted for beautiful knotty pine. I simply adore the character and natural charm that the wood grain and knots bring to these legs. Each leg runs around $48, and shipping costs will vary based on your location. For my specific address, all four legs were shipped for approximately $50, bringing the total cost for the legs to around $250. While this might seem like a significant upfront cost to some, let me assure you, it’s an absolutely excellent price for custom-designed, high-quality turned legs. When you factor in the cost of these legs along with the additional lumber needed for the rest of the table, the total material cost for this entire project hovered around $300. To put this into perspective, a very similar turned-leg dining table from a well-known, beloved furniture store can easily retail for upwards of $2200, often without even including shipping. So, when you consider the savings and the satisfaction of building it yourself, there are absolutely no complaints from my end!
These are the exact turned legs I used for my stunning DIY dining table:
Precision Cuts: Preparing the Braces and Frame
Tackling the 4×4 Braces with Confidence
The very first step in constructing this table was preparing the robust 4×4 pieces that will serve as the braces along the bottom, connecting the elegant legs. Cutting a 4×4 piece of lumber accurately can be a challenging task, and for many standard 10-inch miter saws, it can even be impossible due to their limited blade capacity. For projects involving larger stock like this, both Ash and I swear by our Ridgid 12-inch sliding compound miter saws. While I hold a deep affection for my 10-inch Ryobi saw for many projects, when it comes to powering through thick materials, this 12-inch powerhouse truly gets the job done with precision and ease, making it an indispensable tool for serious woodworkers.
If investing in a 12-inch saw isn’t immediately feasible, you do have the option of having your local hardware store make these initial cuts for you. However, if you’re serious about long-term woodworking and aspire to tackle more substantial projects, I highly recommend looking into acquiring a 12-inch sliding miter saw. It’s a game-changer for versatility and capacity.
After precisely cutting your 4×4 pieces to the required length, the next crucial step involves making specific notch cuts on each brace. These notches are designed to perfectly accommodate the runners that will connect between the legs, creating a strong and seamless joint. I’ll admit, when I first encountered these cuts in the plans, I felt a slight wave of intimidation. I wasn’t entirely sure how I would achieve such a precise cutout from a thick 4×4. The diagram from our plans, which illustrates the exact cut I’m referring to, might seem complex at first glance:
Mastering the Notch Cut with a Circular Saw
The good news is, achieving this cut is actually far simpler than I initially anticipated! My trusty Ryobi 18V circular saw proved to be the perfect tool for creating these notches. Here’s how I approached it:
First, I adjusted the blade depth on my circular saw. This is a critical step for precision and safety. You typically do this by loosening a knob at the back or side of the saw and moving the shoe plate until the blade extends to the desired depth. For this particular notch, I set the blade depth to 1 inch. This ensures you cut just deep enough without going too far.
Next, using a pencil and a reliable speed square, I carefully drew the precise lines on the 4×4 brace, clearly marking the boundaries for where I would make my cuts. Accuracy here is key to a clean, tight-fitting joint.
To remove the material within the marked area, I employed a technique of making multiple, closely spaced passes with the circular saw. I started in the center of the notch and gradually worked my way towards the edges. This creates a series of kerf cuts that effectively “shave” away the wood. It can be a bit messy, generating a fair amount of sawdust, but the results are incredibly effective, providing a perfectly notched section that worked like a charm!
Once you’ve cleared out the material, the 2×4 runner should fit perfectly and snugly into this newly created notch. This creates a robust and stable joint that is essential for the table’s structural integrity.
Assembling the Heart of the Table: The Planked Top
Perfecting Pocket Holes with the Kreg Jig K5
At this stage, I turned my attention to crafting the tabletop. I cut all the individual planks to size and then proceeded to drill all the necessary pocket holes. For this critical step, I relied on my incredibly versatile Kreg Jig K5 model. I honestly love every Kreg Jig I’ve ever used, but the K5 truly stands out as an exceptional model suitable for nearly any woodworking project. Its thoughtful design incorporates so many user-friendly features, making it a joy to operate and ensuring precise, strong joints every time. For the tabletop, I created 1.5-inch pocket holes, which provide ample strength and a clean finish when assembled.
Achieving a Refined Look: Sanding and Edge Treatment
Before attaching the tabletop planks, I used my trusty Ryobi Corner Cat sander to gently round off all the corners and edges of each individual plank. This seemingly small detail makes a huge difference in the final appearance and feel of the table. The slightly softened edges give the table top a beautiful, refined, and handcrafted look once all the pieces are joined together, adding to its overall charm and ensuring a comfortable touch.
Bringing It All Together: Final Assembly Steps
Constructing the Tabletop with Ease
At this crucial stage, recognizing the sheer size and weight of the completed table, I made a strategic decision: I moved the entire build indoors. Attempting to maneuver this “baby” through doorways or lifting it by myself would have been a monumental, if not impossible, task. Assembling it inside my home ensured a much smoother and safer process. I began by carefully laying out all the prepared tabletop pieces on the floor, ensuring they were perfectly aligned and in their final configuration.
With the planks perfectly arranged, I then used my reliable Ryobi 18V drill to securely attach all the pieces together. I used 2.5-inch pocket hole screws, driving them into the pre-drilled pocket holes. The driver bit I use with my drill is specifically designed for pocket hole screws and conveniently comes included with the Kreg Jig, ensuring optimal torque and preventing stripping. This method creates an incredibly strong and seamless bond, essential for a durable dining surface.
Once all the long, central planks were securely joined, I then attached the two breadboards to the ends of the tabletop. These breadboards not only add to the aesthetic appeal but also help prevent the main tabletop from warping over time.
Securing the Lower Braces with Kreg HD
Now, let’s circle back to those substantial 4×4 braces for the bottom of the table. These require robust pocket holes for attachment to the turned table legs, and for this, I employed my Kreg HD Jig. The Kreg HD (Heavy-Duty) Jig is a fantastic, albeit specialized, tool that you might not use on every single project, but when you need maximum strength and stability for larger stock, it’s absolutely indispensable. Its drill bit is notably larger, and it uses heavier-gauge screws, making the resulting joint significantly stronger than what you’d achieve with a standard Kreg Jig. This added strength is crucial for the foundational elements of a large dining table.
Back inside for the main assembly of the base! I began by attaching the apron pieces to the top of the table legs. I used 2.5-inch pocket hole screws combined with a strong wood glue for maximum hold. This combination of mechanical fasteners and adhesive ensures a bond that will withstand years of use.
Once the apron was securely attached to the legs, I carefully positioned the entire leg and apron assembly onto the upside-down table top. I then used the pocket holes I had previously made in the aprons to screw the base firmly into the tabletop. I apologize for not having a photograph of this specific step; in the flurry of building, I had a momentary “brain fart” and forgot to capture it! Rest assured, it’s a straightforward process of aligning and screwing the frame to the underside of the table top.
The penultimate step before flipping the table over is to add the 4×4 braces. These attach to the bottom of the legs using the heavy-duty Kreg HD screws. You’ll notice that these braces are designed not to be flush with the very base of the legs, creating a distinctive and sturdy aesthetic. Once these are securely attached, you can carefully flip the entire table over. Finally, set the long central runner into its designated place, fitting perfectly into the notches you created earlier. I used my finish nailer to attach it firmly to the 4×4 braces, completing the lower structure and adding another layer of stability.
The Finishing Touches: Stain and Protection for Lasting Beauty
With the entire table assembled and standing proudly, it was time for the truly transformative step: applying the finish. I carefully flipped the table over one last time to ensure full coverage and then applied a generous coat of my current favorite stain color: Varathane Wood Stain in Ash. This stain provides a beautiful, muted, and sophisticated tone that perfectly complements the knotty pine, allowing its natural beauty to shine through while adding depth and character.
Varathane Wood Stain in Ash
You can easily find this fantastic product at your local Home Depot. After allowing the stain to dry – which only takes a remarkable hour! – I proceeded to apply a protective topcoat. For this, I used Varathane Triple Thick, and let me tell you, this product is nothing short of amazing. It’s a newer innovation that provides the equivalent of three coats of protective finish in just one application. Not only does it offer incredible durability, but it also dries incredibly quickly, saving you valuable time. You guys are going to absolutely love the ease of application and the flawless, long-lasting protection it provides for your woodworking projects!
The Grand Reveal: Your Completed DIY Dining Table!
And there you have it – completely finished! The culmination of careful planning, precise cuts, and dedicated assembly. This DIY Turned Leg Dining Table is not just a functional piece; it’s a statement, a conversation starter, and a source of immense pride. It embodies the beauty of handcrafted design and the satisfaction of building something truly spectacular for your home.
I sincerely hope you fall in love with this table as much as I have. It truly transforms the dining room and brings such a wonderful, personalized feel to our home. But don’t think for a second that the DIY journey ends here! Just wait until you see the other complementary pieces I’ll be sharing from this dining room makeover. I have plenty more exciting projects and inspiration lined up, promising to keep you all very busy and inspired!
Join the DIY Community!
If you’re feeling inspired and excited to tackle this project, I would absolutely LOVE for you to pin this table to your Pinterest boards and share it with all your friends and fellow DIY enthusiasts! Spreading the word about the joy of building makes the community stronger.
Thank you all so much for following along on this journey. Your enthusiasm and support mean the world to me. You truly are awesome!
Happy building!
Whitney