
Master the Art of Storage: Building Your Own Versatile DIY 6-Drawer Dresser
Following the overwhelming success and wonderful feedback on my daughter’s platform dresser bed project, I’m thrilled to dive deeper into the piece that truly makes it shine: the dresser itself! This isn’t just any dresser; it’s a meticulously designed 6-drawer unit that offers incredible storage, either as a standalone furniture piece or as the integral base for the beloved platform bed. Its adaptability is one of its greatest strengths, making it a fantastic addition to any bedroom or living space. Whether you’re looking to declutter a kid’s room or add stylish organization to your master suite, this DIY dresser promises both functionality and aesthetic appeal.
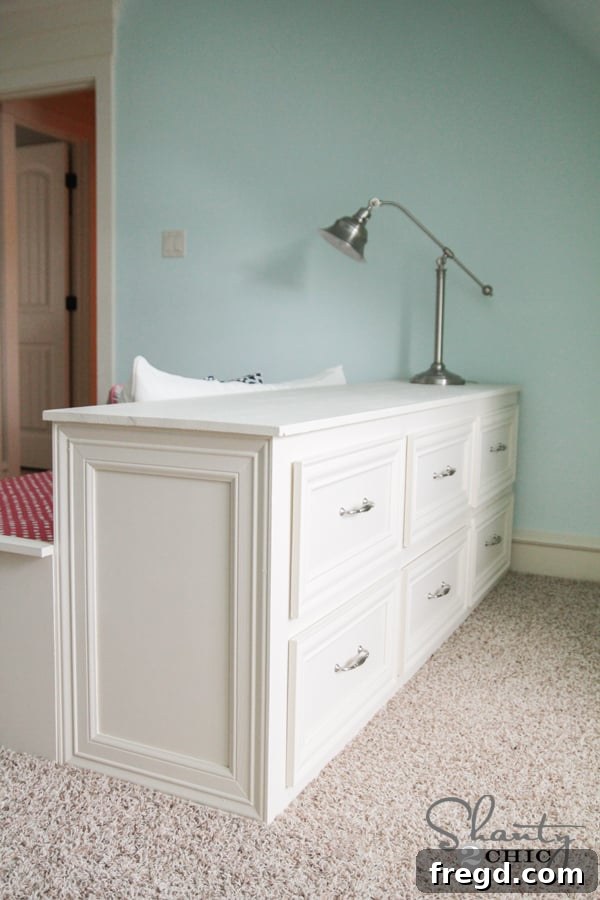
For those considering it as a standalone dresser, you’ll simply need to trim both sides if they will be visible. We’ll delve into that specific detail a bit later in the build process. But for now, take a moment to appreciate the finished piece, a testament to practical design and DIY dedication:
Unleash Your Inner Organizer with Ample Storage
Isn’t that simply delightful? And seriously, can we get a massive cheer for the incredible amount of storage this unit provides? As a busy mom, I can attest that having dedicated, spacious drawers is an absolute game-changer. This dresser isn’t just a pretty face; it’s a powerhouse of organization, perfect for clothes, toys, books, or anything else that needs a home. Say goodbye to clutter and hello to a beautifully organized space!
Download Your Free DIY Dresser and Bed Plans Today!
Ready to build this fantastic piece yourself? You can easily download our comprehensive FREE PLANS for this dresser and bed right HERE. Simply click the link or the button below to get started. As always, I’ll be walking you through the entire build process, sharing essential tips, tricks, and detailed photos to ensure your project is a resounding success. Plus, keep an eye out for exciting announcements, as we often feature giveaways of some of the very tools used in these projects!
Step-by-Step Guide: Crafting Your Custom Dresser
Phase 1: Constructing the Sturdy Frame
Let’s get started! The first crucial step in building this durable dresser is to construct the main frame, which will serve as the robust foundation for all six drawers. This initial stage involves straightforward, precise cuts, ensuring everything aligns perfectly. I relied on my trusty Ridgid Miter Saw for all the necessary cuts, achieving clean and accurate dimensions for each piece. To join these components, I added 3/4-inch pocket holes, a fantastic method for creating strong, concealed joints that contribute to the dresser’s clean aesthetic and structural integrity.
For the pocket holes located at the ends of each piece, I positioned the wood securely within the Kreg Jig, as demonstrated here, to ensure optimal angle and depth:
Conversely, for pocket holes running along the opposite direction, which are equally vital for the frame’s stability, the wood was positioned differently in the Kreg Jig to accommodate the unique angle needed:
Don’t be surprised if some of your pocket hole entries look a bit quirky, like this. It’s perfectly normal and part of the process, and it’s usually hidden once assembled!
Begin by assembling the main rectangular outer frame. This forms the perimeter of your dresser. Visualize the sturdy box that will house your drawers.
The image above clearly illustrates where all the pocket holes were placed for this initial rectangular structure. Once this is done, measure carefully and add the subsequent pieces that will begin to define the internal sections of the dresser.
Finally, integrate the dividing pieces. These are essential for creating the individual compartments for each drawer, ensuring proper spacing and support.
Preparing for the Back Panel: A Time-Saving Trick
Once your main frame is fully assembled, here’s a brilliant time-saving tip: place the completed frame directly onto the back piece of plywood. This allows you to accurately mark where everything lines up. This simple step is incredibly efficient and makes the subsequent stages of the build remarkably easy, preventing misalignments and costly mistakes down the line.
Simply use a pencil to carefully trace the entire perimeter of the frame onto the plywood. This outline will serve as your precise guide for attaching the back panel later.
The Plywood Advantage: PureBond for a Superior Build
Just like with the bed, a significant portion of this dresser utilizes plywood, making the choice of material crucial. To manage costs without compromising quality, I immediately opted for my favorite plywood product: PureBond Plywood. Many of you may already be familiar with PureBond, an exceptional hardwood plywood that has become our go-to for countless furniture projects. But what makes it so special?
PureBond plywood boasts an impressive list of benefits. First, it’s proudly made in the USA, supporting local manufacturing. More importantly, it’s formaldehyde-free, ensuring a healthier environment for my family and me, a peace of mind that is truly invaluable when building furniture for your home. It’s also incredibly affordable, allowing you to achieve the elegant look and feel of beautiful hardwood at a fraction of the cost. Furthermore, PureBond is crafted from sustainable, reusable resources, making it an environmentally conscious choice. However, above all these practical advantages, our absolute favorite feature is its stunning appearance. It is simply BEAUTIFUL!
Since discovering PureBond a few years ago, it quickly became our exclusive brand for plywood. The decision was effortless given its quality, safety, and aesthetic appeal. It’s a choice that delivers both performance and peace of mind.
You can readily find PureBond plywood at your local Home Depot. For this project, I chose birch for both the bed and the dresser, loving its smooth finish and natural grain. Given that it comes in large 4′ x 8′ sheets, which are notoriously difficult to transport, especially with five energetic kids in tow, I often take advantage of Home Depot’s convenient services. I let their lumber department do most of the heavy lifting for me!
The helpful staff at the lumber department gladly cut the large sheets down to more manageable sizes, making transport and subsequent cutting at home much easier.
For precise cuts at home, particularly when ripping down plywood, the combination of my Ryobi 18V Circular Saw and the Kreg Rip Cut attachment is indispensable.
This Ryobi circular saw is genuinely amazing. It shares the same battery as my other Ryobi tools, making it incredibly convenient, and it cuts through wood like butter – smoothly and effortlessly. When you attach the Kreg Rip Cut, it transforms into a highly accurate ripping tool, allowing you to achieve perfectly straight cuts on large sheets of plywood with ease and precision.
Assembling the Side Frames with Pocket Holes
Once all your individual cuts for the frame components are ready, the next step involves making the necessary pocket holes on the frame pieces themselves. For this task, my Kreg K5 Jig was the ideal tool. It provides incredible versatility and precision. You can see how I positioned the wood in the Kreg Jig to create the 3/4-inch pocket holes needed for strong, hidden joinery on the dresser sides.
These images clearly show the side pieces with all the strategically placed pocket holes, ready for assembly.
I started by building the side frames individually, carefully attaching them using a combination of Gorilla Wood Glue for superior bond strength and 1.25-inch pocket hole screws for a secure mechanical connection. The wood glue adds an extra layer of durability that ensures your dresser will stand the test of time.
You’ll notice that I faced the pocket holes outwards on this particular section. While this might seem counter-intuitive to the usual hidden pocket hole technique, there’s a good reason for it: it made the attachment process significantly easier, allowed for a stronger grip on more wood material, and, most importantly, these holes will be completely covered and concealed by decorative trim later on. It’s a clever trick to simplify the build without sacrificing the finished look.
Innovative Wooden Drawer Slides: Simplicity Meets Durability
Now, for one of my favorite features of this dresser: the ingenious wooden drawer slides! Can I get another cheer for ditching cumbersome metal drawer slides? This method offers a fantastic way to create fully functional, smooth-operating drawers without the common frustrations associated with metal slides – they can be tricky to attach, often get misaligned, and sometimes even fail over time. Our wooden slides are built to last and perform flawlessly.
The system for these drawers is elegantly simple, based on the same “L and T” design I utilized for my other daughter’s built-in bed. You’ll construct “L” and “T” shaped pieces onto the back frame, which will serve as incredibly durable and reliable runners for your drawers. All these components are crafted from 2×3 lumber. I used 3/4-inch pocket holes for all these joints, matching the thickness of the frames they will be securely attached to, ensuring a perfect fit and strong connection.
Remember to apply a small amount of Gorilla Wood Glue to each piece before fastening. This glue significantly enhances the strength and longevity of your joints, making them incredibly robust.
Once the glue is applied, simply attach these wooden slides to your main frame. The detailed plans provide precise measurements and locations for attaching each one, taking out all the guesswork.
You’ll notice a small, intentional space between the side frames and these wooden drawer slides, as shown here. This gap is crucial for ensuring smooth drawer operation and prevents any binding.
Here’s the complete assembly of the internal frame with all the wooden drawer slides perfectly in place, ready for the top frame to be attached and bring the structure together.
Attaching the Top Frame and Adding Decorative Trim
To attach the top frame, simply lay it over the entire structure and secure it through the pocket holes you prepared earlier. Sometimes, reaching these pocket holes can be a bit challenging due to tight angles – which is exactly why you absolutely NEED a tool like this in your arsenal:
That’s the Ryobi 18V Right Angle Drill – a true lifesaver for those awkward angles that might otherwise make you want to pull your hair out! It makes reaching and driving screws into tight spots an absolute breeze. For even greater maneuverability, I opted to use the shorter Kreg bit. Once the top frame is firmly attached, it’s time to add the side trim. If you’re building this as a standalone dresser, you’ll want to trim both sides; otherwise, just the visible side.
I chose an inexpensive baseboard for this trim, and I love how it instantly adds a substantial, custom look and feel to the dresser. It truly elevates the piece.
Now, for attaching the main top piece of the dresser! Once again, the Ryobi Right Angle Drill proved to be an invaluable tool. I cannot emphasize enough how much I appreciate having this drill for projects with tricky access points. It saved so much time and frustration.
Building the Drawers: Simple yet Robust
Next up: the drawers themselves! These are designed for simplicity and strength, constructed using 1/2-inch PureBond plywood. The core process involves building a basic box for each drawer, like this:
Once the box frame is complete, you’ll attach the drawer base using 1.25-inch wood screws. A critical tip for this step: always pre-drill with a drill bit before driving the screws. This simple precaution prevents your plywood from splitting, ensuring a clean and strong attachment for the drawer bottom.
With the drawer boxes complete, they should fit snugly and smoothly into each opening, gliding effortlessly on the wooden slides you’ve created. This snug fit is key for a professional look and feel.
The Finishing Touches: Drawer Trim, Filling, and Painting
Now for the final trim! I chose to line my drawer fronts so they extend about 1/2-inch wider than the drawer box itself. This slightly oversized trim adds a beautiful, beefier look to the dresser, giving it a more substantial and custom furniture appearance. This also serves a functional purpose, acting as a natural stop for the drawers when they are closed. Alternatively, you can trim them flush with the edge of the drawer boxes for a different, more minimalist look – both methods work wonderfully, it just depends on your preferred aesthetic.
To achieve a perfectly smooth, professional finish, I meticulously filled all nail holes and minor cracks with 3M Patch and Primer. This product is fantastic because it not only fills imperfections but also primes the surface, preparing it beautifully for paint. With all the prep work done, I painted the entire dresser (and bed, if building the combined unit) in Sherwin-Williams’ “Antique White.” It’s an absolutely perfect off-white shade, offering a timeless, elegant, and versatile look that brightens any room.
The Finished Masterpiece: Your DIY 6-Drawer Dresser
And here she is, all finished and looking magnificent! The pride of building your own furniture, especially a piece this functional and beautiful, is truly unmatched. This dresser offers incredible storage and versatility, whether integrated into the platform bed or standing proudly on its own.
I absolutely adore this project! It ingeniously combines the functions of a bed, a spacious dresser, and even a nightstand all in one elegant unit, making it an incredible space-saver for any room. The ample storage is a dream come true for keeping spaces tidy and organized, while the custom design adds undeniable charm.
Join Our Community and Share Your Creations!
Thank you so much for following along with this DIY journey! I would truly LOVE for you to share and pin this project with all your friends who appreciate thoughtful woodworking and creative home solutions. Your support helps us continue sharing these free plans and inspiring more people to pick up tools and create. Also, be sure to keep an eye on our upcoming posts and social media for exciting giveaways of the very tools we use in these projects – you might just win what you need for your next build!
Happy building, and have a fantastic day!
~Whitney