
Build Your Dream Bar Stools: DIY Turned Leg Designs with Free Plans!
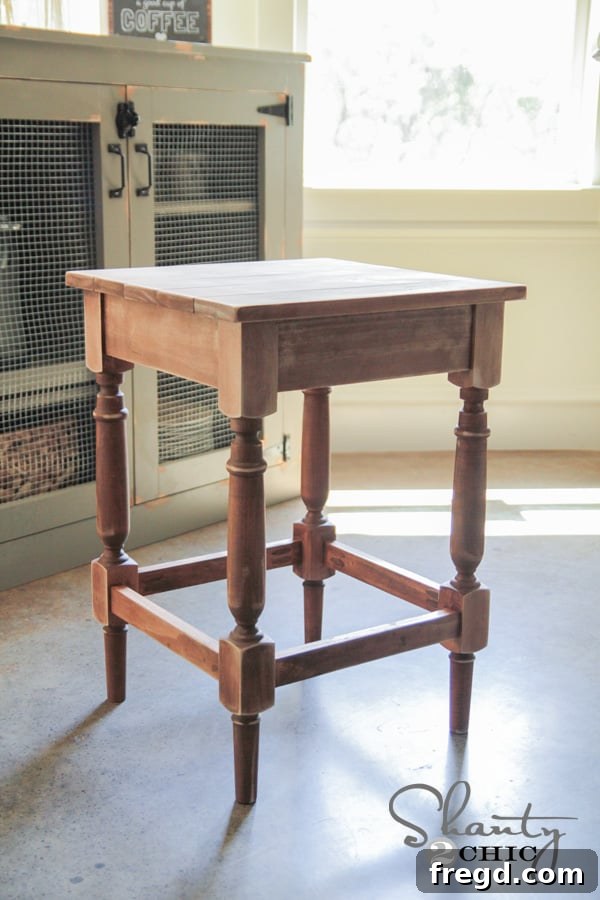
For years, I’ve envisioned the perfect turned leg bar stools completing my home’s aesthetic. The allure of classic craftsmanship combined with a personalized touch was irresistible. Finally, I decided to tackle this exciting woodworking project, and the results exceeded my expectations! I’m thrilled to share my journey and offer you the ultimate guide, complete with free printable plans, to help you create your very own custom bar or counter height stools.
Aren’t these stools absolutely charming? What makes this project truly special is the incredible ease of customization, allowing you to tailor them perfectly to your existing decor. Even better, we’re providing free, comprehensive plans for both bar height and counter height versions! To ensure your build experience is as smooth as possible, our incredibly talented friend Jay, from Jay’s Custom Creations, transformed my designs into easy-to-follow, printable plans. He’s a true craftsman, and I highly recommend checking out his work! You can access these invaluable free plans by clicking HERE or by using the button below. As always, I’ll walk you through my personal build process with detailed tips and photos to guide you every step of the way.
The Foundation: Exquisite Turned Legs from Osborne Wood Products
Let’s talk about my favorite feature: the legs! The elegant, turned design truly elevates these stools, giving them a timeless, sophisticated appeal. I had the pleasure of collaborating with Osborne Wood Products, our go-to furniture leg company, to custom-design and offer these specific legs to you. Their commitment to quality and craftsmanship is unmatched, making them the perfect partner for this project.
For those building the shorter, more intimate counter height stools, you can find the ideal turned legs HERE.
And for those opting for the taller, classic bar height stools, you’ll find the perfect turned legs HERE!
Tools and Materials You’ll Need
Before diving into the build, gather your tools and materials to ensure a smooth and efficient process. You’ll be amazed at how few specialized tools are required for such a professional-looking result!
Essential Tools:
- Miter Saw or Circular Saw (for precise cuts)
- Kreg Jig (K5 model recommended for versatility)
- Drill/Driver
- Measuring Tape and Pencil
- Safety Glasses and Hearing Protection
- Wood Clamps (especially a Kreg Right Angle Clamp and face clamps)
- Orbital Sander or Ryobi Corner Cat Sander (for distressing)
Materials List (per stool):
- 4 x Turned Legs (Counter or Bar Height) from Osborne Wood Products
- 5 x 1×4 boards, 17.5″ long (for the stool top)
- 4 x 1×4 boards, 12″ long (for the base apron)
- 4 x 1×2 boards, 12″ long (for the lower cross supports)
- 1.25″ Pocket Hole Screws
- Wood Glue
- Wood Filler (optional, for imperfections)
- Pine Dowels (if making your own pocket hole plugs)
- Varathane Stain (Provincial recommended) or your desired finish
- Polyurethane (for added durability, optional)
- Sandpaper (various grits, 120-220 for general sanding, finer for distressing)
Step-by-Step Construction Guide
This is a surprisingly easy build, perfect for intermediate DIYers and even ambitious beginners! The key is careful measurement and the magic of pocket hole joinery. Let’s get started!
Step 1: Making All Your Cuts
Accuracy is paramount in woodworking. Take your time to make clean, precise cuts according to the plans. For the stool tops, you’ll need five 1×4 boards, each cut to 17.5 inches long. For the base, prepare four 1×4 boards and four 1×2 boards, all cut to 12 inches long. Once these initial cuts are complete, you’re ready for the next phase: creating strong, hidden joints with your Kreg Jig.
Step 2: Assembling the Stool Top
I chose select pine for the stool top because it’s stable, easy to work with, and takes stain beautifully, offering a smooth finish that can be elegantly distressed. Begin by taking four of your 17.5″ long 1×4 boards. Using your Kreg Jig, drill 3/4-inch pocket holes along one edge of each of these four boards. I generally eyeball the spacing for these, ensuring a good distribution for strong attachment. The fifth 1×4 board will act as the anchor, receiving the screws from its neighbors.
Once your pocket holes are ready, it’s time to join these planks to form the solid stool top. Apply a thin bead of wood glue along the edges to be joined, then clamp the boards together. Using your drill and 1.25-inch pocket hole screws, drive the screws through the pocket holes you just made and into the adjacent board. Repeat this process until all five boards are securely fastened, creating a sturdy, seamless top. The pocket holes provide exceptional strength, ensuring your stool top is built to last.
Step 3: Preparing the Base Frame Components
Now, let’s move on to the base, which forms the structural support for the stool and connects to the elegant turned legs. Each stool base requires eight boards: four 1x4s at 12 inches long (these will be the upper apron pieces) and four 1x2s at 12 inches long (these will serve as the lower cross supports or stretchers). Once your cuts are complete, it’s time to get “jiggy” with your Kreg Jig again! (Couldn’t resist, sorry! 😉)
For the four 12-inch 1×4 boards, you’ll need to create two sets of pocket holes. First, position each 1×4 board in your K5 Kreg Jig to make 3/4-inch pocket holes on both ends. These will be used to attach these apron pieces to the turned legs. Take extra care to ensure consistent depth and placement for a clean fit.
Next, for the same four 12-inch 1×4 boards, lay each one on its side and add a few more pocket holes down one of its longer edges. These specific pocket holes will be crucial later for securely attaching the completed base frame to the stool top. Think of these as the hidden connectors that give the stool its seamless appearance.
Finally, for the four 12-inch 1×2 pieces (your lower cross supports), add two pocket holes to each end. It is vital to keep all these pocket holes on the same side of the board. This side will face the inside of the stool when assembled, ensuring a clean exterior. At this point, all your prepared base components should resemble the layout in the image below, and you’re perfectly set to begin attachment!
Step 4: Assembling the Base with the Turned Legs
The turned legs from Osborne Wood Products are designed with two convenient square spaces, perfectly sized and positioned for attaching the side pieces of your stool base. These integrated square sections simplify assembly and ensure a strong, stable connection. Start by attaching the four 1×4 apron pieces.
The top 1×4 pieces will sit flush with the very top of each bar stool leg. Apply a generous amount of wood glue to the joining surfaces, then use your drill and 1.25-inch pocket hole screws to secure them. For this step, I found my Kreg Right Angle Clamp to be an absolute lifesaver. This incredible clamp fits snugly inside a pocket hole, while a face clamp on the opposite side holds everything incredibly tight. It acts like an extra, incredibly strong hand, ensuring perfect alignment and a secure bond!
Next, attach the four 1×2 pieces, which form the lower cross supports. First, accurately measure and mark the center of the bottom square space on each leg. This ensures that your footrests will be perfectly level and spaced. With your measurements precise, apply wood glue and secure these 1x2s in place using 1.25-inch pocket hole screws, just as you did with the upper apron pieces. Remember to ensure the pocket holes on the 1x2s are facing inwards.
Once you’ve attached the pieces, you will have two distinct side assemblies that look like this, ready to be joined into a complete base frame:
Next, use your Kreg Right Angle Clamp once more to hold these side sections firmly in place while you attach the remaining 1×4 and 1×2 pieces to complete the sturdy, four-sided base frame. Ensure all connections are tight and square for maximum stability.
Step 5: Attaching the Stool Top to the Base
With your base frame and stool top complete, it’s time to bring these two primary components together. Lay the assembled stool top upside down on your workbench, ensuring it’s stable and protected. Then, carefully invert the base frame you just built and center it precisely on top of the upside-down stool top. This positioning allows easy access to the pocket holes you previously drilled along the sides of the 1×4 apron pieces.
Using 1.25-inch pocket hole screws, secure the base frame to the stool top by driving screws through those strategically placed pocket holes. Double-check your alignment before fully tightening to ensure the top is perfectly centered and the base is firmly attached. This connection creates a remarkably strong and integrated structure for your bar stool.
Step 6: Refinements and Finishing Touches
The structural build is complete, but the finishing touches are what truly transform your project into a piece of art. Take your time with these steps to achieve a professional and personalized look.
Concealing Pocket Holes:
For any visible pocket holes, particularly those on the inside of the 1×2 footrest pieces, I highly recommend creating and inserting custom plugs. This simple step vastly improves the aesthetic appeal of your finished stool, giving it a polished, furniture-grade look. I found THIS FANTASTIC TUTORIAL on YouTube for making your own plugs using pine dowels. It’s incredibly easy and worth the extra effort!
Sanding for Perfection:
Before any stain or paint, a thorough sanding is crucial. Start with a medium-grit sandpaper (around 120-150 grit) to smooth out any rough spots or imperfections from cutting and assembly. Progress to a finer grit (180-220 grit) for a silky-smooth surface that will beautifully absorb your chosen finish. Pay close attention to the turned legs and edges for a truly professional feel.
The Magic of Stain:
Now for the color! I opted for Varathane Stain in “Provincial” – it’s quickly become a new favorite for its rich, warm tone. You can find this excellent stain at your local Home Depot. One of its best features is that it typically requires only a single coat and dries within an hour, making the finishing process incredibly efficient. Apply the stain evenly with a brush or rag, wiping off any excess for a consistent finish.
Achieving the Rustic, Vintage Look: Distressing
After the stain has completely dried, I love to add a touch of character with distressing. Using my Ryobi Corner Cat sander (or any fine-grit sandpaper), I lightly sand the edges, corners, and other areas where natural wear would occur. This technique gently removes some of the stain, revealing the lighter wood beneath and creating a beautiful, rustic, and vintage-inspired aesthetic. It adds depth and charm that truly enhances the turned legs and overall design.
Customization Ideas for Your Bar Stools
One of the greatest joys of DIY furniture is the freedom to personalize every detail. While I chose a classic stain and subtle distressing, your stools can be as unique as your imagination! Consider painting them a bold color, experimenting with a two-tone finish (painted legs with a stained top), or even applying a chalk paint for a farmhouse chic look. You could also explore different levels of distressing to achieve a heavily worn antique feel or a more subtly aged charm. The possibilities are truly endless, allowing you to create pieces that perfectly reflect your individual style and complement your home decor.
Cost Breakdown: Smart Savings with DIY
You might be wondering about the investment for these custom beauties. While everyone’s shipping costs for the Osborne Wood Products legs will vary based on location, I can provide a clear estimate for the wood itself, excluding shipping. For the counter height stools, each turned leg costs approximately $25 (including tax). You’ll then need roughly three additional boards for the tops and bases, which can be acquired for around $10.
This brings the total estimated cost for each counter height stool to approximately $110. I understand this might seem like a substantial initial figure, but compare this to designer box stores like Pottery Barn or Ballard Designs, where similar quality, turned-leg stools can easily retail for three times that price or more. Building your own not only gives you a superior, custom product but also incredible savings. It’s a win-win in my book!
Safety First in Your Workshop
Always prioritize safety when working with power tools and lumber. Wear appropriate personal protective equipment (PPE), including safety glasses and hearing protection. Ensure your workspace is well-lit and clear of obstructions. Double-check all measurements and tool settings before making cuts. If you’re unsure about any step, refer to your tool manuals or seek advice from an experienced woodworker. A safe workshop is a happy workshop!
Your DIY Journey Awaits!
What do you think of these turned leg bar stools? I’m absolutely delighted with how mine turned out, and I’m eager to complete the remaining six for a full reveal in my home! I truly hope this detailed guide empowers you to embark on your own DIY furniture-building adventure. The satisfaction of creating something beautiful and functional with your own hands is unparalleled.
Please don’t hesitate to reach out if you have any questions at all about this project. I would absolutely LOVE for you to pin and share this tutorial with all your friends and fellow DIY enthusiasts! Let’s inspire more people to craft their dream homes.
~ Whitney