
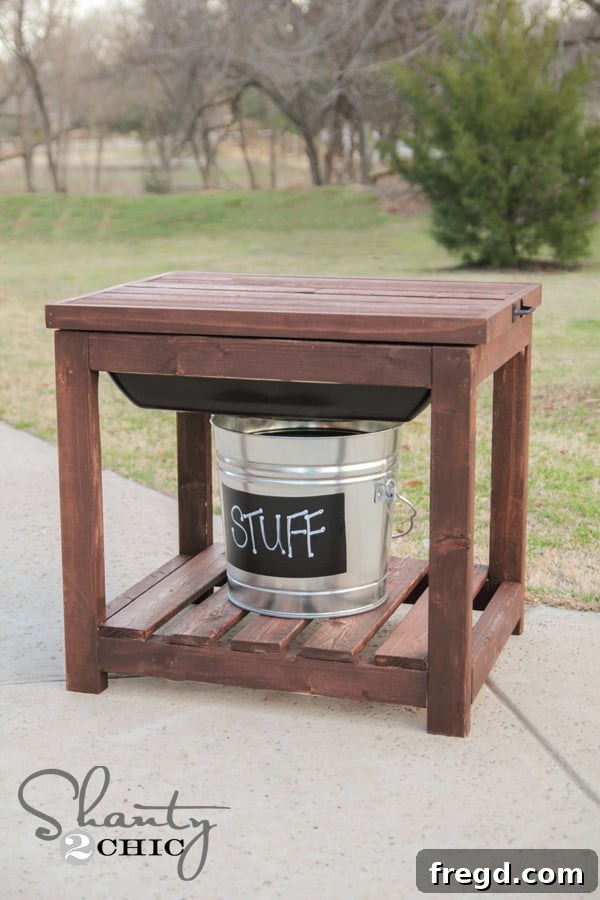
Welcome, fellow DIY enthusiasts! We’re absolutely thrilled to share our latest project, a fantastic addition to any backyard that promises hours of fun for your little ones: a DIY Sand Table with a Lid! Before we dive into the details, remember to follow us on Instagram and Pinterest to keep up with all our creative endeavors and receive daily inspiration for your next build.
There’s something truly special about crafting a piece of furniture that brings joy and sparks imagination, especially when it’s for children. For a while, we’d been dreaming of building a sandbox for our kids, but we had a few specific requirements in mind. We knew we wanted a design that was not only functional but also highly practical. The key features on our wishlist included a protective lid to keep out debris and unwelcome animal visitors, and a compact size that wouldn’t dominate our outdoor space. After some thoughtful designing and meticulous planning, we’re incredibly proud to unveil the result – a sturdy, charming, and highly functional sand table!
The best part? This entire project was completed for under $30! In an age where children’s toys and outdoor play equipment can be quite expensive, building your own budget-friendly solution feels like a real win. Think of it as an affordable source of entertainment and creative play for your kids, and a rewarding weekend project for you. We often say that a good DIY project is a cheap babysitter, and this sand table definitely fits the bill!
Why Build a DIY Sand Table? Benefits Beyond Playtime
Beyond the sheer fun it provides, a DIY sand table offers a multitude of benefits that make it an exceptional addition to your home. For starters, sand play is a fantastic sensory activity crucial for early childhood development. It encourages tactile exploration, fine motor skills, and hand-eye coordination as children dig, scoop, and mold. This hands-on engagement fosters creativity, problem-solving, and imaginative play, allowing kids to construct their own miniature worlds right in your backyard.
From a practical standpoint, building your own sand table provides unparalleled cost savings compared to purchasing a pre-made one. You control the material choices, ensuring durability and quality that often surpasses mass-produced alternatives. The ability to customize the size, finish, and even integrate additional features means you can perfectly tailor it to your space and aesthetic preferences. Our design, specifically, addresses common sandbox challenges: the integrated lid is a game-changer for keeping out leaves, rain, and curious neighborhood pets, preventing your sandbox from becoming an unintended litter box or a breeding ground for weeds. Its elevated design also makes it more comfortable for younger children to play, reducing bending and stooping, and can even double as a regular outdoor activity table when the sand tub is removed.
Ready to bring this fantastic project to life in your own home? We’ve made it incredibly easy for you! Just click the photo below to access the comprehensive, FREE plans for this sand table. Our plans are designed to be user-friendly, catering to both seasoned DIYers and those new to woodworking. They include a detailed supply list, ensuring you have all the necessary materials before you start, and a precise cut list that takes the guesswork out of measuring and sawing. This comprehensive guide will walk you through each step of the construction process, making your build experience smooth and enjoyable. Woohoo!
Gathering Your Tools: Essential for a Smooth Build
Before we grab our lumber and start cutting, let’s talk about the key tools that will make this project not only possible but also incredibly satisfying. Having the right tools on hand ensures precision, efficiency, and safety. For this DIY sand table, a few specific items are truly indispensable.
First and foremost, you’ll need a reliable Kreg Jig. This tool is an absolute game-changer for woodworking, especially when you want strong, concealed joints. We used our Kreg Jig for most of the frame assembly and also for constructing the lid. For this project, we drilled 1.5-inch pocket holes for the main frame components. If you’re wondering which model to use, we highly recommend the K5. It’s our personal favorite, boasting features like an easy-to-use front-mounted clamp, a dust collection port, and a material thickness stop that simplifies setup and ensures accurate pocket holes every time. These features make it incredibly user-friendly, even for those new to pocket hole joinery.
You’ll also need a powerful and reliable drill. We relied on our Ryobi 18V drill, paired with the Kreg driver bit, to effortlessly drive all the pocket hole screws. A good cordless drill provides the torque and flexibility needed to work around your project without being tethered by a cord. For the bottom planks and the lid trim, a cordless nail gun, specifically the Ryobi AirStrike, proved invaluable. If you don’t already own one, this tool is a must-have for quickly and securely attaching trim and thinner boards. It’s incredibly fast and leaves a clean finish with minimal effort.
Finally, don’t underestimate the power of wood glue. For any project, especially one designed for outdoor use and expected to hold considerable weight like sand, wood glue is your best friend. It significantly strengthens every joint, creating a bond that’s often stronger than the wood itself. We liberally applied wood glue to all seams before attaching pieces with screws or nails, ensuring a robust and durable structure that will withstand years of enthusiastic play.
Building the Frame: A Step-by-Step Guide to Your Sand Table
Let’s get started on the construction! The foundation of our sand table is a sturdy frame built primarily from 2×3 lumber. Precision in cutting and assembly is key here to ensure a level and stable finished product.
**Step 1: Preparing Your Wood and Assembling the Sides**
Begin by cutting all your 2×3 pieces according to the measurements provided in the free plans. It’s crucial that these cuts are square for a professional-looking and strong frame. Once cut, set your Kreg Jig to drill 1.5-inch pocket holes. We drilled these holes strategically on all the horizontal 2×3 pieces that will connect the vertical legs, as well as the pieces that will form the long sides of the table. This is how the 2×3 pieces will look in the Kreg Jig after you’ve drilled your pocket holes, ready for assembly.
Next, we assembled two identical side frames. These consist of two vertical 2×3 legs connected by a horizontal 2×3 piece, all joined with pocket hole screws. For this critical assembly, we used 2.5-inch pocket hole screws. You might notice that ours are blue – these are Kreg’s Blue-Kote screws, specifically designed for outdoor projects. Their corrosion-resistant coating makes them ideal for furniture that will be exposed to the elements. We use them for many indoor projects too, simply because of their superior quality. Since this table would be holding a considerable amount of weight from the sand, we didn’t just rely on screws; we applied a generous amount of wood glue to all the mating surfaces before driving each screw. This combination creates an incredibly strong and durable joint.
Using our Ryobi 18V drill with the Kreg driver bit, we secured each screw firmly. It’s important to keep your pieces clamped tightly while driving screws to prevent any shifting and ensure a flush, square joint. This attention to detail in these initial steps pays off immensely in the final stability of your sand table.
Here’s what both of our initial side frames looked like once assembled and ready to be connected.
**Step 2: Connecting the Side Frames**
With the two side assemblies complete, the next step is to connect them to form the full rectangular frame of the sand table. We achieved this using the 18.5-inch 2×3 pieces, again following the same method of drilling pocket holes, applying generous wood glue, and securing with 2.5-inch Blue-Kote pocket hole screws. Ensure that your connections are square and secure, checking with a speed square as you go. This meticulous approach prevents any wobbling and ensures a solid structure that can withstand enthusiastic play.
Here’s a snapshot of our first two sides successfully attached. You might spot a little helper in the background – our 3-year-old was quite the “project manager” for this build, adding her unique touch to the process! It’s moments like these that make DIY projects even more special.
Next, attach the remaining 18.5-inch pieces to complete the rectangular frame, mirroring the previous step. Once all four long connecting pieces are secured, you’ll have a robust and complete frame for your sand table, ready for the bottom planks.
**Step 3: Installing the Bottom Planks**
With the main frame solidly constructed, it’s time to create the base for your sand tub. For this part, we used several planks, cutting them to the specified length from our free plans. We then used our Ryobi AirStrike cordless nail gun, which is one of the most exciting and efficient tools in our garage. This tool significantly speeds up the process, allowing for quick and clean attachment.
Before nailing each plank, we applied a line of wood glue along the top edge of the 2×3 frame where the plank would sit. This creates a stronger bond than nails alone, crucial for a bottom that will support the weight of sand. We then secured each plank into the 2×3 frame using 1 1/4-inch brad nails. The AirStrike makes this process almost effortless, driving the nails flush with the surface, leaving a tidy finish. Continue this process until all the bottom planks are securely in place, forming a solid platform for your sand tub.
Crafting the Protective Lid and Selecting Your Sand Tub
One of the most essential and beloved features of this sand table is its protective lid. This ingenious design prevents your “bad boy” from turning into a neighborhood litter box, keeps out leaves and debris, and ensures your sand stays clean and dry for play. Crafting the lid is a rewarding part of the project, creating a sturdy and functional cover.
**Constructing the Lid**
To build the lid, we once again turned to our trusty Kreg Jig. The lid is made up of several planks joined together to form a solid panel. For this section, we adjusted our Kreg Jig to drill 3/4-inch pocket holes and used 1.25-inch pocket hole screws. We carefully aligned the planks side-by-side, drilled the pocket holes along the edges, and then joined them with wood glue and screws to create a wide, flat surface. This technique ensures a strong, seamless panel that will stand up to the elements and daily use.
Once the planked panel was assembled, we trimmed the outside edges with 1×2 pieces. These not only provide a clean, finished look but also add structural integrity to the lid and help it sit snugly on the sand table frame. We attached these 1×2 trims using the nail gun and a liberal amount of wood glue, just as we did with the bottom planks. This creates a durable and attractive lid that perfectly complements the sand table.
**Choosing Your Sand Tub**
The secret to the functional and removable sand container is a simple, all-purpose mixing tub. We sourced ours from the concrete aisle at Lowe’s, and you can often find similar options at Home Depot. These tubs are incredibly durable, inexpensive (typically around $6 each), and perfectly suited for holding sand. The specific tub we used measures 26 inches by 20 inches. It’s important to note that if you find a tub with different dimensions, you may need to slightly adjust the frame dimensions of your sand table to ensure a perfect fit. Simply measure your chosen tub and make corresponding modifications to the length and width of the connecting 2×3 pieces in your frame. This flexibility ensures that you can adapt our plans to the materials readily available to you.
The Grand Finish: Protecting and Beautifying Your Outdoor Sand Table
The final step in bringing your DIY sand table to life is applying a protective and beautiful finish. Since this piece will be living outdoors, proper finishing is not just about aesthetics; it’s crucial for protecting the wood from the elements and ensuring its longevity. Choosing the right stain and sealant will make all the difference in how your sand table withstands sun, rain, and enthusiastic playtime.
For our sand table, we opted for Rust-Oleum Ultimate Wood Stain in the rich “Carrington” shade. This particular stain provides a lovely, classic look that blends beautifully with any outdoor setting. While some parents might lean towards painting their sand table in bright, fun colors – which is absolutely a fantastic option for personalization – we chose a more natural wood aesthetic to make it “pretty for outside.” Staining not only enhances the natural grain of the wood but also provides an initial layer of UV protection, guarding against fading and sun damage.
Because this sand table is destined for outdoor life, simply staining it isn’t enough to provide lasting protection. The most critical step for outdoor durability is applying a high-quality topcoat. We finished our stain with two generous coats of Spar Varnish. Spar varnish is specifically formulated for exterior wood applications, offering superior protection against moisture, UV rays, and temperature fluctuations. It creates a flexible, highly water-resistant barrier that helps prevent the wood from cracking, peeling, or fading over time. Applying two coats ensures maximum protection, sealing the wood effectively and giving it a beautiful, subtle sheen that highlights the stain beneath.
The Finished Masterpiece: Ready for Playtime!
And here it is, all finished and ready for countless hours of imaginative play! The combination of sturdy construction, thoughtful design, and durable finishing has resulted in a sand table that is not only visually appealing but also built to last. Seeing the final product, especially knowing the joy it will bring, is truly the most rewarding part of any DIY project.
The integrated lid is perfectly designed to sit securely, protecting the sand when not in use. This feature truly sets our DIY sand table apart, offering convenience and hygiene that traditional open sandboxes simply can’t match.
To make lifting the lid effortless for both adults and children, we added some stylish black sash pulls to each side. These small hardware details not only enhance functionality but also contribute to the overall finished aesthetic of the table, giving it a polished and purposeful look.
And as you can tell from these happy faces, we have some very satisfied customers! Seeing the kids immediately dive into play, scooping and building, confirms that this DIY sand table was a resounding success. There’s nothing quite like the sound of children’s laughter filling the backyard, all thanks to a project you built with your own hands.
Remember, guys! You don’t have to start from scratch to build this fantastic outdoor play solution. We’ve done all the hard work for you. You can download, save, or print the FREE, detailed plans for this incredible sand table by clicking HERE! These plans are your complete guide, ensuring you have all the information you need to successfully build this project from start to finish. We are passionate about empowering fellow DIYers, and providing these free plans is our way of helping you create something wonderful for your family and home.
We would absolutely LOVE for you to share this project and pin it with all your friends on Pinterest! Spreading the word about accessible and affordable DIY projects helps inspire others to pick up their tools and create. If you have any questions at all about the build, the tools, the materials, or anything in between, please don’t hesitate to reach out in the comments below. We’re always happy to help and share our experiences. Happy building!
~Whitney