
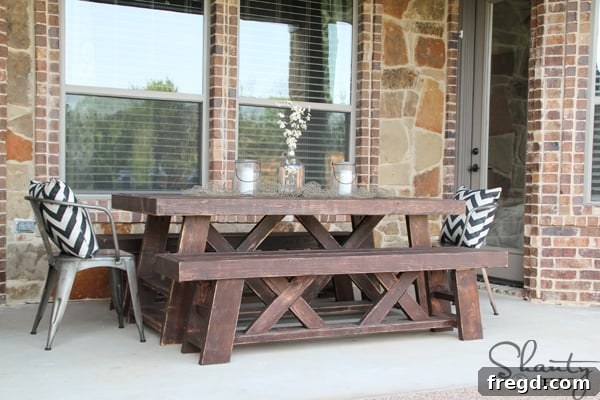
Build Your Own Beautiful & Affordable DIY Outdoor Dining Benches: Free Plans Included!
Welcome back, fellow DIY enthusiasts! As promised, we’re thrilled to share the highly anticipated companion project to our popular Outdoor Dining Table: a set of matching outdoor benches! If you haven’t yet seen the tutorial or grabbed the free plans for the table, you can find them right here. These benches are designed to perfectly complement your outdoor dining setup, creating a cohesive and inviting space. However, their versatile design means they also stand beautifully on their own, offering flexible seating solutions for any patio, deck, or garden area.
Imagine this: a stunning, sturdy outdoor dining set that comfortably seats your family and friends, all built by your own hands. Now, imagine achieving that for an incredibly low cost. That’s exactly what we’re offering with this project! You might find it hard to believe, but the entire outdoor dining ensemble – comprising the table and two matching benches – cost an astonishingly low $125 in lumber! This budget-friendly approach allows you to create high-quality, custom outdoor furniture without breaking the bank, leaving you more to spend on those delightful finishing touches.
Get Your Free Printable Bench Plans!
To make your building journey as smooth as possible, we’re providing comprehensive, FREE printable plans for these outdoor benches. These detailed plans will guide you through every cut, every drill, and every assembly step. Simply click the link below or the image to download and print your very own copy. Having the plans in hand will ensure you have all the necessary measurements and diagrams at your fingertips, making this DIY project incredibly accessible for all skill levels.
Your Step-by-Step Guide to Building Outdoor Benches
If you successfully tackled the outdoor dining table, you’ll find these benches to be a familiar and even quicker build. The core construction principles are similar, just on a slightly smaller scale, making this project an excellent next step in your woodworking journey. Even if you’re new to DIY, don’t fret! We’ve meticulously broken down each stage into easy-to-follow steps, complete with detailed pictures. Our aim is to empower you to create beautiful, functional furniture with confidence. Let’s gather our tools and materials, and get ready to build!
1. Making Your Cuts: Precision is Key
We advocate for a “measure and cut as you go” approach, which helps ensure accuracy and minimizes waste. For these benches, we begin by cutting the 2×6 boards that will form the primary seating surface. While precise measurements are crucial, slight adjustments can often be made during assembly if needed. Use a reliable saw, such as a miter saw or circular saw, to achieve clean, straight cuts. Always double-check your measurements against the plans before making any cut, and remember to prioritize safety by wearing appropriate eye protection.
2. Drilling Pocket Holes with Your Kreg Jig
Pocket holes are a game-changer for woodworking, creating strong, hidden joints that elevate the professionalism of your projects. Using a Kreg Jig, we drilled all the necessary pocket holes into the 2×6 boards. For this project, we set our Kreg Jig and the depth collar to 1.5 inches, matching the thickness of our lumber. If you’re new to the Kreg Jig, it’s an incredibly user-friendly tool, and we even have a beginner-friendly video tutorial available here to get you started. Mastering pocket hole joinery will open up a world of DIY possibilities!
As you can see in the image, the two main boards for the bench top will feature pocket holes primarily towards their outer edges. This design choice is deliberate: since these benches are for outdoor use, we leave a small gap between the two boards in the middle. This crucial gap allows for proper drainage and accommodates natural wood expansion and contraction due to changes in humidity and temperature, preventing warping and extending the life of your furniture. The pocket holes on the outer edges are specifically for attaching the decorative trim pieces.
3. Assembling the Bench Seat: Adding the Trim
With the pocket holes drilled, it’s time to attach the trim pieces that frame the bench top. First, measure and cut your trim pieces. For a professional, finished look, cut both ends of the trim at a 45-degree angle, ensuring they meet seamlessly at the corners to form a crisp mitered joint. To secure the trim to the planks, we used 1.5-inch Kreg pocket hole screws in conjunction with a strong, waterproof wood glue. While clamps aren’t strictly necessary if you’re working solo, they can certainly make the process easier by holding the pieces firmly in place while you drive the screws. Ensure a tight fit for maximum durability, especially for outdoor furniture that will face the elements.
And just like that, the first bench top is fully assembled! You’re making excellent progress towards your beautiful new outdoor seating. Take a moment to appreciate the clean lines and solid construction of your work.
4. Attaching the Legs and Top Stretcher for Stability
Now, let’s give these benches some sturdy legs! Each leg assembly will require 1.5-inch pocket holes for attachment. We recommend using 2.5-inch pocket hole screws along with wood glue for maximum strength and longevity. Once the leg assemblies are prepared, attach them firmly to the bench tops using 2.5-inch wood screws. We often opt for premium screws like Spax from Home Depot, which typically don’t require pre-drilling and save time. However, standard outdoor-grade wood screws will work perfectly well, just remember to pre-drill pilot holes to prevent wood splitting, especially in harder woods. At this stage, also attach the top stretcher between the leg assemblies, again using 2.5-inch wood screws. This stretcher is crucial for reinforcing the structure and preventing any wobbling.
You can truly see the benches taking shape now with the legs and top stretchers securely in place. The robust framework is essential for furniture that will endure outdoor conditions and frequent use.
5. Adding Side Stretchers for Enhanced Durability
The next step involves attaching the side stretchers to the legs. These pieces further enhance the structural integrity of your benches, preventing lateral movement and ensuring a rock-solid feel. When working in potentially tight areas, specialized tools can be incredibly helpful. We used our Ryobi Right Angle Drill paired with a short Kreg driver bit to navigate the confined spaces and securely drive the screws. If you don’t have a right-angle drill, you can still achieve a strong connection by driving 2.5-inch wood screws through the sides of the legs into the stretchers. After assembly, these visible screw holes can be neatly filled with wood filler for a clean finish.
6. Completing the Framework: Runners and X-Braces
With the main leg structure and stretchers in place, it’s time to add the final stretcher, often referred to as a runner, that connects the lower parts of the leg assemblies lengthwise. This piece ties everything together structurally and prepares the frame for the decorative X-braces.
Next, we move on to creating the signature X-braces that give these benches their distinct farmhouse-style charm. Start by attaching the longer pieces of the X, carefully positioning them according to your plans. These not only add significant aesthetic appeal but also contribute to the overall rigidity of the bench.
Finally, attach the shorter pieces of the X-braces, completing the crossed design. You’ll notice that this step might expose a few more pocket holes. For a smooth, finished look that’s ready for staining or painting, we highly recommend filling all visible pocket holes and screw holes with a good quality wood filler. Once the filler is dry, sand it flush with the surrounding wood, ensuring a seamless surface. Now, the structural build is complete, and it’s time for the exciting transformation with the finish!
The Finishing Touches: Stain, Distress, and Protect
The finish you choose for your outdoor benches is just as important as the construction itself. It protects the wood from the elements and brings out its natural beauty, defining the overall aesthetic of your furniture. Follow these steps to achieve a durable and stunning finish.
1. Applying the Stain: Deep Color in One Coat
For this project, we opted for a single coat of Rust-Oleum Carrington stain. We’ve found Rust-Oleum stains to be incredibly reliable and efficient. Apply the stain evenly with a clean cloth, allowing it to penetrate the wood for about five minutes. Then, with a fresh, clean cloth, gently blend and wipe away any excess. The beauty of this particular stain is its one-coat application, which delivers a rich, deep color, and its quick-drying formula (just one hour!). This makes it an absolute favorite for busy DIYers and parents who want stunning results without waiting around all day.
2. Optional Distressing: Adding Character
Once the stain has thoroughly dried, you have the option to add a touch of character through distressing. We love the charm of slightly aged furniture, so we used our Ryobi Corner Cat Sander to gently distress all the edges of the benches. This step isn’t mandatory, but it’s a fantastic way to give your brand-new furniture a beautifully weathered and lived-in look that complements a rustic or farmhouse style. Experiment with light sanding on corners and raised areas until you achieve your desired level of distress.
3. The Essential Protective Layer: Spar Varnish
For any outdoor furniture, a robust protective finish is non-negotiable. To ensure these benches withstand the elements – sun, rain, and fluctuating temperatures – we applied multiple coats of Rust-Oleum Spar Varnish in a satin finish. Spar varnish is specifically formulated for outdoor use, offering superior UV resistance and flexibility to move with the wood, preventing cracking and peeling. We recommend at least three coats for optimal protection, allowing each coat to dry completely according to the manufacturer’s instructions before applying the next. This final step is crucial for the longevity and beauty of your DIY outdoor benches.
And with that, your magnificent DIY outdoor dining benches are complete! You’ve transformed simple lumber into a functional work of art, ready to be enjoyed for years to come.
Styling Your Outdoor Oasis: Beyond the Build
One of the greatest joys of DIY is the incredible savings it provides. Because we were able to build this entire outdoor dining set – table and two benches – for just $125 in lumber, we had plenty of room in our budget to splurge on making the space truly inviting and stylish. This allowed us to invest in comfortable chairs, plush pillows, and a captivating centerpiece, elevating the entire outdoor dining experience.
We sourced a fantastic set of chairs from World Market, which perfectly complemented the rustic charm of our DIY benches. For added comfort and a pop of color, we found durable outdoor pillows at Target, along with smaller lanterns and LED candles to create a warm, ambient glow as the sun sets. The larger gallon jug and decorative fishing net, adding a touch of coastal flair, were discovered on Amazon. Don’t underestimate the power of accessories to transform your DIY creations into a truly personalized and inviting outdoor retreat!
Thank you so much for joining us on this DIY journey. We hope this detailed tutorial empowers you to create your very own affordable and beautiful outdoor dining benches. There’s immense satisfaction in building something with your own hands, especially when it enhances your home and lifestyle. Happy building!
~Ashley