
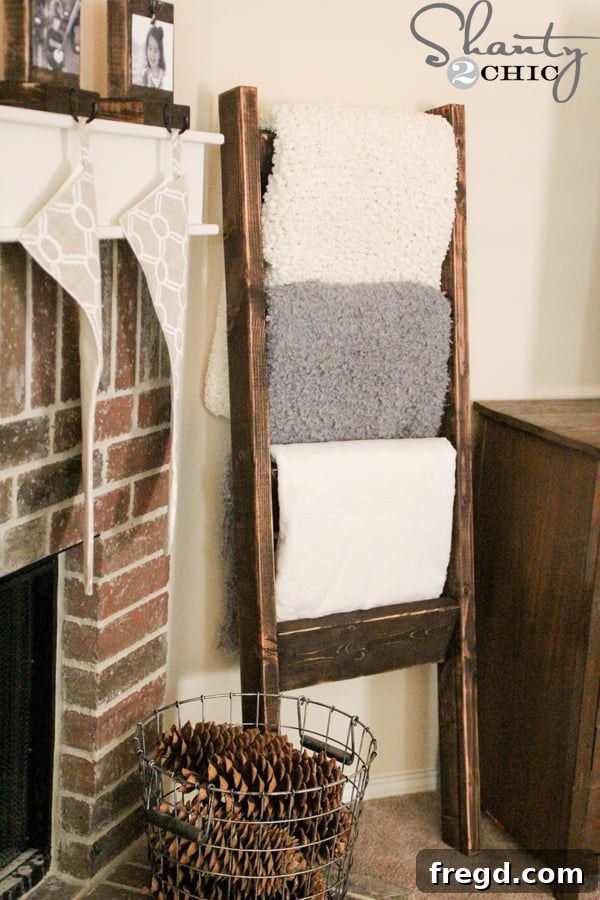
DIY Blanket Ladder: Craft a Stylish and Functional Storage Solution
Transform your living space with a charming and practical DIY blanket ladder! This comprehensive guide will walk you through building a beautiful, sturdy blanket ladder using just a few basic tools and affordable lumber. Perfect for beginners in woodworking, this project offers free plans and a step-by-step tutorial, proving that creating stylish home decor doesn’t have to be expensive or complicated. Get ready to add a touch of warmth and organization to your home, whether for your family or welcoming guests.
I’ve always loved making my home feel cozy and chic, especially during the holidays. While blanket ladders are popular for storage, I envisioned a specific “shanty” aesthetic that truly stands out. My favorite feature of this design is the use of robust 2×6 boards for the rungs, which give the ladder a wonderfully solid and chunky appearance. The result is a piece that’s not only incredibly functional for displaying blankets but also serves as a captivating decor accent. You’ll be amazed at how simple and inexpensive it is to construct – I built mine for around $15, making it an incredibly rewarding project.
CLICK HERE TO JUMP TO THE FREE PRINTABLE Easy DIY Blanket Ladder plans
Let’s dive into how you can build one too!
How to Build a DIY Blanket Ladder
Building your own blanket ladder is an incredibly rewarding experience, offering both practical storage and a stylish decor element for any room. This project is designed with the beginner in mind, requiring minimal tools and basic woodworking skills. The “shanty chic” aesthetic of this particular ladder, characterized by its sturdy and substantial 2×6 rungs, ensures it makes a statement while seamlessly blending into various interior styles, from farmhouse to modern rustic. Let’s gather our materials and get ready to transform simple lumber into a functional work of art!
Materials and Tools for Your Blanket Ladder
One of the most appealing aspects of this DIY blanket ladder is its affordability and the common availability of its materials. You can find everything you need at your local hardware store, often for under $15-$20 depending on lumber prices and your choice of finish. Investing in a few basic tools will make this project a breeze, and these tools will serve you well for many future DIY endeavors.
Essential Supplies:
- 2 – 2x4x8 Pine Boards or Framing Lumber: These will form the vertical sides of your ladder. Pine or whitewood are excellent choices due to their affordability, ease of cutting, and workability, making them ideal for beginner woodworkers.
- 1 – 2x6x8 Pine Boards or Framing Lumber: This board will be cut into the horizontal rungs, providing that signature “chunky” look and substantial support for your blankets. Again, pine is recommended for its characteristics.
- 2 1/2″ Pocket Hole Screws: These specialized screws, used with a Kreg Jig, create incredibly strong and concealed joints, contributing to a clean, professional finish.
- Wood Glue: A crucial component for enhancing the structural integrity and longevity of your ladder. Wood glue forms a bond stronger than the wood itself, ensuring your ladder remains sturdy for years to come.
- Finish of your choice: This allows for complete customization. Options range from stains for a natural wood look, paints for a pop of color, or clear coats for protection while preserving the wood’s natural beauty.
Tools You’ll Need:
While a few power tools will make this project quicker and easier, resourceful alternatives can be used if you’re just starting your tool collection.
- Miter Saw: (or hand saw or circular saw with a straight edge guide). A miter saw provides precise and consistent cuts, which are vital for a square and stable ladder. If you don’t have one, a good hand saw or a circular saw with careful measurement can achieve similar results.
- Drill: Essential for driving screws and potentially pre-drilling holes if you’re not using a Kreg Jig. Any standard cordless drill will work perfectly.
- Kreg Jig: This ingenious tool simplifies creating pocket holes, making joinery incredibly strong and almost invisible. While highly recommended for its ease of use and professional results, alternatives exist (see Step 2).
Step-by-Step Construction Guide
With your materials and tools ready, it’s time to bring your blanket ladder to life. Follow these steps carefully for a smooth building process and a beautiful finished product. Remember, taking your time and double-checking measurements will lead to the best results.
Step 1: Make the Cuts with Precision
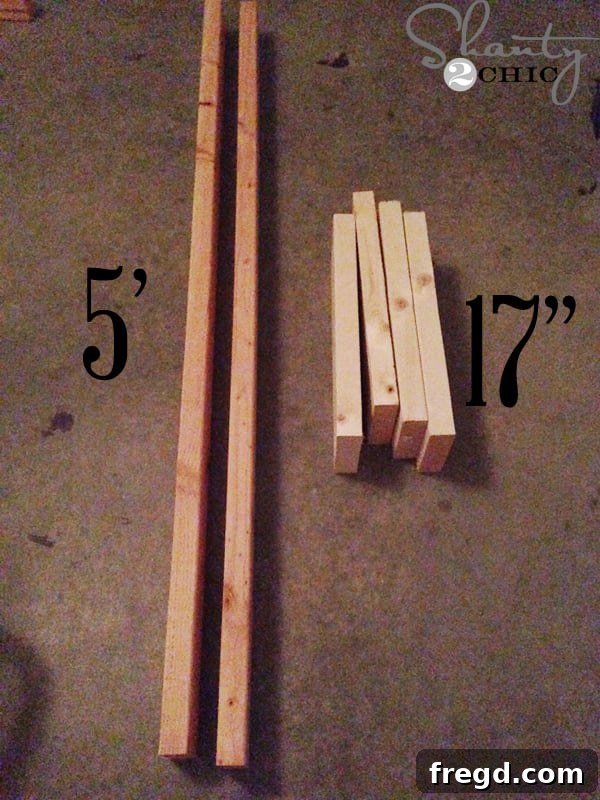
The foundation of any good woodworking project begins with accurate cuts. For this blanket ladder, I designed the dimensions to achieve a generous, substantial look. You will need to make the following cuts:
- Cut two of your 2×4 boards to 5 feet (60 inches) long. These will serve as the vertical side rails of your ladder.
- Cut four of your 2×6 board to 17 inches long. These will become the robust horizontal rungs where you’ll drape your blankets.
These measurements were chosen to create a wide and “chunky” ladder, which contributes significantly to its rustic charm and visual weight. Feel free to adjust the length of the side rails if you prefer a taller or shorter ladder, but ensure the rungs remain consistent in length for stability. Always prioritize safety when operating power saws; wear appropriate eye and ear protection, and ensure your workpiece is securely clamped.
- Watch our How to Use a Miter Saw video HERE for cutting tips!
Step 2: Drill Pocket Holes for Strong Joints
Pocket holes are the secret to strong, clean, and concealed joinery in many woodworking projects, including this blanket ladder. A Kreg Jig makes this process incredibly simple and efficient.
- Using your Kreg Jig, drill two 1 1/2-inch pocket holes into each end of your four 2×6 rung pieces. This means you’ll have a total of four pocket holes per rung (two on each end).
The Kreg Jig creates angled pilot holes that allow you to drive specialized screws through one piece of wood into another, pulling them together tightly for a very secure joint. The beauty of pocket holes is that the screws are hidden from the front of your project, resulting in a professional, fastener-free appearance.
No Kreg Jig? No Problem! If you don’t own a Kreg Jig, you can still build this ladder. Instead of pocket holes, you will need to pre-drill pilot holes directly through the 2×4 side rails into the ends of the 2×6 rungs. Use a drill bit slightly smaller than the shank of your 2 1/2-inch wood screws to prevent splitting the wood. This method will result in visible screw heads on the outside of your 2x4s, which you can either embrace for a more industrial look or fill with wood putty before finishing.
- You can find the Kreg Jig HERE on Amazon if you’re looking to invest in this versatile tool.
- Watch our How to Use a Kreg Jig video HERE for detailed instructions!
As you can see in the image, the pocket holes are strategically placed at an angle, ready for assembly.
Step 3: Securely Attach the Ladder Rungs
Now comes the exciting part: assembling your ladder! This step requires careful alignment and steady hands to ensure your ladder is stable and aesthetically pleasing. We’ll start by attaching the 2×6 rungs to one of the 2×4 side rails.
- Positioning the Rungs: Place one of your 2×4 side rails on a flat, stable surface. Take a 2×6 rung and position it so that one corner of the 2×6 touches the front edge of the 2×4, and the opposite back corner of the 2×6 touches the back edge of the 2×4. This creates a subtle angle for the rungs, adding to the ladder’s unique character.
- Top Rung Placement: Measure 3 inches down from the very top of the 2×4 side rail. This is where the top edge of your first 2×6 rung should align.
- Spacing the Remaining Rungs: From the front corner of the top rung, measure down 12 inches. This will be the placement for the front corner of your second rung. Continue this 12-inch spacing for the remaining rungs, measuring from the front corner of each preceding rung. This consistent spacing ensures an even and balanced look.
- Applying Wood Glue: Before attaching each rung, apply a generous bead of wood glue to the contact surfaces between the 2×6 rung and the 2×4 side rail. This glue is critical for the long-term durability and strength of your ladder.
- Driving the Screws: Ensure the pocket holes you drilled in the 2×6 rungs are facing towards what will be the back of the ladder. This keeps them hidden once the ladder is complete. Using your drill, drive 2 1/2-inch pocket hole screws through the pocket holes and into the 2×4 side rail. Tighten them until snug, but avoid over-tightening which can strip the wood or screws.
- Attaching the Second Side Rail: Once all four rungs are securely attached to the first 2×4 side rail, carefully bring in your second 2×4 side rail. Align it precisely with the rungs, replicating the same spacing and angling as the first side. Apply wood glue to the contact points and secure the rungs to this second side rail using the remaining 2 1/2-inch pocket hole screws.
Allow the wood glue to cure fully according to the manufacturer’s instructions before moving on to finishing. This typically takes a few hours, but full strength is often achieved overnight.
Step 4: Add a Beautiful Finish
The finish you choose can dramatically alter the appearance of your blanket ladder, allowing you to perfectly match it to your existing decor. For this project, I opted for a rich, deep hue that enhances the natural grain of the pine.
- Staining: I applied one coat of my favorite stain, Rust-Oleum Dark Walnut, using a foam brush. Foam brushes are great for even application and getting into corners.
- Application Technique: Work in small sections, applying the stain liberally. Allow the stain to penetrate the wood for about 5 minutes. The longer you let it sit, the darker and richer the color will be.
- Wiping Excess: After the desired penetration time, use a clean, lint-free cloth to wipe off any excess stain. Blend it smoothly to avoid blotches or streaks. Continue this process over the entire ladder.
- Drying Time: Allow the stain to dry completely according to the product’s instructions. This is crucial before moving on to distressing or applying any topcoat.
Other Finishing Options:
If you prefer a different look, consider:
- Paint: A coat of chalk paint can give a beautiful matte, farmhouse-style finish, especially if you plan to distress it. Latex paint works well for a more vibrant or modern look.
- Clear Coat: For a natural wood aesthetic, simply apply a clear polyurethane or polycrylic topcoat to protect the wood and enhance its natural grain without altering its color significantly.
- You can find the Dark Walnut stain HERE on Amazon to achieve the same look.
Step 5: Distressing for a Rustic Charm
To achieve that beloved “worn” or “vintage” look, distressing your finished ladder adds character and depth, making it appear as though it has a history. This technique is especially effective after staining or painting.
- Sanding for Distress: I used my Ryobi Corner Cat Sander to gently distress the wood all over. This type of sander is excellent for reaching corners and angles, making it perfect for a piece like this ladder with many edges.
- Technique: Focus on the edges, corners, and any raised areas where natural wear and tear would occur. Lightly sand these spots to reveal the raw wood underneath or to lighten the stain/paint, creating a softened, aged effect. You can vary the pressure and duration of sanding to control the level of distressing.
- Alternative Distressing Methods: If you don’t have a corner cat sander, you can achieve similar results with sandpaper wrapped around a sanding block or even by hand. For a more aggressive distressed look, you can gently tap the wood with a hammer, drag chains across it, or use a wire brush to create texture before finishing.
Once you’re satisfied with the distressed look, ensure any sanding dust is wiped clean. If you used stain and distressed heavily, you might consider a final topcoat (like polyurethane) to seal the finish and protect the exposed wood.
After the ladder was completely dry and distressed to my liking, I added a few cute and soft throw blankets, instantly elevating the room’s ambiance!
Styling Your New Blanket Ladder
The true beauty of a DIY blanket ladder lies not only in its construction but also in its incredible versatility as a decorative and functional piece. This ladder effortlessly combines form and function, offering a beautiful way to store and display your coziest throws while enhancing the aesthetic of any room. Its rustic, chunky design makes it a perfect fit for a variety of decor styles, from modern farmhouse to bohemian, industrial, or traditional. Don’t limit its use to just blankets!
Here are some ideas for styling your new ladder:
- Living Room Focal Point: Position it against a prominent wall, perhaps next to a sofa or fireplace. Drape a mix of blankets with different textures and patterns to add visual interest and a sense of inviting comfort. Think chunky knits, faux fur, and soft cotton throws.
- Bedroom Accent: In a bedroom, a blanket ladder is perfect for holding extra quilts or duvet covers, keeping them accessible yet tidy. It can also serve as a stylish valet for tomorrow’s outfit or delicate scarves.
- Bathroom Organization: Consider building a smaller version or using this one in a spacious bathroom to store rolled towels, creating a spa-like feel. My next ladder project might just be for towel storage in the bathroom or even outside by the pool!
- Entryway or Mudroom: Use it to hang coats, scarves, or even decorative wreaths, offering a warm welcome to guests and a practical solution for daily essentials.
- Seasonal Decor: Easily swap out blankets to match seasonal themes or holidays. Think festive plaid for winter or light, airy fabrics for summer.
- Beyond Blankets: Get creative! Hang magazines, lightweight plants in small hanging baskets, or even fairy lights for a whimsical touch.
With its striking presence and practical utility, your DIY blanket ladder is sure to be a conversation starter and a cherished piece in your home.
I simply adore getting my home ready for various occasions, and handmade decor like this blanket ladder adds such a personal touch. This project is just the beginning of what you can create. We always appreciate your pins and shares, helping us spread the joy of DIY!
Explore More Free Blanket Ladder Plans!
If you loved building this blanket ladder, or if you’re looking for different styles and challenges, we have a variety of other free blanket ladder plans to inspire your next project. Each one offers a unique design aesthetic, proving just how versatile and popular these functional decor pieces are!
- Barn Door Pull Blanket Ladder
- DIY Rustic Blanket Ladder for $7
- DIY Modern Blanket Ladder
- Blanket Ladder with Wood and Metal Pipe
More DIY Projects for Your Home
Beyond blanket ladders, there’s a whole world of DIY projects waiting to help you personalize your home. Whether you’re preparing for a special season or simply want to refresh your decor, these projects offer creativity and satisfaction. Here are a few other fantastic projects we’ve recently tackled that you might enjoy:
DIY Rectangle Wreath
DIY Bar Cart
Free Printable Merry Christmas Banner
DIY Christmas Tree Stands
DIY Blanket Ladder: Free Printable Plans
DIY Blanket Ladder
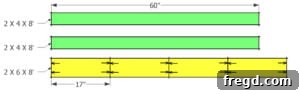
Learn how to build this DIY Blanket Ladder with free, easy-to-follow plans and a comprehensive how-to tutorial. This project by Shanty2Chic is perfect for adding stylish blanket storage to your home. Make sure to download the FREE Printable Plans, which include a detailed supply list and cutting diagram, using the link below!
Click HERE for the FREE Printable Plans
Supply List
- 2 – 2x4x8 Pine or Whitewood Boards
- 1 – 2x6x8 Pine or Whitewood Boards
- 2 1/2″ Pocket Hole Screws
- Wood Glue
- Finish of Choice
Instructions
-
Cut List: Precisely cut your lumber according to the following dimensions:
- Two (2) 2x4s at 5 feet (60 inches) long for the side rails.
- Four (4) 2x6s at 17 inches long for the rungs.

-
Drill Pocket Holes and Assemble First Side: Drill two 1 1/2-inch pocket holes into each end of the four 2×6 rung boards. Attach these 2×6 pieces to one of the 2×4 side rails using wood glue and 2 1/2-inch pocket hole screws. Position the top 2×6 rung 3 inches down from the very top of the 2×4. The remaining rungs should be spaced 12 inches apart, measured from the frontmost corner of each 2×6. Angle the 2×6 rungs so that opposite corners are flush with the opposite sides of the 2×4, as shown in the diagram. Ensure pocket holes face the back of the ladder.
-
Complete Assembly and Finish: Attach the other 2×4 side rail in the exact same manner, ensuring consistent spacing and alignment. Once assembled and the wood glue has dried, sand your entire ladder smooth. Apply your chosen finish (stain, paint, or clear coat) and distress if desired for a rustic look. Allow adequate drying time before displaying. Remember to share your amazing builds with us on social media using #shanty2chic – we’d love to see and share them!


Thanks so much for stopping by and taking on this fantastic DIY project!
Happy Building!