
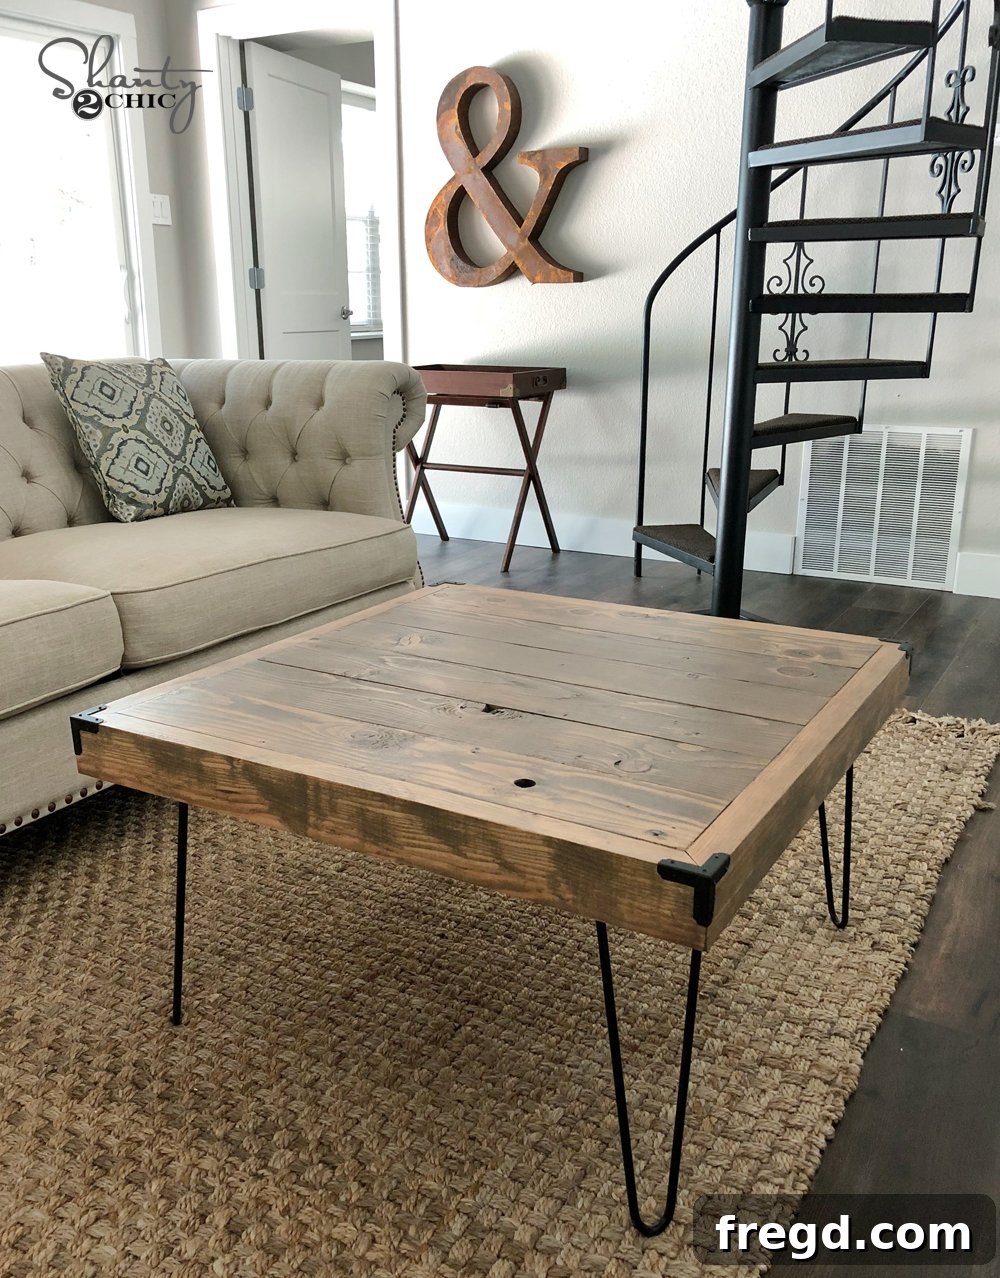
Welcome, DIY enthusiasts and home decor lovers! We are thrilled to share one of our favorite recent projects: a stylish and versatile hairpin leg coffee table. This design perfectly blends modern aesthetics with functional practicality, making it a fantastic addition to any living space. We discovered some incredibly affordable and charming hairpin legs online, which inspired us to craft a custom coffee table that truly stands out. Before we dive into the detailed step-by-step guide, be sure to watch our comprehensive YouTube video tutorial on this build HERE to see every stage of the process visually.
Witness the stunning transformation of simple wood planks into this beautiful square hairpin leg coffee table!
The appeal of a hairpin leg coffee table lies in its minimalist design and industrial-chic charm. These tables are not only aesthetically pleasing but also surprisingly sturdy and easy to integrate into various decor styles, from rustic farmhouse to sleek modern. If you’re ready to create your own, the journey begins with selecting the right components. You can find the exact hairpin legs we used by following this link.
Build Your Own Modern Hairpin Leg Coffee Table: Free Plans & Step-by-Step Guide
Embarking on a DIY project like building a hairpin leg coffee table offers immense satisfaction and the opportunity to customize a piece of furniture perfectly suited to your home. This guide provides detailed instructions and essential tips to help you construct a beautiful and durable coffee table, even if you’re a beginner woodworker. With our FREE downloadable plans available HERE, you’ll have all the measurements and diagrams you need to get started.
Essential Tools and Materials for Your Hairpin Leg Coffee Table Project
Before you begin, gather all the necessary tools and materials. Having everything on hand will ensure a smooth and efficient building process for your DIY coffee table. For this project, you will primarily work with 2×4 and 2×6 lumber, which are common and readily available.
Required Materials:
- 2×4 and 2×6 lumber (refer to the free plans for exact quantities and lengths)
- Hairpin legs (4 units)
- Wood glue
- 2.5-inch pocket hole screws
- 1.5-inch wood screws (for foot pads)
- Hex bolts or suitable screws for attaching legs
- Wood stain (we used a custom mix)
- Protective topcoat (polyurethane or similar)
- Decorative corner hardware (optional, but highly recommended for a finished look)
Recommended Tools:
- Table saw (optional, but highly recommended for ripping boards)
- Miter saw or circular saw (for precise cuts)
- Kreg Jig pocket hole system
- Drill/driver
- Measuring tape and pencil
- Wood clamps
- Sanding block or orbital sander (with various grit sandpaper)
- Safety glasses and hearing protection
Step-by-Step Guide to Building Your Hairpin Leg Coffee Table
Follow these detailed steps to construct your modern hairpin leg coffee table. Precision and careful execution at each stage will result in a professional-looking finished product.
Step 1: Preparing Your Lumber – Ripping Boards for a Clean Edge
The first step involves preparing your 2×4 and 2×6 boards. Standard lumber often comes with rounded edges, which can give your finished project a less refined look. To achieve a crisp, clean, and seamless tabletop, we recommend running your boards through a table saw to rip off these rounded edges. This process not only squares up the edges but also slightly alters the dimensions of your wood. While not strictly mandatory, this step significantly enhances the table’s overall aesthetic and allows for tighter joints between planks. If you choose to skip this, remember to adjust your measurements accordingly to account for the original board widths, or measure and cut as you go to ensure accuracy.
Step 2: Creating Strong Joints with Pocket Holes
Once your boards are prepped, it’s time to create the pocket holes that will hold your tabletop together. For this crucial step, we utilized our favorite Kreg Jig pocket hole system. Pocket holes are an excellent method for creating strong, concealed joints, perfect for furniture construction. Since we are attaching 2x wood to 2x wood (which typically measures 1.5 inches thick), we set our Kreg Jig to create 1.5-inch pocket holes. Be sure to consult your Kreg Jig manual for specific settings and techniques to ensure properly drilled holes for optimal joint strength. Distribute your pocket holes strategically along the edges of the planks that will be joined, ensuring enough support without overcrowding.
Step 3: Assembling the Tabletop Planks
With all the pocket holes drilled, it’s time to assemble the main tabletop. Lay out the six planks on a flat, stable surface, ensuring the bottom face is upwards – this is crucial so your pocket holes are accessible for screwing and remain hidden on the underside of the finished table. Double-check that all your pocket holes are facing the correct direction and are properly aligned for joining. Apply a thin, even layer of wood glue along the mating edges of each plank before joining them. Then, secure these six planks together using 2.5-inch pocket hole screws. Use clamps to hold the boards tightly together as you drive the screws, ensuring a flush and strong joint. Wipe away any excess glue immediately with a damp cloth.
Step 4: Attaching the Apron (Trim Pieces)
The next step is to attach the apron, or trim pieces, which will give your coffee table a finished edge and increased structural integrity. These pieces were crafted from 2×4 boards that we ripped down to 3 inches wide each. Each apron piece is 33 inches long, and we cut the edges at a precise 45-degree angle. Mitered corners are essential here, as they create a clean, seamless, and professional-looking joint at each corner of the table. Apply wood glue generously to the edges where the apron pieces will meet the tabletop and to the mitered ends of the apron pieces themselves. Then, secure the apron pieces in place using 2.5-inch pocket hole screws, ensuring the corners are perfectly aligned before tightening. Clamps will be invaluable here to hold everything snugly while the glue sets and screws are driven.
Step 5: Adding the Foot Pads for Stability and Protection
To enhance stability and provide a robust attachment point for the hairpin legs, we added foot pads – sometimes referred to as leg pads or mounting blocks – to each corner of the table. These were made from 1×6 boards, cut into 5-inch squares. Attaching these pads to the underside of each corner creates a thicker, more secure area for mounting the legs, preventing potential splitting of the apron or tabletop. Apply wood glue to the back of each foot pad and position one squarely into each inner corner of the apron. Secure them firmly with 1.5-inch wood screws, ensuring they are flush with both the tabletop and apron. This small detail significantly improves the longevity and structural integrity of your DIY coffee table.
Step 6: Attaching the Hairpin Legs
With the main structure complete, the exciting part of attaching the hairpin legs comes next! Carefully flip your coffee table top over so the foot pads are facing upwards. Position each hairpin leg onto its respective foot pad. Ensure the legs are aligned properly and square with the table. We used hex bolts for a secure and industrial look, but any robust screw with a large enough head will work effectively to attach the legs firmly. Drive the screws or bolts through the mounting plate of each hairpin leg and into the foot pads. Take care not to overtighten and potentially strip the wood. Once all four legs are securely attached, your coffee table will truly begin to take shape.
Finishing Your DIY Hairpin Leg Coffee Table: Stains and Hardware
Now that the structural assembly is complete, it’s time for the finishing touches that will bring your hairpin leg coffee table to life and protect it for years to come.
Applying the Perfect Stain
Choosing the right stain can dramatically alter the appearance of your coffee table. For this project, we opted for a custom stain mix to achieve a unique and personalized finish. We combined equal parts of THIS stain and THIS stain, stirring them thoroughly to ensure an even blend. Mixing stains is a fantastic technique to create bespoke colors that perfectly match your interior decor. Before applying any stain, ensure the entire table is thoroughly sanded to a smooth finish, removing any glue residue or imperfections. Start with a coarser grit (e.g., 120-grit) and progressively move to finer grits (e.g., 180 or 220-grit) for a silky-smooth surface. Apply the stain according to the manufacturer’s instructions, typically using a rag or brush, allowing it to penetrate the wood for the desired color depth, then wiping off any excess. After the stain has fully dried, apply several coats of a clear protective topcoat, such as polyurethane, to guard against spills, scratches, and daily wear and tear. Lightly sand between coats for an ultra-smooth and durable finish.
Adding Decorative Corner Hardware
To truly elevate the design and add a charming, rustic-industrial accent, we chose to incorporate some cute corner hardware. These small but impactful details were added after the stain and topcoat had completely dried. The hardware not only provides a decorative touch but can also offer a subtle layer of protection to the table’s corners. We absolutely adore how these pieces complete the look, adding a bespoke finish that catches the eye. You can find the specific corner hardware we used HERE.
Your Finished Hairpin Leg Coffee Table
And there you have it – your beautifully handcrafted hairpin leg coffee table, ready to become the centerpiece of your living room! This project demonstrates how simple materials, combined with a bit of effort and careful execution, can result in a stunning and personalized piece of furniture. Enjoy the satisfaction of building something unique and tailored to your home’s aesthetic.
We hope this detailed guide inspires you to take on this rewarding DIY project. The hairpin leg coffee table is a versatile piece that complements various interior designs, from industrial and minimalist to contemporary and eclectic. Remember, the beauty of DIY is the ability to customize every aspect to your taste.
For more inspiration and a wide range of woodworking projects, be sure to explore our extensive collection of DIY Coffee Table Plans. We offer over 15 unique designs, perfect for any skill level and aesthetic preference, ensuring you’ll find your next exciting build. Happy building!