
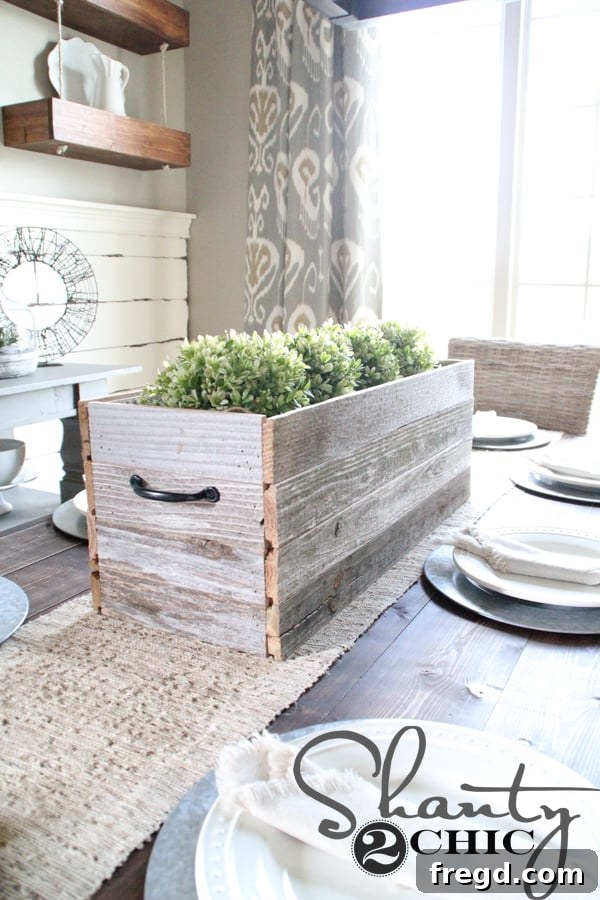
DIY Barn Wood Planter Box: Crafting a Rustic Dining Table Centerpiece on a Budget
Transform your dining space with a touch of rustic charm! This comprehensive tutorial will guide you through building a stunning barn wood planter box, perfect as a centerpiece for your dining table or as a versatile decorative accent anywhere in your home. If you’ve been searching for an easy, affordable, and impactful DIY project, you’ve come to the right place. We’ll show you how to create this beautiful piece using readily available materials and basic tools, even if you’re new to woodworking. Get ready to add that coveted farmhouse aesthetic to your decor!
The Charm of a DIY Barn Wood Planter Box
There’s something undeniably inviting about the weathered look of barn wood. It brings character, warmth, and a story into your home, effortlessly blending with various interior styles, from modern farmhouse to industrial chic. This DIY barn wood planter box isn’t just a container for plants; it’s a statement piece that anchors your dining table, offering a focal point that can be styled for any season or occasion. Imagine fresh herbs, vibrant flowers, or seasonal decor beautifully arranged within this handcrafted box. The best part? You can achieve this high-end look without the high-end price tag, thanks to a clever material choice that mimics authentic barn wood.
Why Build Your Own Dining Table Centerpiece?
The appeal of DIY extends far beyond just saving money. When you build something yourself, you gain the freedom to customize dimensions, choose your preferred materials, and infuse a piece of your personality into your home decor. This planter box project is a prime example. While pre-made options can be costly and limit your design choices, crafting your own allows you to perfectly match it to your dining table’s size and your room’s aesthetic. Plus, the satisfaction of creating something functional and beautiful with your own hands is truly priceless. This specific project stands out for its simplicity, requiring minimal tools and no complex finishing techniques, making it an ideal entry point for budding DIY enthusiasts.
Gather Your Simple Supplies: What You’ll Need
One of the many reasons this project is so popular is its accessibility. You won’t need a workshop full of expensive machinery. In fact, many of these items you might already have in your garage!
Materials List:
- Woodpile Bundles (Barn Wood Slats): Look for these at craft stores like Hobby Lobby. We specifically used the bundles of long, pre-finished slats that mimic old barn wood. The tongue and groove design is a bonus, simplifying assembly. Keep an eye out for coupons to make this incredibly affordable – often less than $5 a bundle! We recommend picking up a couple of bundles to ensure you have enough, especially if you plan on making a larger planter or just want some extra for practice cuts.
- 2×2 Wood Pieces: You’ll need enough to cut four 8 1/2-inch pieces. Scrap premium pine works beautifully for this, offering good stability and easy cutting. Alternatively, standard 2×2 furring strips are a budget-friendly option. These pieces will form the crucial corner supports of your planter box.
- 1×10 Wood Board: A section of 1×10 is needed for the bottom of the planter. The exact length will depend on the final internal dimensions of your box, so it’s best to cut this piece to fit perfectly after the main frame is assembled. This ensures a snug and secure base for your plants or decor.
- 1 1/4″ Brad Nails: These are ideal for neatly attaching the wood slats. Their small heads make them less visible, contributing to a clean finish.
- Optional: Decorative Handles: A pair of rustic or modern handles can add a beautiful functional and aesthetic touch to the ends of your planter box. Choose a style that complements your existing decor.
Essential Tools:
While some specialized tools make the job quicker, this project is designed to be achievable with basic hand tools.
- Miter Saw or Hand Saw: A miter saw offers precise, quick cuts and is ideal if you have one. However, a good quality hand saw with a miter box will work perfectly fine for these cuts, especially since the wood slats are relatively thin and easy to manage.
- 18-Gauge Brad Nailer (e.g., Ryobi Airstrike) or Hammer: A brad nailer makes assembly fast and efficient, securely fastening pieces with minimal effort. If you don’t own a nailer, a hammer and appropriate finish nails (similar size to brad nails) will do the trick just as effectively, though it might take a little more manual effort.
- Measuring Tape: Essential for accurate measurements to ensure all your cuts are precise and your planter box is perfectly square.
- Pencil: For marking your cuts.
- Safety Glasses: Always wear safety glasses when cutting or nailing wood to protect your eyes from debris.
Step-by-Step Guide to Crafting Your Rustic Planter
Before you begin, ensure your workspace is clear, well-lit, and that you have all your materials and tools within reach. Taking a few moments for preparation can make the entire building process smoother and more enjoyable. Remember to measure twice and cut once for the best results!
Step 1: Precision Cuts for Your Planter Box
Accuracy in this initial stage will ensure your planter box comes together beautifully and squarely.
- Cut the Slats: From your barn wood slats, cut eight pieces at 9 1/4 inches each. These will form the short ends of your planter box. Next, cut eight more pieces at 28 inches each. These longer pieces will make up the front and back of your planter. When making your cuts, ensure they are clean and straight for a professional finish. If using a hand saw, a miter box can greatly assist in achieving perfectly square cuts.
- Cut the Corner Supports: Take your 2×2 lumber and cut four pieces, each measuring 8 1/2 inches long. These will serve as the internal corner posts, providing structural integrity and a surface for attaching your slats. Using scrap premium pine offers good strength, but 2×2 furring strips are a cost-effective alternative.
Step 2: Assembling the Short Sides
Now, let’s bring together the first parts of your planter box frame.
- First Short Side: Take two of your 8 1/2-inch 2×2 pieces. Attach four of the 9 1/4-inch barn wood slats to them, forming one short side of the planter. Align the edges of the slats flush with the front edges of the 2x2s. Use 1 1/4-inch brad nails with your nailer, or use a hammer and finish nails. Drive nails carefully to avoid splitting the wood.
- Ensure Overhang: On the backside of this assembly, the slats should overhang the 2x2s by approximately 3/4 inch at the bottom. This overhang is crucial for creating a clean bottom edge later and for supporting the bottom panel.
- Second Short Side: Repeat the process with the remaining two 8 1/2-inch 2x2s and the other four 9 1/4-inch slats to create the second short end of your planter box. Ensure both short sides are identical in construction.
Step 3: Connecting the Long Sides to Form the Box
With the two short ends assembled, it’s time to bring them together and form the main body of your planter box.
- Attach the Long Slats: Position one of your assembled short sides vertically. Take two of the 28-inch long slats and attach them to the 2×2 posts of the short side. The ends of these long slats will butt up against the previously attached 9 1/4-inch slats, creating a corner. Use your brad nailer (or hammer and finish nails) to secure them firmly to the 2×2 posts.
- Complete the Box Frame: Carefully attach the second assembled short side to the other end of the 28-inch slats, ensuring everything is square and aligned. Then, attach the remaining two 28-inch slats to complete the fourth side of your planter box. At this stage, you should have a complete box frame, open at the top and bottom. Double-check all connections to ensure stability. You may want to use a speed square to verify that all corners are truly 90 degrees.
Step 4: Installing the Planter Box Bottom
The base of your planter box needs to be sturdy and secure to hold whatever you decide to fill it with.
- Measure and Cut the Bottom: Carefully measure the inside dimensions of your assembled box frame. You’ll need to cut your 1×10 board to fit snugly within this opening. Precision here is key for a secure fit.
- Attach the Bottom: Place the cut 1×10 board inside the bottom of the box. The 3/4-inch overhang created by the slats in Step 2 will provide a lip for the 1×10 to rest on. Secure the 1×10 in place by driving brad nails from the outside of the slats into the edges of the 1×10. Distribute the nails evenly around all four sides for maximum stability. This method creates a clean finish on the inside of the planter while securely holding the bottom in place.
Step 5: The Finishing Touch – Adding Handles
While optional, adding handles not only enhances the aesthetic but also makes your planter box easier to move and style.
- Select Your Handles: Choose a pair of decorative handles that complement the rustic look of your barn wood. Cast iron, bronze, or simple metal pulls often work well.
- Attach the Handles: Position one handle centered on each of the short ends of the planter box. Mark the screw holes with a pencil and pre-drill small pilot holes if necessary to prevent splitting the wood. Then, secure the handles using the screws provided.
Decorating Your New Barn Wood Planter Box
Congratulations, your barn wood planter box is complete! Now comes the fun part: styling it to reflect your personal taste and the season. For a dining table centerpiece, consider placing small potted herbs like rosemary, basil, and thyme for a fragrant and functional display. Succulents or small flowering plants also make excellent choices. During the holidays, fill it with pinecones, fairy lights, and seasonal greenery. In autumn, mini pumpkins and gourds create a festive look. Don’t forget, this planter box isn’t limited to plants; it can also be used to store remotes, magazines, or as a decorative holder for candles, creating a warm and inviting ambiance.
Customization & Variations: Make It Yours
The beauty of DIY is endless customization. While we’ve provided specific dimensions, feel free to adapt them to your needs. Want a longer planter for a grand banquet table? Adjust the 28-inch slat length. Need it taller or shorter? Modify the 9 1/4-inch slats and 2×2 corner post heights. You could also experiment with different wood types if you prefer a different aesthetic. For instance, pine or cedar could be stained to mimic barn wood, or painted for a more modern look. Although this project champions a “no finish needed” approach thanks to the pre-aged wood, you could always add a clear coat sealant for extra durability if your planter will be exposed to moisture, or apply a wax for a subtle sheen.
DIY for Under $10? Yes, You Can!
Believe it or not, this stylish and sturdy barn wood planter box can be built for under $10! The secret lies in smart shopping. The Woodpile bundles from Hobby Lobby are incredibly affordable, especially when paired with a common 40% or 50% off coupon. Scraps of 2x2s and a 1×10 can often be found at greatly reduced prices at lumber yards or by utilizing leftover pieces from other projects. By focusing on cost-effective materials and doing the labor yourself, you bypass retail markups and custom woodworking fees. This project is not just a creative outlet; it’s a testament to how budget-friendly DIY can be when approached strategically.
Explore More DIY Inspiration for Your Home
If you loved creating this barn wood planter box, you’ll be thrilled to discover that our dining room is filled with even more handcrafted projects just like it! Each piece adds character and personality, proving that a beautiful home doesn’t require an unlimited budget. We encourage you to explore these tutorials and bring more DIY magic into your own space. From the walls to the floor, every element tells a story of creative passion and smart design.
- DIY Distressed Plank Wall
- Restoration Hardware Inspired Dining Table for $110
- DIY Dining Benches
- DIY Turned Leg Buffet Table
- DIY Lined Window Panels (Curtains)
- DIY Rope & Pipe Floating Shelves
- DIY Large Paneled Wall Mirror
- DIY Chandeliers
- Our Favorite House Paint Colors
- How to Install Laminate Flooring
Our Favorite Finds to Complete Your Dining Room Look
Beyond our DIY creations, certain curated pieces perfectly complement the farmhouse and rustic aesthetic of our dining room. Here are a few items that pull the whole look together and can inspire your own styling choices.
- Three Tier Tray – Save on Crafts
- Milk Bottles – Save on Crafts
- Wire Wreath – Save on Crafts
- Charcoal Basket Weave Jute Rug – World Market
We hope this detailed tutorial empowers you to create your very own barn wood planter box. It’s a simple project with a huge impact, bringing warmth and character to any room. Happy building, and don’t forget to share your creations with us!