
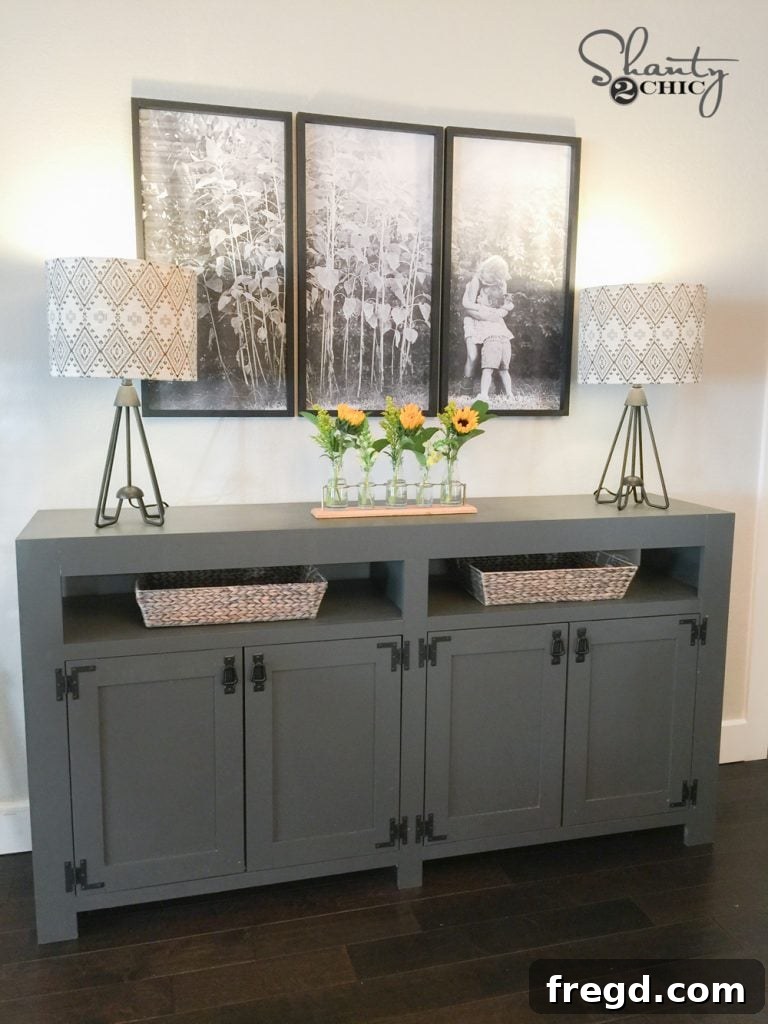
Welcome, fellow DIY enthusiasts and home decor lovers! Today, we’re absolutely thrilled to unveil a project that truly embodies the perfect blend of style, functionality, and craftsmanship: our custom-designed **Modern Farmhouse Media Console Table**. This piece was a highlight of a recent HGTV renovation for the Berry family, who faced a common challenge in many homes – a desperate need for effective storage solutions for their children’s toys and, equally important, a stylish yet practical home for their media equipment. What we created is more than just a table; it’s a comprehensive **entertainment center storage solution** that beautifully integrates into any living space, offering ample room for organization while elevating the room’s aesthetic.
Every element of this **custom entertainment center** has been meticulously chosen and crafted, from the sturdy design and the exquisite hardware to the captivating paint color that truly ties the whole look together. The “Modern Farmhouse” aesthetic is more popular than ever, and this console embodies its core principles: rustic charm meets clean lines, functionality meets inviting warmth. It’s a statement piece that doesn’t just hold your TV; it transforms your entire living area into a more organized and aesthetically pleasing environment.
Ready to build your very own? We’ve made it incredibly easy for you to get started on this rewarding **woodworking project**. Don’t miss out on the opportunity to create a stunning piece of **DIY home decor** that perfectly suits your needs. Be sure to download and print the FREE PLANS by clicking HERE! These detailed plans will guide you through every step, making this an achievable and enjoyable project for even aspiring woodworkers.
For those who like to visualize the scope of the project, here are the overall dimensions for this magnificent **DIY console table**. Planning is key to any successful build, and having these measurements handy will help you prepare your space and materials effectively.
Let’s dive into the construction! The foundational first step to building this robust **storage console** is assembling the main box. The majority of this table is expertly crafted using premium **PureBond hardwood plywood in Birch**, readily available at Home Depot. PureBond plywood is an excellent choice for **build your own furniture** projects because it’s formaldehyde-free, making it a healthier option for your home, and incredibly durable. Its beautiful birch veneer also provides a fantastic surface for painting or staining. For larger sheets, we typically have the knowledgeable associates at Home Depot rip them down into more manageable sizes, which saves time and ensures precise initial cuts. We then make the more intricate, smaller cuts at home with our own tools, ensuring maximum accuracy for a professional finish. To seamlessly assemble this crucial initial section, I relied on **3/4″ pocket holes and 1.25″ pocket hole screws**, utilizing our absolute favorite tool: the K5 Kreg Jig.
The Kreg Jig K5 is, by far, our go-to model for all kinds of **pocket hole joinery**. Many aspiring woodworkers often ask which Kreg Jig is best to start with, and our unequivocal answer is always the K5. It’s incredibly versatile, capable of handling projects ranging from small decorative items to massive furniture builds, and provides incredibly strong, concealed joints. We’ve used the same model for years, and its consistent performance and ease of use are unmatched. Investing in a Kreg Jig K5 is a decision you will absolutely not regret; it will open up a world of possibilities for your **DIY furniture** ventures.
Once the main box structure is solid, the next step involves precisely lining up and securing the middle shelf and the base shelf. These shelves are critical for both structural integrity and providing the essential storage compartments for this **Modern Farmhouse Media Console**. For maximum strength and durability, we recommend using a generous amount of high-quality wood glue along with 1.25″ pocket hole screws. The combination of glue and screws creates a bond that is incredibly robust, ensuring your console will stand up to years of use, whether it’s holding a collection of toys or heavy media components.
Here’s a friendly wave to Andrew and Stephen, who were instrumental in bringing this fantastic piece to life! Their expertise and dedication are a huge part of what makes these **home renovation projects** successful. Pay close attention to the positioning here, where you can clearly see how that bottom shelf is meticulously lined up, running precisely from the base of both the side panels and the middle divider pieces. This meticulous alignment is paramount for ensuring a level and sturdy surface, crucial for the aesthetic appeal and long-term durability of your **DIY media console**.
With the core base of the console firmly assembled, the next critical step is to construct the front face frame of the table. This face frame not only adds significant structural integrity but also provides the finished, polished look that elevates the entire piece, framing the storage compartments beautifully. This component is built using durable 1x boards, which are ideal for their stability and ease of manipulation. Just like the main box, connect everything securely using a combination of strong wood glue and 1.25″ pocket hole screws. This method ensures that the face frame is not only robust but also presents a clean, fastener-free appearance from the front, upholding the high-quality finish expected from a **Modern Farmhouse** design.
Now, it’s time to marry the front face frame to the main box of the table. This integration is a pivotal moment in the build, as it truly begins to define the console’s final form. Ensure a snug fit and then securely attach the face frame to the box using more wood glue and 1.25″ pocket hole screws. The glue will provide an immediate bond, preventing any shifting, while the pocket hole screws will create a permanent, incredibly strong connection that will withstand daily use. This method ensures that your **DIY entertainment center** is not only visually appealing but also structurally sound for years to come.
Achieving a flawless finish is often in the details. This is what the top of the corner should look like after the face frame is attached. Notice the clean lines and solid construction, which are essential for the overall integrity and appearance of your **Modern Farmhouse Console Table**. Attention to these smaller details ensures that the final piece looks professionally crafted.
While the use of **PureBond hardwood plywood** offers exceptional strength and a beautiful veneer, the top sides will naturally show the exposed edges of the plywood. To achieve that signature smooth, refined finish characteristic of high-quality **DIY furniture**, I carefully filled these edges with wood putty. After allowing the putty to dry completely, I thoroughly sanded it down. This extra step is vital, as it ensures that once painted, the entire surface will be perfectly smooth and seamless, giving the console a truly professional and high-end feel. It’s these small but important finishing touches that make all the difference in a **custom built entertainment center**.
Moving to the back of the console, we used 1/4″ hardwood plywood, custom-cut to perfectly fit behind the cabinet portion. A thoughtful design feature for any media console is cord management. To facilitate easy routing of television and other electronic cables, I deliberately kept the top portion of the back panel open. This prevents unsightly wires from tangling or being exposed, maintaining the clean aesthetic of your living space. Securely attach the back panel using 1″ staples, ensuring it is flush and provides a neat, enclosed look for your **TV stand build**.
The final, incredibly satisfying step is crafting the doors! These doors are designed to give the **Modern Farmhouse Media Console** a truly unique and sophisticated appearance. They are created by cutting panels to size, which form the base of the door. Then, these panels are meticulously trimmed with smaller wood pieces. This layering technique not only adds a beautiful dimensional quality but also gives the piece that distinct modern feel while retaining farmhouse charm. The best part? They are surprisingly easy to build! For attaching the door trim, I used 1/2″ brad nails in conjunction with wood glue. The brad nails offer immediate hold while the glue cures, creating a durable and seamless bond that will keep your doors looking fantastic for years.
Once all the carpentry was complete, including filling any remaining nail holes and fine-sanding all surfaces for a baby-smooth finish, it was time for the transformative power of paint. I painted the entire console with **Urbane Bronze by Sherwin-Williams**, and let me tell you, I am utterly obsessed with this color! It’s a sophisticated, deep gray-brown that exudes warmth and modernity, perfectly complementing the **Modern Farmhouse aesthetic**. This choice of paint color is crucial in defining the overall character and mood of the piece, allowing it to blend seamlessly with various decor styles while still making a subtle statement.
After the paint had thoroughly dried and cured, it was time for the crowning glory: adding the hardware. I strongly believe that hardware can make or break a piece of furniture, and I was determined to find elements that would truly make this console pop. I discovered an incredible online company specializing in distinct and antique-style hardware, and I fell completely in love with their selection. That company is House of Antique Hardware. Their extensive collection offers a timeless elegance and unique character that you simply won’t find in standard hardware stores. Seriously, check them out – but be warned, you’ll want everything!
For the console doors, I opted for these beautiful surface-mounted hinges. Their forged iron finish and exposed design perfectly embody the rustic yet refined charm of the Modern Farmhouse style, adding an authentic touch that truly enhances the piece.
To complete the look, I selected these elegant Mission-style vertical cabinet pulls for the doors. Their clean lines and robust design perfectly complement the hinges and the overall aesthetic of the console, providing both functionality and a touch of timeless sophistication. This thoughtful selection of hardware is key to achieving that high-end, custom-built appearance that elevates the entire **DIY furniture** project.
That sums up the journey of creating this remarkable **Modern Farmhouse Media Console Table**, friends! From the initial problem of clutter and lack of dedicated media space to the final reveal, this project has been incredibly rewarding. It’s more than just a piece of furniture; it’s a tailored **storage solution** that brings both order and beauty to a home. The satisfaction of building something so functional and aesthetically pleasing, especially knowing it provides much-needed **toy storage ideas** and a stylish **TV stand build** for a family, is truly immense.
I sincerely hope you love this console as much as we did the moment we saw it settled into the Berry family’s renovated home. There was a moment, I must confess, where I almost wanted to keep it for myself! Its unique charm and practical design are truly captivating.
Here it is, all finished up and performing its dual duty as a beautiful centerpiece and an indispensable **space-saving furniture** item in a real home environment!
Don’t hesitate to reach out if you have any questions at all about this **DIY woodworking project**, the materials, tools, or techniques. We’re here to help you succeed in building your own beautiful and functional **Modern Farmhouse Media Console**. Happy building, and enjoy the process of creating something truly special for your home!