
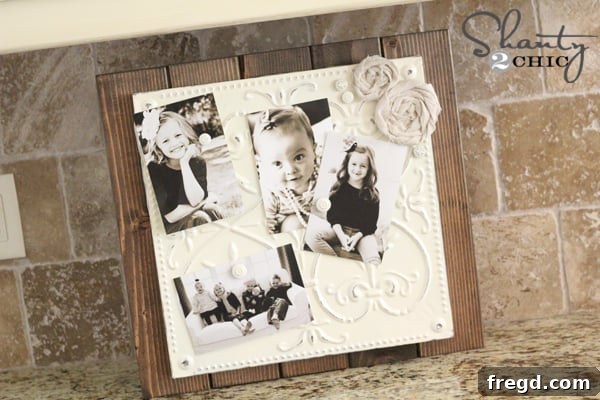
Hello, fellow DIY enthusiasts and home decor lovers! Are you searching for a functional yet stylish way to keep your kitchen organized, manage family reminders, and display cherished memories? If so, you’re in for a treat! We’re thrilled to share our latest and arguably one of our most satisfying home improvement projects: a custom-designed, rustic magnetic memo board.
Life gets busy, especially when you have a bustling household. From school notes and grocery lists to impromptu photos and important appointments, a centralized spot for all those little bits of paper and inspiration is invaluable. With the exciting addition of our fifth little one, our kitchen’s organizational needs truly called for an upgrade. We needed something more robust, more spacious, and undeniably charming to handle the influx of daily life. This project was designed with our countertop in mind, offering easy access and a prominent display. However, with a simple addition of hanging hardware to the back, it can effortlessly transform into a beautiful wall-mounted piece!
Imagine a world where important notes don’t get lost under stacks of mail, where your favorite family photos are always visible, and where quick reminders are always front and center. That’s the promise of this DIY magnetic memo board. It’s not just a practical tool; it’s a piece of art that reflects your personal style and brings a touch of rustic elegance to your home. And the best part? It’s incredibly easy to make and remarkably affordable. Take a look at the stunning result:
Create Your Own Beautiful & Budget-Friendly DIY Magnetic Memo Board
This project ticks all the boxes: it’s incredibly simple to construct, demands minimal tools, and astonishingly, costs less than $12! Yes, you read that right – twelve dollars for a large, functional, and visually appealing piece of home decor. This is definitely our kind of DIY adventure!
Why a DIY Magnetic Memo Board is a Kitchen Essential
In today’s fast-paced world, keeping a household running smoothly requires effective organization. A magnetic memo board serves as a central hub for all those crucial bits of information that often get scattered or forgotten. Beyond its practical utility, a handmade memo board offers a unique aesthetic appeal that mass-produced items simply can’t match. It injects personality and warmth into your kitchen, transforming a utilitarian space into a cozy, well-managed heart of the home.
Think about the benefits: a dedicated space for grocery lists, children’s artwork, appointment reminders, important receipts, or even inspirational quotes. It fosters better communication among family members, ensuring everyone is on the same page. Moreover, this DIY approach allows you to customize every aspect, from the wood finish to the style of the magnets, ensuring it perfectly complements your existing decor. Opting for a DIY project like this also brings the immense satisfaction of creating something beautiful and functional with your own hands, all while staying well within a budget.
Materials You’ll Need for Your Sub-$12 Memo Board Project
One of the most appealing aspects of this project is its affordability. We sourced most of our materials from local hardware and craft stores, often taking advantage of clearance sales and coupons. Here’s a detailed list of what you’ll need to gather:
- **Wood for the Frame:** One standard 2×4 (approximately 8 feet long). We got ours from Lowe’s for under $2. This will be cut into five 16-inch pieces to form the base.
- **Wood Adhesive:** Gorilla Wood Glue provides a strong, reliable bond for your wooden frame.
- **Decorative Tin Tile:** We discovered a fantastic clearance tin tile at Hobby Lobby for just $9. Its textured, pressed design adds a beautiful rustic touch. If you don’t have a Hobby Lobby nearby, similar decorative metal sheets or tiles can often be found online or at architectural salvage stores. Make sure to look for coupons!
- **Custom Magnet Embellishments:** A selection of fun buttons from Hobby Lobby. While we loved the charm of these buttons, you can use anything from small wooden shapes, scrabble tiles, flat-backed cabochons, or even small toy figures to create unique magnets.
- **Small Magnets:** Strong, flat magnets that can be securely attached to your chosen embellishments. Neodymium magnets are excellent for their holding power.
- **White Spray Paint:** Rust-Oleum Painter’s Touch 2X Ultra Cover in Heirloom White. This paint-and-primer-in-one offers excellent coverage and a beautiful, soft white finish for the tin and buttons.
- **Wood Stain:** Rust-Oleum Premium Wood Stain in Dark Walnut. This is a personal favorite for achieving a rich, deep finish that highlights the wood grain beautifully. You can find this at Lowe’s or similar hardware stores.
- **Strong All-Purpose Adhesive:** Gorilla Glue Epoxy is ideal for attaching the tin to the wood frame and the small magnets to your button embellishments, ensuring a durable hold.
- **Sandpaper:** Medium-grit sandpaper (around 120-150 grit) for distressing and fine-grit sandpaper (220 grit) for smoothing the wood if desired.
- **Optional:** Wood clamps or strong painter’s tape to hold wood pieces together while the glue dries.
- **Optional:** Pliers for removing shanks from buttons.
- **Optional:** Decorative rosettes or other embellishments to add a final flourish to your board.
- **Optional:** D-rings or sawtooth hangers if you plan to hang your memo board on a wall.
Essential Tools for the Project:
- **Measuring Tape:** For accurate wood cuts.
- **Saw:** A hand saw, miter saw, or circular saw for cutting the 2x4s. Alternatively, ask your hardware store to cut them for you!
- **Paint Brushes or Rags:** For applying stain and paint.
- **Protective Gear:** Gloves and safety glasses are always recommended when working with wood, saws, paints, and glues.
Step-by-Step Instructions: Building Your Custom Magnetic Memo Board
Step 1: Preparing Your Wood Frame
Begin by preparing the foundation of your memo board: the wood frame. We opted for a sturdy 2×4, which provides a nice chunky, rustic feel to the finished piece. Purchase one 8-foot 2×4 stud. You will need to cut this into five equal 16-inch pieces. If you don’t have a saw or prefer not to cut the wood yourself, most hardware stores like Lowe’s offer cutting services, which can save you time and effort.
Once cut, inspect your wood pieces for any splinters or rough edges. A quick sanding with medium-grit sandpaper (120-150 grit) will smooth them out, creating a better surface for staining and handling.
Step 2: Assembling the Wood Base
Now it’s time to join your wood pieces to form the solid base for your memo board. Lay the five 16-inch pieces side-by-side on a flat, protected surface. Apply a generous bead of Gorilla Wood Glue along the long edges where the pieces will meet. Ensure full coverage for a strong bond. Press the pieces firmly together, ensuring their ends are flush and the top surface is even.
To hold the pieces together securely while the wood glue dries, use clamps. If you don’t have wood clamps, a clever, budget-friendly alternative is to use strong painter’s tape wrapped tightly around the joined pieces. This “shanty” method, as we like to call it, works surprisingly well! Allow the glue to dry completely according to the manufacturer’s instructions. This usually takes a few hours, but it’s best to let it cure overnight for maximum strength.
Step 3: Preparing Your Decorative Tin Tile
While your wood frame is drying, you can move on to preparing the decorative tin tile and your custom magnets. We found a beautiful pressed tin tile at Hobby Lobby on clearance – a real score at just $9! If you’re not near a Hobby Lobby, you can find similar decorative tin sheets or tiles online. Ensure the tin is clean and free of dust or oils before proceeding to the next step. A quick wipe-down with a damp cloth and then a dry one usually suffices.
Step 4: Crafting Custom Magnets
For our magnets, we selected an assortment of charming buttons from Hobby Lobby. The variety of shapes, sizes, and textures adds a playful and personalized touch that perfectly complements the rustic tin. Of course, the beauty of DIY is that you can choose any small embellishments that speak to your style! You could use small wooden discs, vintage bottle caps, or even flat-backed glass pebbles.
If your buttons have shanks (the loop on the back for thread), you’ll need to remove them to create a flat surface for the magnet. Carefully use a pair of pliers to snip off the shank. Be gentle to avoid damaging the button’s front. This creates a smooth, flat surface that will adhere perfectly to your small magnets.
Step 5: Painting and Staining Your Components
With the structural elements prepared, it’s time to add the finishing touches. Take your tin tile and your prepared buttons, and give them a coat of Rust-Oleum Painter’s Touch 2X Ultra Cover in Heirloom White. This spray paint provides excellent coverage and a beautiful, smooth finish. Apply several light, even coats rather than one thick coat to prevent drips and achieve a professional look. Allow ample drying time between coats and before proceeding.
While the paint on the tin and buttons is drying, turn your attention to the wood frame. We used our absolute favorite stain: Rust-Oleum Premium Wood Stain in Dark Walnut. This stain penetrates deep into the wood, enhancing its natural grain and providing a rich, warm, and inviting finish. Apply the stain evenly with a brush or a clean rag, wiping off any excess after a few minutes to avoid a patchy appearance. Always follow the manufacturer’s instructions for application and drying times. This stain can typically be found at Lowe’s or similar hardware retailers.
Step 6: Final Assembly: Bringing It All Together
Once all your painted and stained components are thoroughly dry, it’s time for the final assembly. This step requires a strong adhesive to ensure longevity.
First, position your painted tin tile onto the stained wood frame. We aimed for a slightly distressed look, so after the paint dried, we lightly sanded parts of the tin to reveal some of the metal underneath, giving it a charming, worn character. Apply Gorilla Glue Epoxy to the back of the tin tile. This two-part epoxy creates an incredibly strong bond, perfect for securing the tin to the wood. Carefully place the tin onto the wood frame, ensuring it’s centered and straight. Hold it firmly in place or use painter’s tape to secure it while the epoxy cures. Depending on the epoxy, this can take anywhere from a few minutes to several hours, so consult your product’s instructions.
While the tin is drying, use the same Gorilla Glue Epoxy to attach the small magnets to the back of your painted buttons. Apply a small dab of epoxy to each magnet and press it firmly onto the flat back of a button. Allow these to cure completely, ensuring the magnets are securely attached and ready for use.
That’s it! Your stunning, super easy, and incredibly cheap magnetic memo board is complete! We absolutely adore its generous size, which is perfect for our family of seven. While it will inevitably become cluttered with reminders for late field trip forms, permission slips, and daily to-dos, for now, we’re enjoying its pristine, charming look. Oh, and we couldn’t resist adding a couple of delicate rosettes to the top – it truly felt like the board was begging for that extra touch of sweetness and charm.
Personalizing Your Magnetic Memo Board: Endless Possibilities
The beauty of this DIY project lies in its adaptability. While we opted for a rustic, dark wood frame with a distressed white tin and charming button magnets, your board can be as unique as your home. Consider these customization ideas:
- **Color Palette:** Instead of Heirloom White, paint your tin a vibrant pop of color, a soothing pastel, or even a sleek metallic. Coordinate it with your kitchen’s existing accent colors or introduce a fresh new hue.
- **Wood Finish:** Experiment with different wood stains – lighter oak, rich cherry, or even a gray wash for a more modern farmhouse feel. You could also paint the wood frame entirely for a painted-furniture look.
- **Magnet Style:** Beyond buttons, think about tiny chalkboard labels, miniature frames, sea glass, or even custom printed photos laminated and backed with magnets.
- **Embellishments:** The rosettes we added are just one idea. Consider stenciling a family motto or design onto the tin, adding small decorative hooks along the bottom for keys or light items, or framing the tin with thin trim pieces.
- **Texture Play:** Instead of a tin tile, you could use a large sheet of galvanized metal, or even cover a plain metal sheet with fabric or wallpaper before adding magnets.
The Finished Masterpiece: A Functional & Stylish Addition to Any Space
We are absolutely thrilled with how this project turned out. It’s a robust and beautiful piece that adds so much character and organization to our kitchen. What do you think?
Beyond the Kitchen: Versatile Uses for Your DIY Memo Board
While designed for the kitchen, the versatility of this magnetic memo board knows no bounds. Its charming aesthetic and practical function make it suitable for almost any room in the house! Consider placing it in a home office for important documents and to-do lists, in a child’s bedroom for displaying artwork and achievements, or even in an entryway as a welcoming message center. It’s a fantastic solution for keeping track of keys, mail, and other small items that tend to disappear.
Beyond personal use, this DIY magnetic memo board also makes an incredibly thoughtful and personalized gift. Imagine giving it as a teacher’s gift, where it can organize classroom notes and student artwork. It’s also a wonderful new baby gift for new parents to display photos and keep track of important milestones. Or a housewarming present, or a bridal shower gift – truly, just about any kind of gift! The fact that it costs less than $12 to make only enhances its appeal, proving that heartfelt, handmade gifts don’t have to break the bank.
We hope you love this project as much as we do! It truly is so easy to make, and the possibilities for customization are endless. We’d love to see your interpretations and how you integrate this functional piece into your own homes. Share your creations and inspire others!
Thank you so much for stopping by and sharing in our DIY adventure! If you found this project inspiring, we would be incredibly grateful if you could pin this like crazy below! Your support means the world to us. Thanks so much, guys! Have a wonderful and creative day!
~Whitney