
Craft Your Own Stunning DIY Truss Dining Benches: A Comprehensive Guide
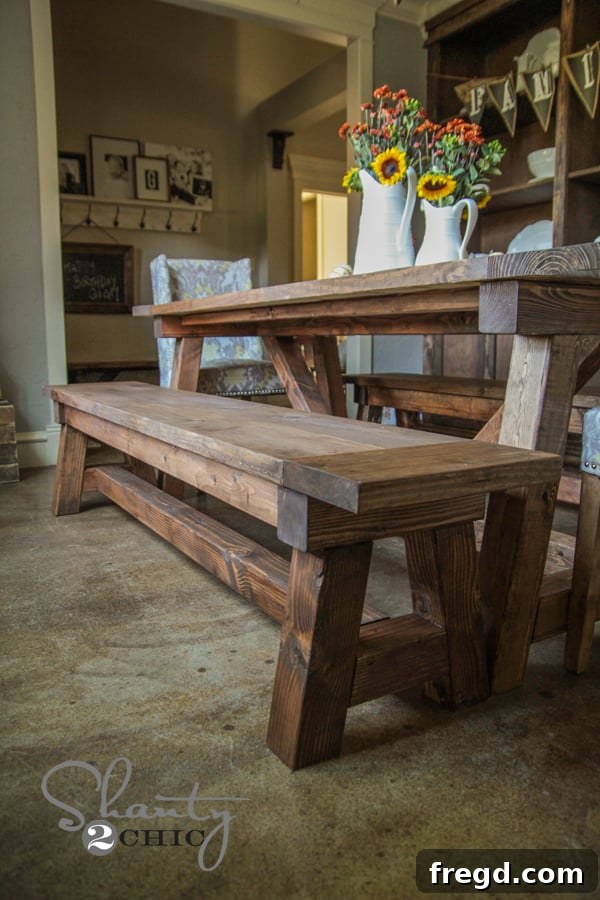
Hello, fellow DIY enthusiasts and home decor lovers! We’re thrilled to bring you an exciting update on our dining room transformation. If you’ve been following our journey on Instagram, you’ve witnessed the incredible progress we’ve made in revitalizing our dining space. The new look is absolutely captivating, and we couldn’t be more excited to unveil the latest addition: a pair of robust and stylish dining benches, perfectly paired with our previously built DIY dining table. These benches aren’t just seating; they’re a statement, blending rustic charm with substantial craftsmanship. We poured our hearts into building them, and the results are truly spectacular. Get ready to be inspired as we walk you through every step of this rewarding project!
We absolutely adore these benches. Their substantial presence and classic design have transformed our dining area into a welcoming and stylish hub.
Collaborating with a DIY Legend: Designing Your Truss Benches
To bring these beautiful pieces to life, we had the immense pleasure of collaborating with our incredibly talented friend, Miss Ana White. Known for her brilliant, free woodworking plans, Ana helped us refine the design for these striking truss benches. Together, we envisioned a design that was not only aesthetically pleasing but also incredibly sturdy and achievable for DIYers of all skill levels. The “truss” style adds an architectural detail that elevates the entire look, giving the benches a custom, high-end feel. Here, we’ll share some invaluable tips and insights from our build process. For the comprehensive, step-by-step instructions and a full material list, you can download the free plans directly from Ana White’s website. And, if you’re curious about how we built the accompanying table, make sure to check out our post on the DIY Dining Table HERE!
Choosing the Right Foundation: The Power of 4×4 Lumber
From the outset, our goal was to create dining benches that felt solid, durable, and commanding. We wanted them to match the robust aesthetic of our dining table, which also featured substantial elements. This led us immediately to the decision to use 4×4 lumber for the primary structural components. There’s something inherently appealing about the chunky, rustic look of 4x4s. They deliver that “big and beefy” feel we were after, providing a strong visual anchor for the dining space. Beyond their aesthetic appeal, 4x4s are remarkably cost-effective, making them an excellent choice for budget-conscious DIY projects without compromising on quality or appearance. They offer incredible stability and longevity, ensuring your benches will withstand years of family dinners and gatherings.
However, working with 4×4 lumber does come with a few considerations, primarily due to its thickness. Standard saws, especially smaller miter saws, might struggle to cut through a 4×4 in a single pass. For this project, a 12-inch miter saw proved to be the ideal tool, providing the necessary blade capacity for clean, precise cuts. If you don’t have a 12-inch miter saw, a circular saw with a sharp, appropriate blade can also work, though it may require multiple passes or careful flipping of the lumber. Always prioritize safety when making cuts, ensuring your lumber is securely clamped and you’re wearing proper protective gear.
The Indispensable Kreg HD Jig: Precision for Heavy-Duty Projects
For strong, hidden joints in this heavy-duty build, we once again turned to our trusty Kreg HD Jig. This tool is a game-changer for woodworking, especially when dealing with larger materials. The Kreg HD (Heavy Duty) Jig is essentially a super-sized version of the standard Kreg Jig, engineered specifically for creating robust pocket holes in thicker lumber, like our 4x4s. While a regular Kreg Jig is fantastic for 1x and 2x material, it simply can’t accommodate the substantial dimensions of a 4×4. The Kreg HD Jig solves this problem, allowing you to create incredibly strong, discreet pocket hole joints that are essential for the structural integrity of these benches. Its ability to create larger, deeper pocket holes means you can use longer, heavier-gauge screws, providing superior holding power. Given its versatility and the professional finish it helps achieve on larger furniture pieces, the Kreg HD Jig is truly a must-have tool for any serious DIY woodworker’s garage. Its price point also makes it an accessible upgrade for those looking to tackle bigger projects with confidence and ease. Below, you can see how we clamped it securely to our boards, ensuring precise hole placement every time.
Drilling Pocket Holes and Ensuring Structural Integrity
With the Kreg HD Jig in place, we used our reliable Ryobi 18V drill to create the necessary pocket holes. It’s crucial to remember that these pocket holes, and the corresponding screws, are significantly larger and more robust than those made with a standard Kreg Jig. This larger size is what provides the exceptional strength required for furniture made from 4x4s. One of the biggest challenges in any woodworking project is often determining the optimal placement for pocket holes to ensure maximum strength and a clean finish. We made sure to capture plenty of photos of our pocket hole placements on the bench base to guide you. While there are often several viable options, we’ve found these specific locations to be the most effective for creating a durable and stable structure.
Beyond the mechanical fasteners, we always advocate for the power of adhesive. For this build, we generously applied between all of our joints. Wood glue creates an incredibly strong bond, essentially making the joint stronger than the wood itself. When combined with Kreg HD screws, this dual approach ensures your benches will be rock-solid and withstand the test of time. Below, you’ll see a detailed shot of the bench base with all the Kreg HD pocket holes ready for assembly, secured with HD screws. Careful planning and execution at this stage are key to a successful build.
These are all Kreg HD pocket holes, and we used corresponding HD screws to securely attach each component.
Assembling Your Robust Dining Bench
Once all the pocket holes were drilled and ready, the assembly process began to truly bring the benches to life. Starting with the base, we carefully joined the 4×4 components, ensuring every connection was tight and square. Precision at this stage prevents wobbles and ensures a level bench. Here is a shot of the bench turned upside down, providing a clear view of where we strategically placed the other pocket holes for maximum stability and hidden aesthetics. We relied on the robust Kreg HD screws for all these connections, trusting their superior strength for this substantial piece of furniture.
Next, it was time to attach the long bench tops and the breadboards. For these connections, we used 1 1/2-inch pocket holes and 2 1/2-inch pocket hole screws, ensuring a flush and incredibly strong bond between the top planks and the end grain of the breadboards. This method not only provides exceptional durability but also creates a clean, professional finish without visible fasteners on the bench surface.
An important step for reinforcing the bench seat involved adding 2×4 runners underneath. We drilled 1 1/2-inch pocket holes into each of these runners *before* attaching them to the main bench frame. This pre-drilling makes the final attachment of the bench top significantly easier. To secure the bench top, we simply drove 2 1/2-inch pocket hole screws through these pre-drilled holes in the runners and into the underside of the bench seat. Now, here’s a crucial tip from our experience: fitting the drill into the tight space to drive these screws can be challenging. We encountered this exact “booger of a time” situation. Our solution was simple yet effective: we temporarily detached the long, straight 4×4 runner that forms part of the bench base. This allowed ample room to comfortably drive all the screws into the bench seat. Once the seat was fully secured, we reattached the 4×4 runner. While it might sound like an extra step, this minor detour saved us a lot of frustration and ensured a solid attachment, ultimately making the entire assembly process quicker and much more efficient. It’s these little tricks that make DIY projects so rewarding!
The Perfect Finish: Staining and Sealing Your Masterpiece
With the construction complete, it was time for the grand finale: the finish! This is where the true character of the wood comes to life and the benches get their protective shield. Our goal was to create a cohesive look across our entire dining room, so we decided to match the finish of these new benches to our existing dining table, as well as the Restoration Hardware-inspired sideboard and hutch we built previously. This unified aesthetic brings a sophisticated and harmonious feel to the entire space.
For the stain, we chose **Rustoleum Ultimate Wood Stain** in Dark Walnut. This product is an absolute dream to work with! Its superior formulation means it typically only requires a single coat to achieve a rich, deep color, saving you time and effort. Even better, it dries incredibly fast, often in under an hour, allowing you to move quickly to the next step of your project. Having worked with countless stains over the years, we can confidently say that Rustoleum Ultimate is, by far, our favorite for its ease of use, beautiful results, and quick drying time.
Once the stain had fully dried and cured, it was time to protect our beautiful work. We applied two coats of **Rustoleum Ultimate Polyurethane** in Satin. Polyurethane is essential for any high-traffic furniture piece like a dining bench, as it provides a durable, protective layer against spills, scratches, and everyday wear and tear. This particular polyurethane goes on with a milky-white appearance but dries to a crystal-clear, satin finish that enhances the wood’s natural beauty without adding excessive shine. We especially appreciate that it has a low odor and dries quickly, making the finishing process much more pleasant. Lightly sanding with a fine-grit sandpaper between coats, followed by a thorough cleaning, ensures a silky-smooth and professional-looking finish. With these two simple yet effective steps, your DIY dining benches are not only stunning but also ready to endure years of joyful use.
That’s all it takes to achieve a beautiful, durable finish!
The Finished Product: Admire Your Handiwork!
And there you have it – the finished DIY dining benches! We are absolutely thrilled with how they turned out and how perfectly they complement our dining table and the overall aesthetic of our newly revamped dining room. The substantial 4×4 construction provides a sense of heirloom quality, while the dark walnut finish adds warmth and elegance. These benches aren’t just practical; they’re conversation starters, showcasing the beauty and satisfaction of handmade furniture. We truly hope you love them as much as we do and feel inspired to tackle your own woodworking projects. Imagine gathering your family and friends around a table flanked by these custom-made beauties – the perfect setting for countless cherished memories.
Extend Your DIY Journey: More Dining Room Delights!
We hope this detailed guide encourages you to embark on your own DIY dining bench project. Don’t forget, the comprehensive, free plans are available on Ana White’s site, making it easier than ever to get started. If you enjoyed this build, we would be incredibly grateful if you could share this post and PIN it with your friends and followers! Your support means the world to us and helps inspire more people to embrace the joy of DIY. You guys are truly the best!
And for those eager to continue their DIY journey and create a complete, cohesive dining room ensemble, here are links to some of our other fantastic dining room projects you can build yourself:
DIY Shanty Wine Rack
Elevate your entertaining space with this stylish and functional wine rack, perfect for displaying your favorite vintages. It’s a great beginner-friendly project that adds a touch of elegance to any dining area.
Shanty Sideboard and Shanty Hutch
These Restoration Hardware-inspired pieces provide ample storage and a sophisticated backdrop for your dining room. Building them yourself allows for customization and significant savings compared to retail.
Shanty Wine Bottle Wall Vase
Add a charming, unique touch to your walls with this creative wine bottle wall vase. It’s an excellent way to upcycle and bring a touch of greenery or floral decor into your space.
DIY Window Panels
Complete your dining room ambiance with custom-built window panels. These add architectural interest and can significantly enhance the perceived value and design of your home.
We hope these projects spark your creativity and help you build the dining room of your dreams. Remember, with a little effort and the right tools, you can create beautiful, functional pieces that reflect your personal style and enhance your home. Have an absolutely fantastic day, and happy building!
~Whitney