
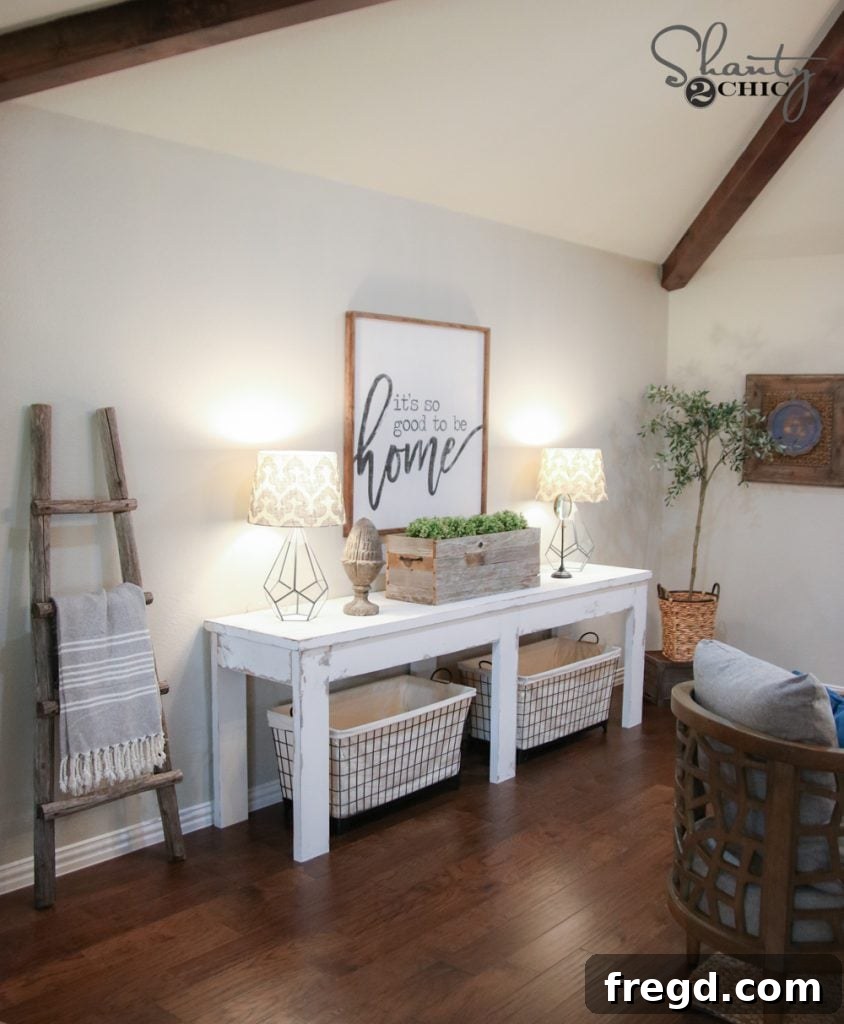
DIY Farmhouse Console Table: Build This Beginner-Friendly Project for Under $40!
Are you dreaming of adding a touch of rustic charm to your home without breaking the bank? Look no further! This comprehensive guide will walk you through building your very own stunning DIY Farmhouse Console Table for an incredible budget of around $40. Perfect for beginners, this project was even featured on HGTV’s “Open Concept” by the talented team at Shanty-2-Chic, where it brought much-needed character to the Davis family’s living space. Its timeless design fits seamlessly into any decor, offering both style and functionality.
Imagine transforming your entryway, living room, or hallway with a beautiful, handmade piece that exudes warmth and farmhouse elegance. This project isn’t just about saving money; it’s about the immense satisfaction of creating something beautiful with your own hands. With just eight standard 2×6 boards and a few basic tools, you can achieve professional-looking results. Let’s get started on bringing this charming console table to life!
Once completed, this table isn’t just a piece of furniture; it’s a testament to your newfound woodworking skills and a focal point for your home decor. The distressed finish and sturdy construction make it a truly remarkable and durable addition.
Before diving into the detailed steps, ensure you have the blueprint for success. You can easily download or print the FREE PLANS by clicking HERE! These plans are your essential guide, providing precise measurements and diagrams to simplify every cut and joint.
Essential Tools and Materials for Your Budget-Friendly Build
Building this farmhouse console table requires minimal tools, making it an excellent entry point for aspiring woodworkers. Here’s a list of what you’ll need to gather:
- Materials:
- Eight 2×6 boards (standard pine or whitewood are budget-friendly options, chosen for their affordability and ease of workability for beginners).
- Wood glue (a strong adhesive is crucial for durable joints).
- 2.5-inch pocket hole screws (specifically designed for pocket hole joinery to ensure strong, hidden connections).
- Varathane Dark Walnut wood stain (for achieving an authentic distressed look by creating a dark base layer).
- Vaseline (a simple household item used as a resist to prevent paint adhesion in specific areas).
- Rust-Oleum Chalked Paint in Linen White (or your preferred chalk paint color, known for its excellent adhesion and matte finish, perfect for distressing).
- Tools:
- Miter saw (essential for making precise, straight, and angled cuts, ensuring your table comes together squarely).
- Table saw (optional, but highly recommended for ripping boards to a consistent width, resulting in cleaner edges).
- Kreg Jig K5 (or similar pocket hole jig system, a beginner-friendly tool for creating strong and concealed joints).
- Drill (for driving screws and operating the Kreg Jig).
- Sander (an orbital or block sander is vital for smoothing surfaces and achieving the distressed finish).
- Clamps (essential for holding pieces firmly together during assembly, ensuring accurate and strong bonds).
- Measuring tape and pencil (for accurate layout and marking cuts).
- Safety glasses and hearing protection (always prioritize personal safety when working with power tools).
Safety is paramount in any DIY project. Always wear appropriate personal protective equipment, including safety glasses and hearing protection, especially when operating power tools. Work in a well-ventilated area, and follow all manufacturer instructions for your tools and finishes to ensure a safe and successful build.
Step-by-Step Construction Guide for Your Farmhouse Console Table
This beginner-friendly project breaks down into manageable stages. Follow these detailed steps to construct a beautiful and sturdy console table, gaining valuable woodworking experience along the way.
Step 1: Preparing Your Wood Boards and Making Cuts
The foundation of any great woodworking project is properly prepared materials. Begin by addressing your 2×6 boards according to the provided plans.
The first optional but recommended step is ripping down all of your 2×6 boards to a uniform 5 inches wide. This is a personal preference that significantly impacts the final aesthetic. Ripping the boards creates very straight, clean edges, which many prefer for a more refined, modern farmhouse look and tighter joints. However, if you enjoy the rustic charm of slightly rounded factory edges, you can skip this step entirely. Be aware that not ripping the boards will result in a slightly wider tabletop and a slightly longer overall table length, so adjust your expectations and measurements accordingly. If you choose to rip, a table saw with a sharp blade is essential for clean, consistent cuts along the length of the boards.
Once your boards are prepared (whether ripped or left with their factory edges), the next crucial step is making all your precise cuts according to the free plans. A miter saw is ideal for achieving accurate, square cuts, which are critical for strong and flush joints. Because of this design’s straightforward nature, you can pre-cut all your pieces before assembly, eliminating the need for constant measurement adjustments during the build. This organized approach streamlines the process. Double-check each measurement against your plans before making the final cut to ensure perfect accuracy, as even small discrepancies can affect the final fit.
Step 2: Drilling Pocket Holes for Strong Joinery
Pocket hole joinery is a favorite among DIY enthusiasts and beginners alike for its remarkable strength, simplicity, and concealed appearance. Using your Kreg Jig K5 (or similar model), you will add 1.5-inch pocket holes to the designated pieces as indicated in your plans. These strategically placed holes will be used to connect the various components of your table securely and discreetly.
Ensure the depth collar on your Kreg Jig drill bit is set correctly for 1.5-inch thick material (which is the actual thickness of a 2×6 board). Drill slowly and steadily to create clean, splinter-free holes. It’s always a good practice to drill a few test holes on scrap wood if you’re new to using a Kreg Jig, to get a feel for the tool. For a detailed visual demonstration and tips on proper usage, you can check out this helpful How to Use a Kreg Jig Video HERE!
After drilling all necessary pocket holes, you should have all your prepared pieces, including the six legs, ready for the assembly phase.
Step 3: Assembling the Side Frames of the Console Table
The console table’s base is robustly constructed from two identical side frames. To begin, assemble each side separately on a flat, stable work surface. Each side will consist of three legs and two longer apron pieces that span between them.
Apply a generous, even amount of wood glue to the ends of the apron pieces where they will meet the legs. Clamp them firmly in place between the legs, ensuring they are flush and square. Then, secure them with 2.5-inch pocket hole screws driven through the pre-drilled holes. It is crucial to ensure that the pocket holes on all your apron pieces are consistently facing upwards. This seemingly small detail is important because these upward-facing pocket holes will be used later to securely attach the tabletop to the base, making for a hidden, strong, and clean connection from the underside.
Use additional clamps to hold the pieces firmly together while you drive the screws, ensuring everything remains perfectly square and flush. Take your time during this step to achieve strong and aesthetically pleasing joints, as these form the core stability of your table. At this point, you should have two complete side assemblies that look like independent ladder-like structures, ready to be joined.
Step 4: Connecting the Side Frames to Complete the Base
With both side frames meticulously assembled, it’s time to connect them and form the full, sturdy base of your console table. This crucial step is achieved by attaching the shorter apron pieces between the two side assemblies, creating the depth of the table.
Begin by attaching the shorter aprons to one of your completed side frames. As before, apply wood glue to the ends and then secure them with 2.5-inch pocket hole screws. Ensure that these aprons are perfectly flush and square with the legs, using clamps to hold them firmly in place. Once secured, carefully bring the other side frame into position and attach it to the opposite ends of these shorter aprons. This process will seamlessly bring the entire structure together, forming a robust and stable base for your table. Double-check all connections to ensure tightness, stability, and squareness, which are vital for a wobbly-free table.
Step 5: Constructing the Beautiful Planked Tabletop
The tabletop is arguably the most visible and defining part of your console table, providing that signature farmhouse look. Assemble your planked top by joining several 2×6 boards side by side to create a wide, continuous surface.
Apply a generous, continuous bead of wood glue along the edges of the boards that will join together. Then, using 2.5-inch pocket hole screws driven through pre-drilled holes (as indicated in your plans, typically along the underside of the planks), securely fasten the boards to each other. It’s highly advisable to use multiple clamps to hold the boards tightly together while the glue dries and as you drive the screws, ensuring a strong, seamless bond with minimal gaps. Immediately wipe away any excess glue that squeezes out with a damp cloth to prevent dried glue from interfering with the finish later. This planked construction not only creates a beautiful, rustic surface but also significantly adds to the table’s overall strength and stability.
Step 6: Attaching the Tabletop to the Base for Final Structure
With both the base and the tabletop now complete and sturdy, the final structural step is to join them together securely. This is where those upward-facing pocket holes in your aprons come into play.
Carefully set the assembled tabletop upside down on a clean, protected surface, such as a drop cloth or blankets, to prevent any damage to the surface. Then, precisely place the assembled base structure upside down directly onto the tabletop. Align the base centrally on the tabletop, ensuring an even overhang on all four sides. Utilize the upward-facing pocket holes you thoughtfully drilled in the aprons (from Step 3) to attach the base to the tabletop. Drive 2.5-inch pocket hole screws through these holes and into the underside of the tabletop. This method creates a very strong, stable, and completely concealed connection, leaving the top surface smooth and clean, free of visible fasteners.
Congratulations, your farmhouse console table is now structurally complete! The next exciting phase involves transforming its raw wood into a beautifully finished piece that will catch every eye and add authentic farmhouse character to your home.
Achieving the Perfect Distressed Farmhouse Finish
The timeless beauty of a farmhouse console table often lies in its character-filled, aged appearance. This distressed finish is surprisingly easy to achieve, even for beginners, and adds immense charm and depth to your handmade piece.
Step 7: Applying Base Stain for Depth and Character
To create a natural, worn look that mimics years of use, begin by rubbing some Varathane Dark Walnut wood stain primarily on the joints and corners of your newly built table. This step is strategic: when the top coat of paint is applied and later distressed, these stained areas will peek through, brilliantly mimicking natural wear and tear where paint would typically chip off first, revealing the darker wood beneath. Use a clean rag or foam brush to apply the stain, allowing it to penetrate the wood for a few minutes before wiping off any excess. This subtle base layer is key to an authentic distressed look.
Step 8: The Vaseline Resist Technique for Chipped Effects
Next, apply a small amount of Vaseline to specific spots where you want the underlying stain or raw wood to show through prominently after painting. Focus on edges, corners, and areas that would naturally experience wear over time, such as around the legs or edges of the tabletop. The Vaseline acts as a resist, preventing the paint from adhering effectively to those spots. This technique is incredibly effective for creating a realistic chipped or worn paint effect, adding instant age and character. Apply it sparingly with your finger, rubbing it into the wood or stained areas to create a patchy, uneven distribution.
Step 9: Painting with Chalk Paint and Distressing to Perfection
The final layer of character comes with the application of paint and the subsequent distressing process. Paint the entire console table with Rust-Oleum Chalked Paint in Linen White. Chalk paint is an excellent choice for this type of finish as it adheres exceptionally well to most surfaces without extensive prep work like sanding or priming, and it provides a beautiful, ultra-matte finish ideal for distressing. Apply two thin, even coats for full, opaque coverage, allowing ample drying time between coats as per product instructions.
Once the paint has completely dried and cured, it’s time to distress! Grab your sander (an orbital sander with fine-grit sandpaper works wonderfully for larger areas, or a sanding block for manual, controlled distressing on edges and corners) and gently sand the areas where you applied Vaseline. The paint will easily lift off these areas, revealing the dark stain or raw wood beneath, creating those desired chipped effects. Continue to lightly sand other edges, corners, and even flat surfaces to create a naturally worn look, paying attention to areas that would genuinely see wear over time. The amount of distressing is entirely up to your personal preference – some prefer a subtle aged look, while others go for a more heavily chipped appearance for a bolder statement.
For more detailed insights into various finishing techniques, including how to achieve different shanty-style finishes, you can explore this helpful video on finishes! It demonstrates four favorite shanty-style finishes, providing visual guidance and inspiration for your projects.
Styling Your Farmhouse Console Table: Decorating Ideas
Now that your stunning DIY Farmhouse Console Table is built and beautifully finished with its unique distressed character, it’s time for the exciting part: styling it to complement and enhance your home decor! A console table serves as a fantastic display surface for a variety of items, adding personality, flair, and functionality to any room, whether it’s an entryway, living room, or hallway.
Consider the following ideas to style your newly built console table, turning it into a captivating focal point:
- Wall Decor: Above the table, a large statement piece of art, a vintage-inspired mirror, or a curated collection of framed photos can immediately create an impressive focal point. The custom sign made by Vine and Branches for the HGTV episode is a perfect example of personalized wall decor that adds a unique touch. You can buy similar custom signs from her on Etsy in different sizes HERE!
- Lighting: Table lamps are not only essential for providing ambient and practical lighting but also add significant aesthetic value. Flank your console with a pair of matching lamps for a balanced and elegant look. The lamps featured in the original project are from World Market HERE, and the complementary lamp shades are also from World Market HERE.
- Storage and Texture: Baskets are an excellent choice for both practical storage and adding rich texture to your display. They can gracefully hold blankets, magazines, remote controls, or other clutter, while simultaneously enhancing the cozy, authentic farmhouse aesthetic. The charming baskets in the original styling were thoughtfully sourced from Hobby Lobby.
- Greenery: Infuse a touch of nature and freshness with potted plants, succulents, or a beautiful vase of fresh flowers. This brings life, color, and organic softness to your display, creating a welcoming atmosphere.
- Books and Trinkets: Stack a few antique or aesthetically pleasing books, display cherished decorative objects, or showcase sentimental trinkets to reflect your personal style and interests. Layering different heights and textures creates visual interest.
Here are a few more finish shots, showcasing the beautiful result and offering further inspiration on how effortlessly it can be styled:
Conclusion: Your New Favorite DIY Project for Authentic Farmhouse Style
Building this DIY Farmhouse Console Table is an incredibly rewarding experience, demonstrating that stunning home decor doesn’t have to come with a hefty price tag. For less than $40 and a weekend’s worth of dedicated effort, you can create a durable, stylish, and highly functional piece of furniture that rivals high-end retail options. This project is a true testament to the power of simple materials, basic woodworking tools, and clear, easy-to-follow instructions, making it perfectly suited for beginners eager to explore the world of woodworking and enhance their living spaces.
Whether you’re looking to enhance your entryway with a welcoming touch, provide essential extra display space in your living room, or simply enjoy the immense satisfaction of completing a successful DIY endeavor, this farmhouse console table delivers on all fronts. Embrace the joy of creating something beautiful and tangible with your own hands, and savor the rustic elegance and personal touch it brings to your home for many years to come.
Don’t hesitate any longer – grab your FREE PLANS HERE and embark on your building journey today! You’ll be amazed at what you can achieve!