
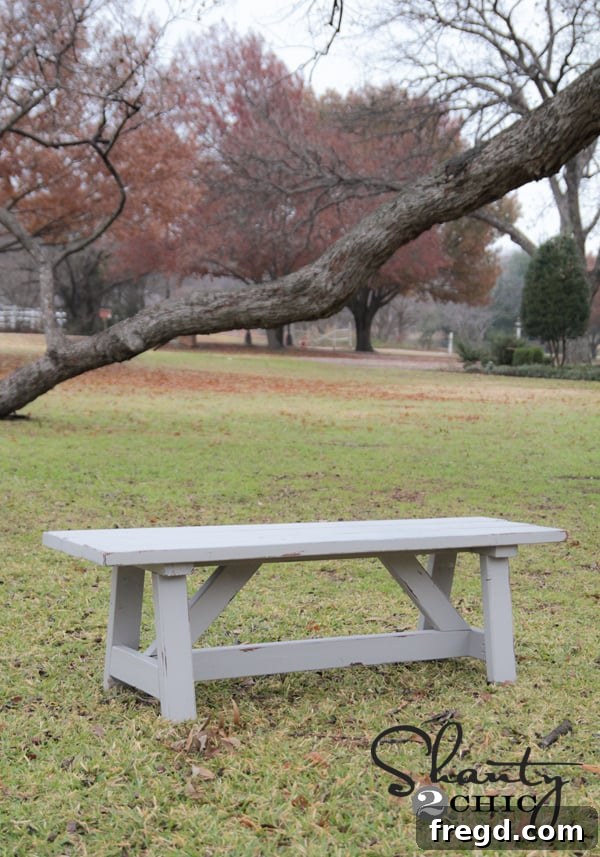
Crafting Your Dream Outdoor Bench: A $15 DIY Project That Delivers Style and Durability
Hello fellow DIY enthusiasts!
The weather here in Texas has been a spectacle lately, offering a wild rollercoaster of temperatures that truly keeps you on your toes. One week we’re basking in a glorious 80 degrees, enjoying the early taste of spring, only for an unexpected ice storm to sweep through a couple of days later, halting school for three days straight. That’s just quintessential Texas for you – wonderfully unpredictable!
However, I wasn’t going to let the fluctuating forecast deter me from taking full advantage of those beautiful 80-degree days. It presented the perfect opportunity to finally tackle a woodworking project that had been on my wish list for quite some time, one that promised both practical utility and a touch of rustic charm.
The Inspiration: A Perfect Perch by the Trampoline
My vision was simple: a sturdy, comfortable bench positioned right next to our trampoline. As any parent knows, watching kids bounce with boundless energy is a delightful, yet sometimes lengthy, activity. This bench would not only provide me with a comfortable spot to supervise and cheer them on, but it would also serve as a designated resting area for the kids while they patiently wait for their turn. It’s a win-win scenario, enhancing both comfort and organization in our backyard play space.
What truly made this project irresistible was its incredibly low cost. Believe it or not, this entire bench cost me just $15 to build! Achieving such a significant upgrade for such a minimal investment made the entire endeavor even more satisfying.
Choosing the Right Plan: The Ana White Providence Bench
When it comes to woodworking plans, I often turn to trusted sources, and for this project, I opted for one of my absolute favorites: the Providence Bench plan by the incredibly talented Ana White. Her designs are renowned for their clarity, simplicity, and beautiful aesthetics, making them perfect for DIYers of all skill levels.
This particular plan stood out because of its versatile design. While it’s absolutely perfect for outdoor settings, offering a robust and weather-resistant structure, its classic lines and clean aesthetic would also make it a fantastic addition to an entryway, a dining room, or even as extra seating in a living area. The adaptability of the Providence Bench ensures that your efforts will result in a piece of furniture that can evolve with your home’s needs.
Materials and Tools for Your DIY Bench
One of the most appealing aspects of this project is its straightforward material list. You don’t need exotic woods or complex cuts to achieve a professional-looking result. Simplicity is key, and it helps keep the cost incredibly low.
Lumber List:
- 2 – 2x4s (standard pine or cedar for outdoor use)
- 3 – 2x6s (standard pine or cedar for outdoor use)
For outdoor furniture, consider using pressure-treated lumber, cedar, or redwood for enhanced durability against the elements. While I used standard pine and relied on a good protective finish, these options offer superior natural resistance.
Essential Tools:
Beyond the basic lumber, you’ll need a few crucial tools to make this build smooth and enjoyable. The Kreg Jig is undoubtedly the star of this project, simplifying joinery significantly.
- Kreg Jig®: Essential for creating strong, hidden pocket-hole joints.
- Drill/Driver: For making pocket holes and driving screws.
- Measuring Tape: For accurate measurements.
- Miter Saw or Circular Saw: For precise cuts (a miter saw will make crosscuts easier).
- Safety Glasses: Always wear eye protection when working with power tools.
- Clamps: Crucial for holding pieces securely while drilling and assembling.
- Pencil: For marking cuts and pocket hole locations.
- Gorilla Wood Glue: For extra strong joints.
- Screws: 1 1/4″ Kreg pocket-hole screws for joining.
Step-by-Step Construction Guide: Building Your Sturdy Bench
This bench truly is a very simple build, making it an excellent project for beginner woodworkers looking to expand their skills. The magic happens with pocket-hole joinery, creating incredibly strong and discreet connections.
Mastering Pocket Holes for a Flawless Finish
The Kreg Jig® is a game-changer for DIY furniture projects. It allows you to create strong, hidden joints that elevate the look and durability of your piece. Here’s how I strategically placed my pocket holes:
I started by adding pocket holes to the bottom inside of the leg pieces. These holes will be largely out of sight, ensuring a clean appearance from the outside.
Next, I drilled pocket holes into the top sections of the legs. These will be used to attach the seat planks securely from underneath, again maintaining a smooth, unblemished surface on the visible parts of the bench.
For the bench seat itself, I used the Kreg Jig® to plank the top pieces together before attaching them to the base. This method creates a solid, unified seating surface. By connecting the individual 2×6 planks with pocket holes, you eliminate visible screws from the top and achieve a much cleaner, more professional look.
The diagonal support pieces also received pocket holes on their backs. Since these would be facing a wall or the interior of the bench, I wasn’t concerned about the pocket holes being visible. This allows for strong, simple attachment points without compromising the exterior aesthetic.
Assembling Your Bench Frame with Confidence
Once all your pieces are cut and pocket holes are drilled, assembly is relatively quick. Always use wood glue in addition to screws for maximum strength and durability, especially for outdoor furniture. Wood glue fills any microscopic gaps, creating a bond stronger than the wood itself.
The bottom support piece was attached carefully to the legs, forming the sturdy base of the bench. Ensure everything is square during assembly. Clamps are incredibly useful here to hold pieces in place while you drive the screws.
For attaching the pre-planked top to the base, I used 1 1/4″ Kreg pocket-hole screws, driving them through the pre-drilled pocket holes on the legs and into the underside of the seat planks. Remember to apply Gorilla Wood Glue to all mating surfaces before screwing them together. This ensures a rock-solid connection that will stand up to years of use.
Always double-check your measurements and ensure your frame is square as you assemble. A little extra time spent ensuring accuracy at this stage will save you headaches later on.
Bringing Your Bench to Life: The Finishing Process
Once the bench was fully assembled, it was time for the fun part: adding character and protection. I opted for one of my favorite distressing techniques to give it that sought-after aged, farmhouse feel.
The Foundation: Rich Dark Walnut Stain
I began by staining the entire bench with Rustoleum Ultimate Wood Stain in Dark Walnut. This deep, rich color serves as a beautiful base, peeking through the top coat to create a wonderful distressed effect. Staining first allows for a layered look that adds depth and authenticity to the final finish.
The Art of Distressing: My Vaseline Technique
After allowing the stain to dry thoroughly for at least an hour, I moved on to my signature Vaseline distressing technique. This simple method creates natural-looking wear and tear. You can read more about the detailed steps for this technique here (Note: Original link was not provided, so I’ve used a placeholder. Please replace with actual link if available). Essentially, you apply a thin layer of Vaseline to areas where natural wear would occur – edges, corners, and raised grains – before applying your topcoat of paint. This prevents the paint from adhering, allowing you to easily scrape it away later to reveal the beautiful stain beneath.
A Touch of Modernity: Valspar “String” Paint
My final paint coat was a lovely new Pantone color called “String,” a warm and inviting shade from Valspar. I simply painted it directly over the stained and Vaseline-treated wood. After letting the paint dry completely, I gently distressed the areas where the Vaseline had been applied, revealing the dark walnut stain and creating that perfectly imperfect, charmingly worn look. This contrast adds immense character and makes the bench truly unique.
Ultimate Outdoor Protection: Rust-Oleum Spar Varnish
Given that this beautiful bench would be residing outdoors by the trampoline, protecting it from the elements was paramount. I sealed everything with two coats of Rust-Oleum Spar Varnish. Spar varnish is specifically designed for exterior use, offering superior protection against UV rays, moisture, and temperature fluctuations. This crucial step ensures that your hard work will endure the sun, rain, and playful bumps for many years to come, keeping your $15 bench looking fantastic.
The Final Reveal: A $15 Bench That Transforms Your Space!
I couldn’t be happier with how this DIY bench turned out. It looks absolutely adorable by the trampoline, perfectly complementing our outdoor space. And did I mention again that it only cost me a mere $15 to build? Yes, it’s worth repeating! This project is a testament to how budget-friendly DIY can yield incredibly stylish and functional results. It fits perfectly within my budget and exceeds expectations in terms of both form and function.
It’s not just a place to sit; it’s a charming addition that enhances the entire backyard experience, making those trampoline sessions even more enjoyable for everyone. Here are just a few more glimpses of the finished bench in its new home:
Your Next DIY Project Awaits!
Thank you so much for stopping by and taking the time to read about this fun and rewarding DIY project. I hope this inspires you to grab some lumber and create something beautiful and functional for your own home or garden. Building something with your own hands is an incredibly satisfying experience, especially when the result is this charming and affordable.
If you loved this project, I would be absolutely thrilled if you would share it with your friends and family! Please feel free to Pin my bench below to your favorite DIY boards on Pinterest so others can discover this easy and budget-friendly build.
Happy building, friends!
~Whitney