
Transform Your Front Door: Crafting a Stunning & Affordable DIY Spring Wreath in Under 30 Minutes!
Happy crafting, everyone! Are you still admiring your autumn decorations, even though spring has officially sprung? Don’t worry, you’re not alone! Many of us find ourselves in that creative limbo, but it’s time for a refresh. Today, we’re going to banish those lingering fall vibes and welcome the vibrant energy of spring with an incredibly simple, yet utterly charming, DIY wreath project. This isn’t just any craft; it’s a quick, budget-friendly solution that will have your front door radiating seasonal joy in less than half an hour and for under $10!
I recently tackled this exact dilemma, and the results were so delightful, I had to share. This project proves that you don’t need to be a seasoned crafter or break the bank to achieve beautiful, personalized home decor. Get ready to transform your entryway with a fresh, custom-made wreath that reflects your unique style and celebrates the new season.
The Charm of a Handmade Wreath: Why DIY?
There’s something uniquely satisfying about creating something with your own hands, especially when it comes to home decor. A handmade wreath offers more than just aesthetic appeal; it brings a personal touch that store-bought options simply can’t match. Imagine the compliments you’ll receive when guests learn you crafted this beautiful piece yourself!
Beyond the personal satisfaction, DIY wreaths are a fantastic way to save money. Retail wreaths, especially those with seasonal flair, can often come with a hefty price tag. By sourcing your materials smartly and investing a little bit of your time, you can achieve a high-end look without the high-end cost. This project, for instance, came in at under $10 – a true testament to smart crafting!
Furthermore, crafting provides a wonderful opportunity for creative expression. You get to choose every element, from the base wreath to the ribbon and embellishments, ensuring the final product perfectly complements your home’s aesthetic. It’s an enjoyable activity that can spark joy and help you unwind. So, let’s roll up our sleeves and dive into making this adorable spring wreath!
Your Beautiful New Wreath: The Finished Look
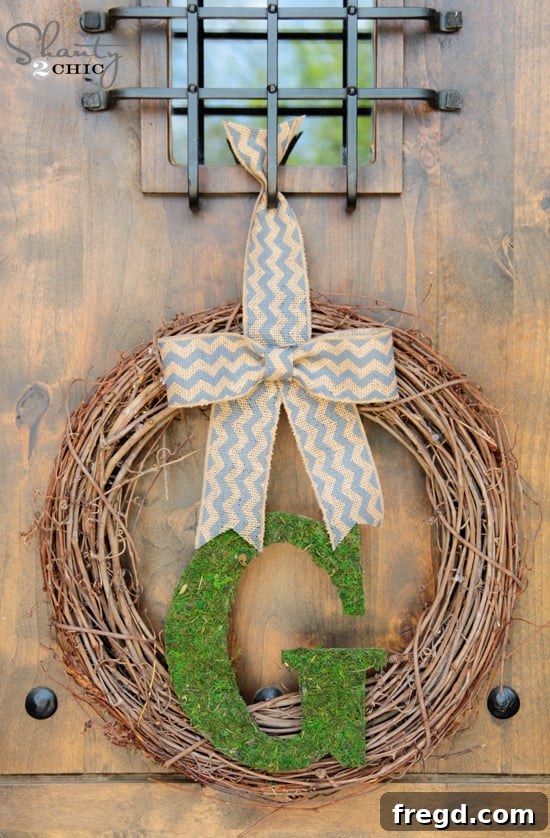
Before we delve into the step-by-step process, let’s take a moment to admire the charming outcome. This wreath effortlessly blends rustic elegance with a touch of personalized flair, featuring a lush moss initial and a stylish faux burlap bow. It’s the perfect welcoming statement for any front door, embodying simplicity, charm, and handmade warmth.
Simple, yet incredibly captivating, isn’t it? The combination of natural textures and a personalized initial creates a sophisticated, inviting display. Ready to create your own?
Gathering Your Materials: Smart Shopping for Your DIY Wreath
One of the secrets to keeping this project under budget is smart shopping. I found all the necessary supplies at Hobby Lobby, taking full advantage of their fantastic sales. Most items were already 50% off, and for the one item not on sale (the sheet moss), a handy 40% off coupon sealed the deal. With a little strategic planning, you can easily replicate these savings and keep your project cost-effective.
Here’s what you’ll need to create your personalized spring wreath:
- A Grapevine Wreath (approx. 18-24 inches in diameter for a standard door)
- Sheet Moss (found in the floral or craft section)
- An MDF Letter of your choice (representing your initial or family name)
- A Roll of Ribbon (I used a stylish chevron burlap ribbon for a rustic-chic look)
- High-Temperature Hot Glue Gun and Glue Sticks
- Sharp Scissors
Remember to keep an eye out for sales and coupons at your local craft stores. These little tricks can make a big difference in your total expenditure!
Step-by-Step Guide: Crafting Your Personalized Spring Wreath
Let’s get started on bringing this beautiful vision to life! Each step is designed to be straightforward and enjoyable, ensuring a stress-free crafting experience.
Step 1: Preparing Your Grapevine Wreath Base
The foundation of our wreath is a classic grapevine wreath. These natural bases are incredibly versatile and provide a sturdy, organic look that beautifully complements various decor styles, from farmhouse to rustic chic. They also offer a fantastic surface for hot glue, ensuring all your embellishments stay firmly in place.
Choose a size that feels appropriate for your door. I opted for a medium-sized wreath, which offers a substantial presence without overpowering the entryway. Unpack your grapevine wreath and ensure it’s clean and free of any debris. It’s now ready to be transformed!
Step 2: Crafting Your Personalized Moss Initial
Adding a moss initial is what truly makes this wreath unique and personal. It’s a simple yet incredibly effective way to customize your decor. For this, you’ll need your sheet moss and an MDF letter.
Start by carefully unrolling or unfolding your sheet moss. It typically comes pressed flat and can be quite delicate, so handle it gently to prevent tearing. Lay it out on a flat, protected surface.
Next, take your MDF letter and position it firmly onto the moss. Using your high-temp hot glue gun, apply a generous amount of hot glue to the back of the MDF letter. Quickly but carefully press the letter onto the moss, ensuring good adhesion across the entire surface. Hold it in place for a few moments until the glue sets.
Once the glue has dried, use a sharp pair of scissors to meticulously cut around the perimeter of your letter. Take your time with this step to ensure clean, crisp edges. This process is surprisingly simple, and you’ll be amazed at how professional your moss-covered initial looks!
With your beautiful moss initial complete, it’s time to attach it to your grapevine wreath. Decide on the ideal placement – I chose the bottom-front for a balanced and inviting look. Apply a generous amount of high-temp hot glue to the back of your moss letter and firmly press it onto the grapevine wreath, holding it until it’s securely adhered. This will become the focal point of your wreath!
Step 3: Crafting the Elegant Faux Burlap Bow
Now for a touch of rustic charm: the faux bow! This technique creates a perfectly shaped bow without the fuss of traditional tying. I used a lovely chevron burlap ribbon, which adds texture and a subtle pattern. Feel free to choose any ribbon that complements your desired aesthetic.
Here’s how to create your faux burlap bow:
Part 1: Forming the Main Bow Loop
Begin by cutting a long piece of your chosen ribbon. The length will depend on how large you want your bow to be. For a standard wreath, about 20-24 inches works well. Take both ends of this long piece and bring them to the center, creating a loop on each side. Secure the overlapping ends in the middle with a dab of hot glue.
Part 2: Pinching and Securing the Center
Once the glue is dry, gently gather and squeeze the center of your ribbon, creating a neat pinch. This forms the classic bow shape. While holding the pinch, take another small piece of ribbon (about 4-6 inches) and fold it lengthwise two or three times to create a thicker “knot” piece. Apply hot glue to one end of this folded ribbon and wrap it tightly around the pinched center of your bow. Secure the other end with more hot glue on the back. This step sounds more complex than it is; essentially, you’re just cinching the middle and covering the join with a neat ribbon band.
The back of your faux bow should now look something like this, with all the raw edges neatly hidden by the center wrap.
Part 3: Adding the Decorative Tails
No bow is complete without elegant tails! Cut two separate strips of ribbon, each about 10-12 inches long, depending on your desired tail length. For a polished finish, cut the ends of these strips at an angle, creating a V-shape or dovetail cut. This small detail adds a lot to the overall appearance.
Using your hot glue gun, attach one tail at a time to the back of your bow, just beneath the center knot. Overlap them slightly or position them side-by-side, allowing them to hang gracefully. Ensure they are securely glued, as these will be exposed.
And just like that, your beautifully crafted faux burlap bow is complete! It’s a simple technique that yields impressive results every time.
Voila! Your perfect bow, ready for its starring role.
Step 4: Assembling and Hanging Your Wreath
With your moss initial and faux bow ready, it’s time for the final assembly! Take a long piece of your remaining ribbon and loop it around the top portion of your grapevine wreath. This piece of ribbon will serve two purposes: it adds another layer of texture and provides a sturdy base for attaching your bow, while also being part of your hanging mechanism.
Carefully position your beautiful faux bow over this ribbon, near the top or wherever it balances best with your moss initial. Apply a generous amount of hot glue to the back of the bow and firmly press it onto the ribbon you’ve wrapped around the wreath. Hold it in place for a good minute or two to ensure maximum adhesion. This strategic placement helps integrate the bow seamlessly into the overall design.
Now, for hanging your masterpiece! Every front door is unique, with different hooks, knocker styles, or glass panels. Because of these variations, I’ll let you decide the best and most secure way to hang your new wreath on your particular door. You might use an over-the-door hanger, a suction cup hook on glass, or simply secure the ribbon loop around a pre-existing nail or hook. The goal is to ensure it hangs straight and proudly for all to admire.
Admire Your Handiwork: The Finished Spring Wreath!
It’s time for the grand reveal! Step back and take in the beauty of your creation. You’ve transformed simple materials into a stunning, personalized piece of decor that’s ready to greet every visitor with a touch of spring cheer. All this achieved in under 30 minutes and for less than $10 – truly remarkable!
Isn’t it absolutely lovely? The natural textures of the grapevine and moss, combined with the chic burlap ribbon and personalized initial, create a cohesive and welcoming statement. It’s perfect for adding that much-needed pop of fresh, seasonal charm to your home.
The simplicity of this design allows it to blend beautifully with various home styles, from modern farmhouse to traditional. It’s a versatile piece that speaks volumes about your attention to detail and love for handmade elegance.
Tips for Customization and Longevity
While this design is beautiful as is, feel free to let your creativity shine! Consider these ideas for personalizing your wreath even further:
- Ribbon Variations: Experiment with different patterns, colors, or materials. Satin, grosgrain, or even lace ribbons could create entirely different looks.
- Floral Accents: Tuck in a few faux spring flowers or sprigs of greenery into the grapevine for added color and texture.
- Other Embellishments: Small bird figurines, faux nests, or even painted wooden shapes can add extra charm.
- Seasonal Swaps: The grapevine base and moss letter can be quite versatile. You could potentially swap out the ribbon and add new seasonal embellishments to transform the wreath for other holidays or seasons.
To ensure your wreath lasts, especially if displayed outdoors, consider applying a clear sealant spray (such as a UV-resistant clear coat) to the moss and ribbon to protect them from the elements and fading. Store it in a cool, dry place during off-seasons.
Final Thoughts & Your Next DIY Adventure!
So, what are your thoughts? Pretty impressive for a project under $10 and achievable in less than 30 minutes, right? This DIY spring wreath is not just a decoration; it’s a statement that handmade charm doesn’t have to be expensive or time-consuming. It’s an invitation to embrace the satisfaction of creating something beautiful and functional for your home.
Thank you so much for joining me on this crafting journey! I hope this tutorial has inspired you to clear away the old and usher in the new with a refreshing, personalized touch. I’m always thrilled to see your creations, so please don’t hesitate to share your finished wreaths or your own unique twists on this project!
I would absolutely love for you to share this project and PIN my new wreath below to inspire others. Spreading the joy of DIY is what it’s all about!
If you have any questions at all about the materials, steps, or customization ideas, please feel free to ask in the comments section. Happy crafting, and enjoy your beautiful new front door decor!
~Whitney