
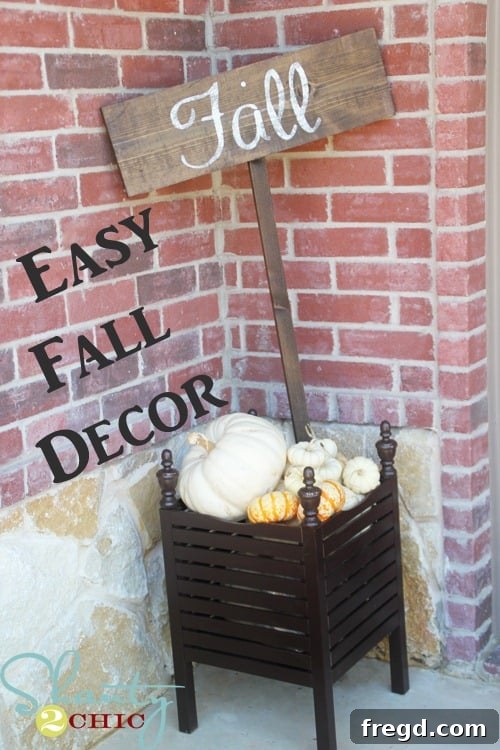
Craft Your Own Rustic Wooden Fall Sign: An Easy & Affordable DIY Guide
Welcome back, fellow DIY enthusiasts! If you’ve been following along, you might recall the charming Pumpkin Planter Box we crafted recently. That project truly set the mood for autumn, and I was inspired to add another personalized touch to our seasonal decor. There’s something incredibly satisfying about creating unique pieces for your home, especially when they perfectly capture the cozy spirit of fall.
Today, we’re diving into another wonderfully simple and budget-friendly project: a custom wooden fall sign! This piece not only complements the rustic vibe of our pumpkin planter but also stands beautifully on its own, bringing warmth and character to any space. The best part? It can be made almost entirely from scrap wood, making it an incredibly sustainable and economical choice for your autumn decorating.
Why a DIY Wooden Fall Sign is the Perfect Autumn Project
Fall decor doesn’t have to be expensive or complicated. In fact, some of the most charming pieces are those made with a personal touch. Crafting your own wooden sign offers numerous advantages:
- Budget-Friendly: By utilizing scrap wood, you significantly cut down on material costs.
- Customizable: You choose the words, fonts, colors, and finish, ensuring your sign perfectly matches your home’s aesthetic.
- Sustainable: Repurposing wood not only saves money but also gives new life to materials that might otherwise be discarded.
- Sense of Accomplishment: There’s immense satisfaction in looking at a beautiful piece of decor and knowing you created it with your own hands.
- Unique Decor: Stand out from mass-produced items with a one-of-a-kind creation that reflects your style.
This particular project is designed to be accessible for crafters of all skill levels. Whether you’re a seasoned woodworker or picking up a brush for the first time, you’ll find these steps easy to follow, leading to a stunning result that celebrates the season.
Gathering Your Essential Materials & Tools for This Autumn Craft
One of the most appealing aspects of this project is how few specialized tools and materials are required. Chances are, you might already have most of these items tucked away in your garage or craft bin. For this charming wooden fall sign, I was fortunate enough to have all the necessary wood scraps on hand, meaning this project was essentially free to make!
The Wood Foundation
For my sign, I used two pieces of scrap wood, perfectly sized so no cutting was necessary. This saved time and effort, but don’t worry if your wood needs a trim; a simple hand saw will do the trick.
- 1×2 piece of wood: This will serve as the vertical support or backing for your sign. Its slim profile makes it ideal for holding the main sign panel.
- 1×8 piece of wood: This will be the main panel where your fall message will be stenciled. The wider surface provides ample space for text and designs.
If you don’t have these specific dimensions, feel free to adapt! Pallet wood, fence pickets, or any other reclaimed wood can work beautifully, often adding even more rustic charm. Just ensure your pieces are relatively flat and free of major splinters.
Stains and Paints for a Rich Finish
The choice of stain and paint will largely dictate the final look and feel of your sign, from deep rustic to light farmhouse.
- Rust-Oleum Dark Walnut Stain: This stain provides a beautiful, rich, deep brown finish that perfectly evokes the warmth of autumn. It’s easy to apply and offers excellent coverage. Rust-Oleum is a trusted brand, known for its quality finishes.
- Foam Brush: Ideal for applying stain smoothly and evenly, ensuring no brush marks are left behind.
- Clean Cloth: Essential for wiping off excess stain to achieve your desired shade and reveal the wood grain.
- Cream-colored Acrylic Paint: This provides a lovely contrast against the dark walnut stain, making your stenciled message pop. Acrylic paints are versatile, quick-drying, and easy to clean up.
Stenciling Tools for Your Message
This is where your chosen fall message comes to life! There are a couple of excellent options for creating your stencil.
- Silhouette Cutting Machine: If you own a Silhouette or a similar electronic cutting machine (like a Cricut), this is fantastic for creating custom stencils with precise lettering and intricate designs. You can choose any font and phrase imaginable.
- Store-Bought Stencil Letters: For those without a cutting machine, don’t fret! Your local craft store will have a wide array of pre-made stencil letters and fall-themed designs that work just as well.
- Bristle Brush: A stiff bristle brush is key for the dry brushing technique, allowing you to apply paint with control and achieve a slightly distressed, rustic look.
- Scrap Paper: An often-overlooked but crucial item for offloading excess paint when dry brushing.
Assembly Essentials
- Hammer or Nail Gun: For securely joining your wood pieces.
- Nails: Small finishing nails work perfectly for this project, providing a strong hold while being discrete.
Your Step-by-Step Guide to Crafting a Charming Wooden Fall Sign
Now that you have all your materials ready, let’s dive into the creative process! This project is divided into three simple stages: staining, stenciling, and assembly. Take your time with each step, and remember that slight imperfections often add to the handmade charm.
Step 1: Preparing Your Wood with a Rich Stain
The stain is what gives your sign its beautiful, aged, and rustic appearance, highlighting the natural grain of the wood.
- Clean Your Wood: Ensure your 1×8 and 1×2 wood pieces are clean and free of dust or debris. If the wood is particularly rough, a light sanding with fine-grit sandpaper can create a smoother surface for staining.
- Apply the Stain: Dip your foam brush into the Rust-Oleum Dark Walnut stain. Apply a single, even coat to both sides and edges of your 1×8 piece of wood, and optionally to the 1×2 support piece if you want a fully stained look. Work in the direction of the wood grain for the best finish.
- Allow to Set: Let the stain penetrate the wood for approximately 5 minutes. This allows the wood to absorb the pigment and achieve a deeper color. The exact time can vary based on the wood type and desired darkness.
- Wipe Off Excess: Using a clean, dry cloth, gently wipe off any excess stain. This step is crucial for revealing the wood grain and preventing a patchy, overly dark finish. You’ll notice the beautiful variations in the wood come to life. Allow the stained wood to dry completely, typically for several hours or overnight, before moving on to the next step. A fully dry surface is essential for proper stencil adhesion.
Step 2: Designing and Applying Your Stencil
This is where your sign truly begins to take shape, with your chosen fall message adding personality and charm.
- Create Your Stencil:
- Using a Silhouette/Cricut: Design your desired fall message (e.g., “FALL,” “WELCOME AUTUMN,” “GATHER,” “PUMPKIN SPICE”) using your machine’s software. Choose a font that complements the rustic aesthetic. Cut your design onto vinyl or stencil film.
- Using Store-Bought Stencils: Select your preferred stencil letters or fall motifs from your local craft store. Arrange them on your 1×8 board to plan your layout.
- Position the Stencil: Once the stain is completely dry, carefully position your stencil onto the 1×8 board. If using vinyl, smooth it down firmly to prevent paint bleed. For plastic stencils, you might use painter’s tape to secure them in place.
- Prepare for Dry Brushing: Pour a small amount of cream-colored acrylic paint onto a disposable plate or palette. Dip the tips of your bristle brush into the paint, picking up only a small amount.
- Offload Excess Paint: This is the secret to dry brushing! Firmly dab your brush onto a piece of scrap paper until it feels almost dry and very little paint transfers. This prevents paint from seeping under the stencil and creates a crisp, slightly distressed look. You can find more detailed instructions on this versatile technique in my Stenciled Photo Frames tutorial.
- Apply Paint Through the Stencil: Using light, dabbing motions, carefully apply the almost-dry brush over your stencil. Build up the color gradually. If you need more coverage, re-offload paint onto your scrap paper and repeat. Resist the urge to use too much paint or broad strokes, as this can lead to bleeding.
- Remove Stencil: Once you’ve achieved the desired opacity, carefully peel off your stencil while the paint is still slightly damp. This helps prevent the paint from sticking to the stencil and lifting off the wood. Allow the paint to dry completely.
Step 3: Assembling Your Rustic Masterpiece
The final step brings your two wood pieces together, creating the finished sign. This is where you can add a touch of personality with a slightly unconventional assembly.
- Position the Panels: Lay your stenciled 1×8 board face down on a clean, protected surface. Place your 1×2 support piece across the back of the 1×8.
- Add a Touch of Whimsy: Instead of aligning the 1×2 perfectly straight, I chose to set it a little crooked. This subtle tilt adds a charming, handcrafted, and delightfully imperfect touch that enhances the rustic appeal of the sign. Feel free to experiment with the angle that you find most appealing.
- Secure with Nails: Once you’re happy with the positioning, use a hammer and nails (or a nail gun) to securely fasten the 1×2 to the back of the 1×8. Drive a few nails through the 1×2 into the 1×8, ensuring a sturdy connection.
Personalizing Your Fall Sign: Ideas for Endless Creativity
The beauty of DIY lies in its infinite possibilities for customization. While “FALL” is a classic, don’t stop there! Think about how you can make this sign truly your own.
Word Choice & Fonts
- Seasonal Sayings: Beyond “FALL,” consider “Grateful,” “Blessed,” “Hello Autumn,” “Pumpkin Spice & Everything Nice,” “Give Thanks,” or even your family name.
- Font Styles: Experiment with different fonts – chunky block letters for a bold statement, elegant scripts for a touch of sophistication, or whimsical handwritten styles for a playful feel.
Color Palettes & Distressing
- Traditional vs. Modern: Stick with traditional fall hues like deep reds, oranges, and yellows, or opt for a modern farmhouse look with muted grays, whites, and blues.
- Distressing Techniques: For an even more aged and rustic appearance, lightly sand the edges of your finished sign after the paint has dried. You can also apply a thin layer of dark wax or antique glaze over the painted letters to deepen their tone and create a vintage patina.
Size & Shape Variations
- Larger Statements: Don’t be limited by the original dimensions. Use larger wood pieces to create a prominent entryway sign or a substantial piece for your living room wall.
- Multi-Panel Signs: Instead of one 1×8, use several narrower boards joined together for a multi-line message.
Displaying Your Handmade Autumn Treasure
Once your sign is complete, it’s time to find the perfect spot for it to shine. A beautifully crafted sign deserves a prime location where it can contribute to your home’s seasonal ambiance.
Indoor Styling
This rustic sign is versatile enough to enhance various indoor settings:
- Mantelpiece: Place it proudly on your fireplace mantel, surrounded by pumpkins, gourds, and autumn foliage for a classic fall display.
- Entryway Table: Create a welcoming vignette for guests by placing the sign on an entryway console table, perhaps alongside a vase of dried flowers or a stack of antique books.
- Kitchen Counter or Shelves: Add a touch of fall charm to your kitchen by leaning the sign against a backsplash or placing it on open shelving, nestled amongst cookbooks and pottery.
- Part of a Fall Vignette: Integrate your sign into a larger decorative arrangement on a buffet, coffee table, or bookshelf, combining it with candles, pinecones, and other seasonal elements.
Outdoor Charm
If you have a covered porch or entryway, this sign can also add a delightful touch to your exterior fall decor. Just ensure it’s protected from direct rain and extreme weather to preserve its beauty.
- Front Porch Welcome: Lean it against a potted mum or a stack of pumpkins by your front door to greet visitors with autumnal cheer.
- Garden Nook: Integrate it into a sheltered garden area, adding a rustic accent to your outdoor oasis.
The Joy of DIY: More Than Just a Sign
Creating this wooden fall sign is more than just a craft project; it’s an experience. It’s an opportunity to tap into your creativity, personalize your living space, and enjoy the satisfaction of building something beautiful with your own hands. Every time you see this sign, you’ll be reminded of the fun you had making it and the unique charm it brings to your home.
Moreover, embracing DIY projects like this allows you to save money, reduce waste by repurposing materials, and ultimately, fill your home with meaningful pieces that tell a story. This little sign is a conversation starter, a warm welcome, and a testament to the fact that beautiful decor doesn’t require a hefty price tag.
Looking Ahead to More Creative Projects
This fall sign is just the beginning! The techniques learned here – staining, stenciling, and simple wood assembly – can be applied to countless other projects throughout the year. I’m already brimming with ideas for fun signs for every season, holiday, and special occasion. Imagine a festive holiday sign, a cheerful spring welcome, or a patriotic summer display, all crafted with the same love and ingenuity.
Thank you so much for stopping by and joining me on this creative journey. I hope this tutorial inspires you to pick up some scrap wood and create your own rustic fall masterpiece. Don’t forget to share your creations; I always love seeing what you come up with!
Happy crafting!
~Ashley