
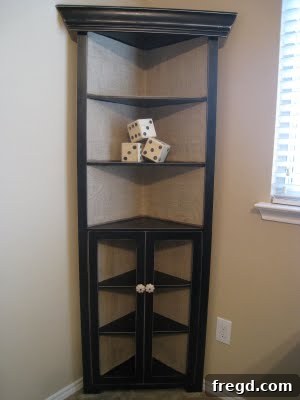
Revitalize Your Home: A Stunning DIY Hutch Makeover from Gameroom to Grandeur
Hello, fellow DIY enthusiasts and home decor lovers! I know it’s been a little quiet on the blog front recently, but that’s because I’ve been pouring every ounce of creativity, effort, and passion into transforming a very special piece of furniture. What started as a simple idea blossomed into a rewarding project, and I am absolutely thrilled to finally unveil the results of this labor of love!
Get ready to be amazed by a complete hutch makeover that takes a dated gameroom staple and elevates it into a chic, versatile showpiece for any room in your home. This transformation proves that with a clear vision and a bit of elbow grease, you can breathe new life into almost any piece of furniture, creating something truly unique and reflective of your evolving style.
It might be hard to believe, but this elegant piece once looked quite different. Let’s take a moment to appreciate its humble beginnings…
Yes, you read that right! Before its incredible transformation, our corner hutch was a vibrant, albeit somewhat boisterous, fixture in our gameroom. It perfectly served its purpose for years, holding games, toys, and various knick-knacks associated with childhood fun. There was absolutely nothing “wrong” with it – it fit the space perfectly and was structurally sound.
However, as my boys are growing older, their interests are shifting, and so is our family’s aesthetic. The bright yellow, cheerful blue, and prominent sports-themed decor, while endearing for a time, no longer aligned with the more mature and sophisticated vision I had for the gameroom, or indeed, for other spaces within our home. I envisioned a piece that could seamlessly transition from a lively play area to a more refined living space, a piece with timeless appeal that could evolve with our family’s style. It was time for this beloved hutch to undergo a dramatic, yet elegant, furniture upcycling journey.
This challenge ignited my DIY spirit, and I couldn’t wait to get started on creating a beautiful, versatile hutch that would truly make a statement. Here’s a glimpse of where we began…
This is the “before” shot of our corner hutch, a piece that has been a long-standing fixture in our gameroom. While it dutifully served its purpose of storing various game-related items, its bright yellow and blue hues, coupled with the prominent wooden sports decals, no longer resonated with the evolving aesthetic of our home. My vision was to create a more mature, refined look that would allow the hutch to seamlessly integrate into any room, should we decide to move it from its corner spot. The original style, though charming in its own right, just didn’t fit the elegant, versatile furniture piece I envisioned.
The Deconstruction: Prepping for a Fresh Start
Every great furniture transformation begins with thorough preparation. My first step was to carefully remove the cabinet doors, setting them aside for their own individual makeover. The most significant structural change involved tackling those wooden sports decals that were firmly attached to the doors. To achieve a smooth, clean surface, I needed to remove them entirely.
I started this task with my trusty Ryobi battery-powered circular saw, which made quick work of the larger, more accessible sections of the decals. For those intricate curves and hard-to-reach corners that the circular saw couldn’t manage, Whit’s hand saw came to the rescue, allowing for precise cuts without damaging the underlying wood. Once the decals were removed, the edges were, understandably, a bit rough. A good session of sanding with various grits ensured all surfaces were perfectly smooth, creating the ideal canvas for the subsequent steps. Proper sanding is crucial for paint adhesion and a professional-looking finish, making this “elbow grease” stage absolutely essential.
Time to Bring on the Color: Painting the Transformation
With the structural changes complete and all surfaces prepped, it was time for the fun part: painting! This step truly begins to define the new personality of the hutch.
For this significant phase of the hutch makeover, I opted for a perennial favorite among DIY enthusiasts: Rustoleum American Accents Canyon Black spray paint. This particular shade of black isn’t just a basic dark tone; it offers a rich, deep finish that immediately elevates any piece of furniture. Spray paint, when applied correctly, provides an incredibly smooth, even coat that’s difficult to achieve with a brush, making it perfect for a flawless, modern look.
I meticulously applied two thin, even coats across the entire hutch, including the cabinet doors and shelves. The key to successful spray painting is multiple light coats rather than one heavy one, which prevents drips and ensures full coverage. The transformation was instant and dramatic; the vibrant blues and yellows vanished, replaced by a sophisticated, elegant black that immediately exuded a sense of maturity and timelessness. Once the paint was dry to the touch, I was eager to move on to the detailing phase, which would add layers of texture and character to this striking new base.
Adding Texture and Warmth: The Burlap Interior
To introduce a rustic, yet refined, element and provide a beautiful contrast to the sleek black paint, I decided to line the interior walls of the hutch with burlap. Burlap offers incredible texture and a natural, earthy feel that instantly adds character and warmth. The first step was precise measurement: I carefully measured each inside wall section, ensuring I had enough fabric to create clean, well-defined edges.
Once the burlap pieces were cut to size, I used my trusty hot glue gun – an indispensable tool for any non-sewer like myself! With its quick drying time and strong hold, the hot glue gun is truly my best friend for these kinds of projects. I meticulously hot-glued the edges of each burlap piece, folding them over to create neat, finished seams on all sides. This attention to detail ensures a professional appearance and prevents fraying, giving the hutch a polished, custom-made feel.
With the burlap panels prepared, it was time to secure them inside the hutch. I started by spraying Elmer’s Spray Adhesive generously on the inside corner of the hutch. This adhesive provides a strong, reliable bond without causing lumps or hardening, ensuring the burlap lies flat. I carefully positioned the center of the burlap piece into the corner and, using a ruler, smoothed it downwards, working out any air bubbles or wrinkles as I went. The ruler technique is essential for achieving a perfectly flat and even application, which contributes significantly to the overall finished look.
Once the center was firmly adhered, I gently pulled the burlap tight towards the outer edges. To ensure a taut, wrinkle-free finish and to add an extra layer of security, I strategically placed several small tacks along the outer edges, where they would be discreetly hidden. This step prevents any sagging over time and gives the burlap a perfectly fitted, custom appearance. The combination of spray adhesive and tacks creates a robust and aesthetically pleasing interior lining.
Looking good, isn’t it? The subtle texture of the burlap against the deep black paint is already creating a beautiful contrast.
Reassembly and Interior Styling
With the burlap firmly in place, it was time to reintroduce the hutch’s shelving. The existing peg holes for the adjustable shelves needed to be accessible through the new burlap lining. I carefully pushed the shelf pegs directly through the burlap into their designated holes, ensuring the fabric remained snug against the hutch walls. This created clean, functional openings for the shelves, maintaining the integrity of the new lining.
Next, I carefully placed the newly painted shelves back into their respective spots. The deep Canyon Black of the shelves beautifully complemented the natural texture of the burlap, creating a cohesive and sophisticated interior. This combination immediately gave the hutch a much more curated and mature feel, a stark contrast to its previous youthful persona.
At this stage, the hutch was truly starting to come alive, revealing glimpses of its new identity. The transformation was already striking, and I could feel the excitement building for the final touches.
I continued applying the burlap lining and reinserting the shelves all the way to the top of the hutch, ensuring a consistent and polished look throughout the entire interior. Every surface now contributed to the elegant new aesthetic.
The Art of Distressing: Adding Character and Charm
Now, for the details that truly impart character and depth: distressing. While the sleek black paint provided a modern foundation, I wanted to introduce an element of aged charm and a hint of rustic appeal. This is where the beauty of distressing comes into play, adding a gently worn, vintage feel that tells a story.
Using my trusty 3M sanding block, I carefully distressed all of the edges and corners of the hutch. The trick here is to lightly sand areas where natural wear and tear would occur over time – along the top edge, around the door frames, and on prominent corners. This technique allows a whisper of the original wood or previous paint color to peek through, creating a beautiful contrast and softening the starkness of the new black finish. The result is a piece that looks genuinely aged and loved, rather than factory-new, adding depth and a touch of farmhouse chic to its overall design.
To further enhance the rustic elegance and give the burlap a truly finished edge, I hot glued 4-ply jute twine along the bottom edges of each shelf. This small, yet impactful, detail beautifully frames the burlap, providing a clean transition and adding another layer of natural texture. The jute twine perfectly complements the burlap’s character, making the interior feel even more cohesive and thoughtfully designed. It’s these subtle accents that often make the biggest difference in elevating a DIY project to a professional standard.
The Grand Finale: Molding and Hardware
No furniture makeover is truly complete without the perfect finishing touches. For this hutch, I wanted to add a detail that would give it a truly custom, built-in feel, reminiscent of high-end cabinetry. This came in the form of decorative molding.
I carefully selected a piece of molding that would complement the hutch’s new sophisticated style. After measuring precisely, I cut the molding to fit perfectly along the top front edge of the hutch. This addition serves not only an aesthetic purpose, elevating the visual appeal and making the piece look more substantial, but also helps to define its top, giving it a more polished and architectural presence.
Just like the rest of the hutch, the newly cut molding received a generous spray-down with our beloved Rustoleum American Accents Canyon Black. Consistency in color is key to making the added molding look like an original part of the hutch, rather than an afterthought. The rich black instantly transformed the raw wood molding into an elegant trim piece, ready to be integrated seamlessly into the design.
To securely attach the molding, I carefully turned the hutch onto its belly. This gave me better access and leverage to ensure a strong bond. I used Gorilla Glue Epoxy, known for its incredible strength and durability, to firmly attach the freshly painted molding to the front top edge of the hutch. This adhesive creates a permanent bond, ensuring the molding will remain a robust and beautiful feature for years to come.
Finally, with the molding securely in place, I reattached the cabinet doors, which had also been transformed with the Canyon Black paint. To complete the sophisticated look, I installed a charming set of new knobs, which I found at Hobby Lobby. The right hardware can dramatically change the feel of a piece, acting like jewelry for furniture. These delicate, yet stylish, knobs provided the perfect elegant flourish, tying the entire transformation together and adding a touch of personal flair.
From Gameroom Outcast to Home Decor Darling: The Stunning Reveal
It’s truly incredible to reflect on the journey this hutch has undergone. What was once a bright, playful, and somewhat overlooked piece of furniture in our gameroom, perfectly suited for storing kid-centric items, has now been reborn into something utterly elegant and sophisticated. The power of paint, carefully chosen materials, and thoughtful detailing has completely revolutionized its appearance and expanded its potential placement within our home.
Is now a chic piece of furniture that I can proudly display in any part of our home! Its versatile design, combining the timeless appeal of black with the rustic charm of burlap and distressed edges, makes it suitable for a variety of decor styles, from modern farmhouse to industrial chic. I can envision it gracing a dining room, adding character to a hallway, or even serving as a stylish storage solution in a home office.
The transformation is not just cosmetic; it’s a testament to the potential hidden within every piece of furniture. This project has truly exceeded my expectations, creating a bespoke item that feels far more expensive and unique than its humble origins suggest. It’s a proud moment when your vision comes to life so beautifully.
For now, this stunning piece will remain in our gameroom, perfectly anchoring the space with its newfound elegance. However, its newfound versatility means it might just make its way around the house, finding a temporary home in various rooms as our decor needs evolve. I am incredibly happy with my new corner hutch; it’s more than just a piece of furniture – it’s a statement. More importantly, this successful DIY project has given me just the motivation and creative spark I needed to embark on the exciting journey of completely redecorating our gameroom. Stay tuned for more updates as this room continues its stylish evolution!
I hope this extensive guide inspires you to look at your own old furniture with fresh eyes and consider the incredible potential hidden within. Happy DIYing!