
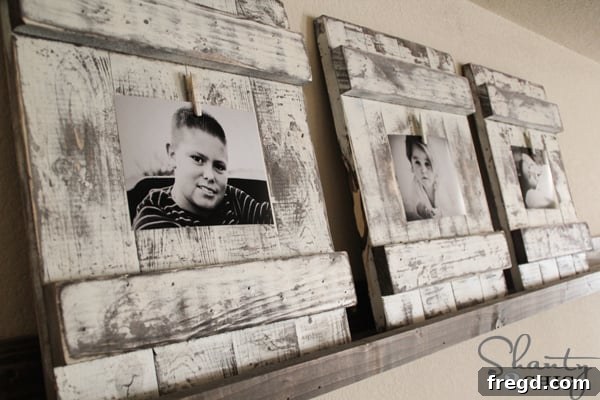
Welcome, fellow DIY enthusiasts! If you’ve been searching for a project that combines rustic charm, simplicity, and budget-friendliness, you’ve landed in the right place. Today, we’re diving into how to create stunning, chippy wooden picture frames that exude farmhouse-style elegance without breaking the bank. You might have caught a glimpse of these beauties on social media, and I’m thrilled to share just how incredibly easy they are to make. For about $7 per frame, you can craft a personalized piece of home decor or a thoughtful, handmade gift. These frames feature a beautifully distressed finish, giving them that coveted weathered, vintage look that’s so popular in modern interior design. Whether you’re a seasoned woodworker or just starting your DIY journey, this project is remarkably straightforward and yields incredibly satisfying results.
The allure of a chippy finish lies in its imperfect perfection – the subtle hints of underlying color, the worn edges, and the texture that tells a story. This guide will walk you through every step, from selecting your wood to applying the final distressing touches, ensuring your handmade picture frames become a cherished focal point in any room. Let’s get started on transforming simple pieces of wood into charming, personalized treasures!
Why Craft Your Own Chippy Wooden Frames?
Beyond the undeniable satisfaction of creating something with your own hands, there are numerous compelling reasons to embark on this DIY picture frame project. Firstly, the cost savings are significant. Store-bought distressed frames, especially those with a genuine aged look, can be quite expensive. By making them yourself, you control the budget and can produce multiple frames for a fraction of the cost. Secondly, personalization is key. You get to choose the exact dimensions, the specific stain and paint colors, and the degree of distressing, ensuring the finished product perfectly matches your home’s aesthetic. This level of customization is simply not possible with mass-produced items.
Moreover, these rustic wooden frames make exceptional handmade gifts. Imagine presenting a loved one with a beautiful, custom-made frame holding a cherished photograph – it’s a gift that speaks volumes about care and thoughtfulness. The farmhouse, shabby chic, and rustic decor styles continue to dominate home interiors, and these chippy frames fit seamlessly into these aesthetics, adding warmth, character, and a touch of vintage appeal. They are versatile enough for any room, from a cozy living room to a bright kitchen or a serene bedroom, and can beautifully showcase anything from family photos to inspiring quotes or even small pieces of art. The process itself is therapeutic and rewarding, offering a wonderful escape into the world of creative crafting.
Essential Materials You’ll Need
Before we pick up any tools, let’s gather all the necessary materials. One of the best aspects of this project is that it requires readily available and affordable supplies. For each frame, you’ll be working with a combination of wood boards to create both the main display area and the sturdy backing.
- Wood Boards:
- 3 – 1x4s @ 8 feet each: These will form the main body of your picture frame, providing a substantial surface for your photographs.
- 1 – 1×3 @ 8 feet: This narrower board will be used to brace the 1x4s together, ensuring structural integrity.
- Adhesives:
- Wood Glue (e.g., Gorilla Wood Glue): Essential for a strong, lasting bond between your wood pieces. Look for a reliable wood glue that dries clear.
- Super Glue Gel (e.g., Gorilla Super Glue Gel): Perfect for attaching the small wooden clothespin securely to the frame’s surface. The gel formula helps prevent drips and provides a strong bond on smaller items.
- Fasteners:
- 1 ¼ inch Brad Nails: These small nails are ideal for securing the frame components without splitting the wood. If you don’t have a brad nailer, finishing nails and a hammer will also work effectively.
- Finishing Supplies:
- Wood Stain (e.g., Rust-Oleum Dark Walnut): This provides the base color that will peek through the distressed white paint, creating depth and character. Choose a color that complements your desired aesthetic.
- Spray Paint (e.g., Rust-Oleum Heirloom White): A light, neutral off-white spray paint is perfect for achieving the chippy, aged look. Its quick-drying nature is an added bonus.
- Accessories:
- Small Wooden Clothespins: These charming clips are central to the frame’s design, allowing you to easily swap out photos. You can often find these in craft stores like Hobby Lobby.
- Optional: Sawtooth Hangers: If you plan to hang your frames on a wall, these inexpensive hangers are easy to attach to the back.
Essential Tools for the Project
Having the right tools makes any DIY project smoother and more enjoyable. While some specialized tools can speed things up, I’ll also suggest hand tool alternatives to keep this project accessible for everyone.
- Cutting Tools:
- Miter Saw: For precise, straight cuts on your wood boards. If you have access to one, it will make the cutting process very quick and accurate.
- Hand Saw: A great alternative if you don’t own a power saw. For a project like this, a basic hand saw is perfectly suitable and a good starter tool for any DIYer.
- Nailing Tools:
- Brad Nailer (e.g., Ryobi Airstrike Nailer): This pneumatic or cordless tool makes quick work of securing the brad nails, providing a strong hold with minimal effort.
- Hammer: If you’re using finishing nails, a standard hammer will do the trick.
- Sanding Tools:
- Orbital Sander or Corner Cat Sander (e.g., Ryobi Corner Cat sander): These power sanders are excellent for efficiently distressing the painted surface. A corner cat is particularly good for getting into edges and corners.
- Sanding Block or Sandpaper (80-grit): If you don’t have a power sander, a simple sanding block with 80-grit sandpaper will achieve the same distressed effect, just with a bit more elbow grease. The 80-grit is aggressive enough to quickly remove paint and create the “chippy” look.
- Miscellaneous:
- Measuring Tape: Crucial for accurate cuts and placement.
- Safety Glasses: Always protect your eyes when cutting or sanding wood.
- Gloves: To protect your hands from stain, paint, and splinters.
- Foam Brush: For applying the wood stain evenly.
- Clean Cloths or Rags: For wiping and blending stain, and for general cleanup.
Step-by-Step Guide to Building Your Frames
Now that we have all our materials and tools ready, let’s dive into the construction phase. Remember, the beauty of these frames lies in their rustic, slightly imperfect nature, so don’t stress over achieving absolute perfection.
Step 1: Accurate Wood Cutting
This is where precision begins. For each picture frame you’re creating, you’ll need to cut specific lengths from your 1×4 and 1×3 boards. The standard dimensions provided here are designed to give you a substantial frame that can hold a variety of photo sizes.
From your 1×4 boards, cut four pieces to 17 ¼ inches each. These will form the main vertical panels of your frame. Next, for the 1×3 boards, cut two pieces to 14 inches each. These shorter 1×3 pieces will serve as the horizontal braces for the back of your frame.
Pro Tip: Wood width can vary slightly even within the same nominal size. To ensure your 1×3 braces fit perfectly across your assembled 1x4s, it’s a good practice to lay all four 1×4 pieces side-by-side once cut. Then, measure the combined total width of these four boards. Cut your 1x3s to that exact measurement. This simple step eliminates potential gaps or overhangs, ensuring a snug fit. Always double-check your measurements before making any cuts, and use appropriate safety gear, such as safety glasses, when operating any saw.
Step 2: Assembling the Frame Base
With your wood pieces cut, it’s time to bring your frame to life. Lay the four 1×4 pieces side-by-side on a flat, stable surface. Ensure they are aligned evenly and pushed together tightly to form a solid panel. Next, take your two 1×3 braces. These will be attached horizontally across the back of the 1x4s to hold them together.
Position one 1×3 brace approximately 2 inches down from the top edge of the 1x4s, and the other 1×3 brace about 2 inches up from the bottom edge. This spacing provides ample support for the entire frame. Before securing them, apply a generous, even amount of wood glue to the side of each 1×3 that will make contact with the 1x4s. Spread the glue well to ensure maximum adhesion across the surface.
Once the glue is applied and the 1x3s are in position, it’s time to secure them with brad nails. Using your brad nailer (or a hammer and finishing nails), shoot 1 ¼ inch brad nails through the 1x3s and into each of the 1x4s. For this project’s desired old, worn look, I recommend shooting your nails through the front of the frame. This allows the nail heads to be visible, adding to the authentic, distressed character we’re aiming for. Space your nails evenly for a secure hold. Allow the wood glue to dry completely according to the manufacturer’s instructions before moving on to the next step, ensuring a robust and stable frame.
Step 3: Attaching the Photo Clip
The small wooden clothespin is a signature element of these frames, allowing for easy rotation of photos or mementos. Once your frame base is fully assembled and the glue has dried, it’s time to add this charming detail. Locate the center of each frame’s front surface. This is where your clothespin will be attached. Using a strong adhesive like Gorilla Glue Super Glue Gel, apply a small dab to the back of the wooden clothespin. Carefully press the clothespin firmly onto the center of the frame. Hold it in place for a few seconds to allow the glue to begin setting, then leave it to cure completely.
Make sure the opening of the clothespin is facing upwards so you can easily clip your photos. These small wooden clothespins can often be found in the craft section of stores like Hobby Lobby or online. This simple addition transforms a plain wooden panel into a functional and stylish photo display.
Achieving the Signature Chippy Finish
The “chippy” finish is what truly sets these frames apart, giving them a beloved vintage and weathered aesthetic. This process involves layering stain and paint, then strategically sanding to reveal the layers beneath.
Step 4: The Base Stain Application
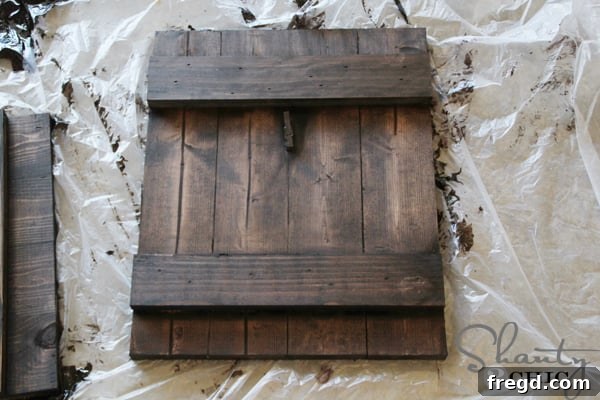
The first step in achieving our signature chippy finish is to apply a base layer of wood stain. This layer will provide the underlying color that peeks through when we distress the paint later, adding depth and authenticity to the aged look. I recommend Rust-Oleum Dark Walnut, as it offers a rich, warm tone that contrasts beautifully with a light topcoat.
Using a foam brush, apply one even coat of the dark walnut stain to the entire frame. Don’t worry about achieving perfect coverage at this stage, as the distressing process will naturally break up the finish. Allow the stain to sit on the wood for approximately 5 minutes. This allows the wood to absorb the pigment, creating a rich color. After 5 minutes, take a clean, lint-free cloth and gently wipe the stain across the surface. The goal isn’t to remove all the stain, but rather to blend it and remove any excess, ensuring an even tone. This technique allows the wood grain to show through while establishing a solid, darker foundation for the chippy effect. Let the stain dry completely, which typically takes several hours, before moving on.
Step 5: A Layer of Heirloom White
Once your stain is thoroughly dry, it’s time for the contrasting topcoat that will eventually become “chippy.” For this, we’ll use a light-colored spray paint, such as Rust-Oleum Heirloom White. This soft, off-white shade is perfect for achieving that classic farmhouse, distressed look.
Apply one light, even coat of Heirloom White spray paint over the stained frame. It doesn’t need to be perfectly opaque or flawlessly smooth; in fact, a slightly imperfect coat is ideal because we are going to sand most of it off! This light coverage ensures that the underlying stain will be easily revealed during the distressing process. Allow the spray paint to dry completely. Drying times can vary depending on humidity and temperature, so check the manufacturer’s recommendations on the can, but generally, a few hours should suffice before handling.
Step 6: Distressing for the Perfect Chippy Look
This is where the magic happens and your frame truly comes alive with its chippy character. Once the white paint is completely dry, it’s time to start sanding to reveal the dark stain beneath. For this step, I used my Ryobi Corner Cat sander fitted with an 80-grit sanding pad. An 80-grit paper is quite aggressive, which is perfect for quickly removing paint and achieving that worn, chipped effect.
You have full control over how distressed you want your frame to be. You can go heavy on the sanding for a very pronounced, aged look, or lighter for a more subtle, gently worn effect. I prefer a noticeably distressed finish, so I sanded them down pretty thoroughly. Pay special attention to all the corners and edges of the frame, as these are the areas that would naturally show the most wear and tear over time. Also, lightly sand some of the flat surfaces to create areas where the stain peeks through. The goal is to mimic natural aging, so vary your pressure and motion. Once you’re satisfied with the level of distressing, wipe down the frames with a clean cloth to remove any sanding dust.
Final Touches and Display Options
Congratulations, your chippy wooden frames are now complete! The beauty of these frames is their versatility in display. If you plan to hang them on a wall, simply attach a sawtooth hanger to the back of each frame. Position the hanger towards the top center for balanced hanging. Alternatively, D-rings with picture wire or simple command strips can also be used, depending on your preference and the weight of the frame.
For a more casual and dynamic display, I chose to prop mine on my DIY shelves. This allows for easy rearrangement and creates a layered look that adds warmth and texture to any space. These frames are perfect for creating a rustic gallery wall, accenting a mantelpiece, or adding a personal touch to bookshelves. Their distressed finish complements various decor styles, from modern farmhouse to bohemian chic, making them incredibly adaptable.
Your New Favorite Home Decor Piece (and Gift Idea!)
I am absolutely enamored with the finished look of these chippy wooden frames! The rich dark walnut stain peeking through the soft heirloom white paint creates a depth and character that is simply irresistible. This project not only delivers beautiful results but also offers immense satisfaction in knowing you created something unique and personal. These frames are incredibly versatile, fitting seamlessly into a variety of home decor styles, from the ever-popular farmhouse aesthetic to rustic, shabby chic, and even minimalist interiors looking for a touch of warmth.
Beyond adorning your own home, these handmade distressed frames make fantastic gifts. Whether it’s for Christmas, a birthday, a housewarming, or just because, a personalized frame holding a treasured memory is a thoughtful present that will surely be cherished. You can easily adapt the colors to suit the recipient’s taste or your current seasonal decor. This project is a wonderful way to unleash your creativity and add a touch of handcrafted charm to your living space or to delight friends and family with a truly special item.
If you’ve loved following along with this DIY guide and are inspired by these charming Chippy Wooden Frames, we would be absolutely thrilled if you would share your enthusiasm! Please consider pinning this project to your Pinterest boards, sharing it with friends on social media, or even leaving a comment below to tell us about your experience. Your shares help our DIY community grow and inspire more people to embrace the joy of creating. Thank you so much for joining me on this creative journey – happy crafting!