
Transforming Diaper Boxes into Charming Playroom Storage: A No-Sew DIY Guide
Hey, creative friends and DIY enthusiasts!
Isn’t it wonderful when a day of intense heat or chilly weather provides the perfect excuse to dive into an indoor project? That’s exactly what happened recently, and I seized the opportunity to tackle a long-anticipated organizational challenge. Having just completed the cubby systems for both the baby’s room and the playroom, my mind immediately turned to a brilliant storage idea I had bookmarked ages ago. This particular DIY project promised an incredibly budget-friendly solution, and I couldn’t wait to bring it to life. I’m thrilled to share the fantastic results from the playroom, showcasing how these “almost free” storage boxes turned out!
A Splendid Inspiration: Upcycling Diaper Boxes into Chic Bins
Before diving into the nitty-gritty, I must extend a massive shout-out to Amy from Positively Splendidfor her truly splendid and ingenious idea! Her original post, shared a while back, immediately sparked my interest, prompting me to start stashing away every empty diaper box I encountered. And yes, you read that right – the main material for this project is humble diaper boxes! This brilliant concept not only provides a fantastic storage solution but also offers an incredible way to upcycle and save money, turning potential waste into beautiful, functional home decor.
I followed Amy’s comprehensive directions almost to the letter, making only a few minor adjustments to suit my preference for a no-sew approach. If you’re someone who prefers crafting without pulling out the sewing machine, this method is absolutely perfect for you. It’s an accessible project that yields impressive results with minimal effort and cost.
Gather Your Materials: What You’ll Need for Your DIY Storage Bins
Before we begin, let’s gather everything you’ll need for this exciting project. The beauty of this DIY is its reliance on readily available and inexpensive materials, keeping your investment minimal while maximizing impact.
Essential Materials:
- Diaper Boxes: The star of our show! Start saving those empty diaper boxes. The more, the merrier, especially if you plan to create a full set for a cubby system. They are sturdy and the perfect base for our bins.
- Drop Cloth: I opted for a canvas drop cloth, specifically the smallest size (4×5 feet) available at hardware stores like Lowe’s, costing around $5. This material is incredibly versatile, durable, and provides a neutral, appealing texture. It’s also very cost-effective. Each 5-foot side can be cut in half, yielding enough material to cover one box. For four boxes, I used two drop cloths.
- Fabric for Top Band: Choose a decorative fabric that complements your room’s decor. This fabric will form a neat band around the top edge, adding a polished finish and concealing the raw edges of the drop cloth. I found mine for $4 at Hobby Lobby, demonstrating how affordable it can be to add a touch of personal style.
- Hot Glue Gun and Glue Sticks: Your best friend for this no-sew project! A reliable hot glue gun will secure all your fabric and ensure a sturdy finish.
- Scissors or Rotary Cutter: For precise cutting of the drop cloth and fabric.
- Pencil and Ruler: For marking measurements and cutting lines.
- Optional: Silhouette Machine or Stencils, Contact Paper, Red Acrylic Paint, Stencil Brush: If you wish to add numbering or other custom designs to your boxes.
Now that we have all our supplies ready, let’s transform these simple cardboard boxes into stylish storage solutions!
Step-by-Step Guide: Crafting Your No-Sew Storage Boxes
Follow these detailed instructions to create your own beautiful and functional fabric-covered storage boxes.
Step 1: Prepare Your Diaper Boxes
The first step in our transformation process is to prepare the foundation: your diaper boxes. Begin by cutting off all the flaps from the top of each box. This creates an open, clean-edged base for our storage bin. Ensure your cuts are as straight and neat as possible for a professional finish.
Step 2: Cut and Position Your Drop Cloth
Next, lay your chosen drop cloth flat on a clean surface. Place your prepared diaper box squarely onto the canvas. As mentioned earlier, I used a 4×5 foot drop cloth, cutting the 5-foot side in half, which provided enough material for two boxes. Now, with the box positioned, we’ll mark the cutting lines for the fabric. This method, inspired by Amy’s original tutorial, simplifies the wrapping process. Using a pencil, mark a line at approximately a 45-degree angle from each corner of the box where it meets the fabric. Then, extend two straight lines from these angled marks, ensuring you leave enough fabric to wrap up and over the box edges. Don’t worry about being perfectly precise; I “eyeballed” much of this part, and it turned out great. The goal is to create sufficient overhang to cover the box completely.
Step 3: Secure the Long Sides with Hot Glue
Once your drop cloth is cut to size, it’s time for our trusty hot glue gun to shine. Begin by folding over the long sides of the fabric. Apply a generous bead of hot glue along the edge of the fabric, then carefully fold it over to create a clean, finished edge. Press firmly to ensure the glue adheres well. This step creates a neat hem for the top edge of your box. After folding and gluing the hem, apply more hot glue along the length of this finished edge and attach it securely to the side of your cardboard box, pulling the fabric taut to avoid wrinkles. Repeat this process for both long sides of the box.
Once the fabric edge is neatly folded and glued, apply hot glue to the folded edge and secure it to the side of the box, ensuring the fabric is smooth and tight. Repeat this for both longer sides of the box.
Step 4: Attach the Shorter Sides
With the long sides securely in place, turn your attention to the shorter sides of the box. Follow the same technique: fold over the raw edge of the fabric to create a clean hem, securing it with hot glue. Then, apply glue to this finished edge and attach it to the side of the box. The corners will naturally create a neat fold, mimicking a professionally wrapped gift. Ensure the fabric is pulled taut and smoothed down for a crisp appearance.
At this stage, the top edge might look a bit “shanty,” as I call it, with visible raw fabric edges and cardboard peeking through. But don’t fret – this will all be beautifully covered up in the next step, and nobody has to know our little secret!
Step 5: Add the Decorative Top Fabric Band (No-Sew Liner Alternative)
While Amy’s original design featured super cute sewn liners, I opted for a simpler, no-sew alternative: a decorative fabric band at the top. This not only adds a beautiful accent but also effectively hides any imperfections along the top edge of the drop cloth. Begin by cutting your chosen accent fabric into 8-inch wide strips. Make sure each strip is long enough to comfortably wrap around the entire circumference of your box with a slight overlap. This ensures a seamless finish.
Next, fold both long ends of your fabric strip towards the center, meeting in the middle. Press the fabric firmly, either with an iron or by hand, to create a neat, binding-like strip. This step neatly tucks away the raw edges of your accent fabric, providing a clean finish.
Now, let your hot glue gun do the rest of the work! Apply hot glue along one side of the folded fabric band and carefully attach it to the outside top edge of your box. Start at one corner and work your way around, ensuring the fabric is flush with the top of the box and evenly aligned. Once the entire outer band is attached, repeat the process for the inside. Apply glue to the remaining folded edge of the fabric band and fold it over to the inside of the box, pressing it firmly against the interior wall. This creates a neat, finished rim, completely concealing the cardboard edge and the raw drop cloth edges.
And just like that, your basic fabric-covered box is almost complete!
Step 6: Personalize with Stenciled Numbers
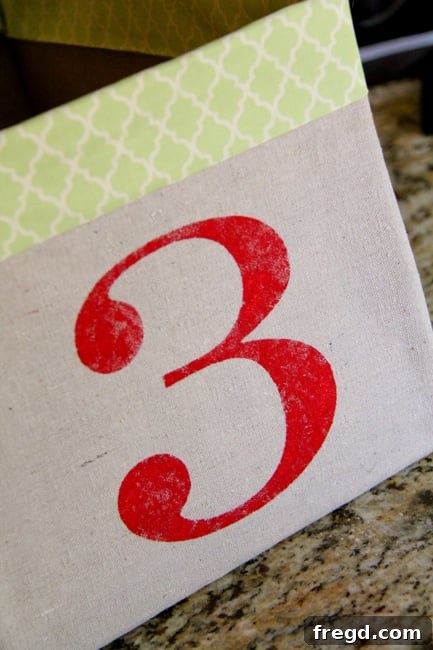
To add a functional and aesthetic touch, I decided to number my boxes. This is particularly useful for organizing different categories of toys or items. I used my Silhouette machine to cut out numbers 1-4 from contact paper, creating custom stencils. If you don’t have a Silhouette, pre-made stencils or even hand-cut designs from contact paper or cardstock will work perfectly. Carefully attach these stencils to the front of each box, ensuring they are centered and smooth to prevent paint bleed.
With the stencils in place, use a small amount of red acrylic paint and a stencil brush to gently dab the paint into the cut-out areas. Use an up-and-down motion, rather than brushing, to minimize bleeding under the stencil. Apply thin layers until you achieve your desired opacity. Once the paint is dry to the touch, carefully peel away the contact paper stencils to reveal your crisp, personalized numbers.
The Finished Product: Versatile and Eco-Friendly Storage
And with that final touch, you’re done! It’s such an easy and rewarding project. Now, I do acknowledge that the inside of the boxes, where the drop cloth simply wraps around, might still bear a slight resemblance to a diaper box. For these particular boxes designated for the playroom, I am absolutely fine with that! The LEGOs and other toys going inside certainly don’t mind. However, for the baby’s room, where a more polished look might be desired, I plan to create proper fabric liners. This demonstrates the versatility of this project: you can customize the finish to suit the specific needs and aesthetic of any room.
Why These DIY Storage Boxes Are a Game-Changer:
- Incredibly Cost-Effective: With diaper boxes being free and minimal material costs, this project offers maximum impact for a minimal investment. My total cost for four boxes was just $14!
- Eco-Friendly Upcycling: You’re giving new life to cardboard boxes that would otherwise end up in the recycling bin, contributing to a more sustainable lifestyle.
- Customizable Design: The choice of drop cloth, accent fabric, and personalization elements (like stenciled numbers) allows you to tailor these boxes to perfectly match your home decor.
- Boosts Organization: These sturdy bins are ideal for organizing toys, books, craft supplies, linens, and countless other items, helping to declutter any space.
- No-Sew Friendly: The heavy reliance on hot glue makes this project accessible even for those who shy away from their sewing machine.
Here they are, nestled in their new home in the playroom, bringing order and a touch of handmade charm!
Final Thoughts and Your Turn to Create!
What do you think of these budget-friendly, upcycled storage boxes? I’m absolutely thrilled with how they turned out. A huge thank you again to Miss Amy for sharing her splendid idea, which allowed me to finally complete this set for the playroom after diligently collecting enough boxes. I’m currently collecting more diaper boxes for the baby’s room project – given how quickly they accumulate, it shouldn’t take long!
I hope you love them as much as I do! Let’s quickly recap the incredible value:
Diaper boxes – Free
Drop Cloths – $10 (for two, covering four boxes)
Fabric for top bands – $4 at Hobby Lobby
Total Investment for 4 Boxes: $14!
Now that’s my kind of smart, shanty-chic DIY! It proves that functional and beautiful home organization doesn’t have to break the bank. Thank you so much for stopping by and sharing in this creative journey. We’re excited about a few more upcoming projects we have planned for this weekend, and we’ll be back soon to share those with you. Take care, and happy crafting!
~Whitney