
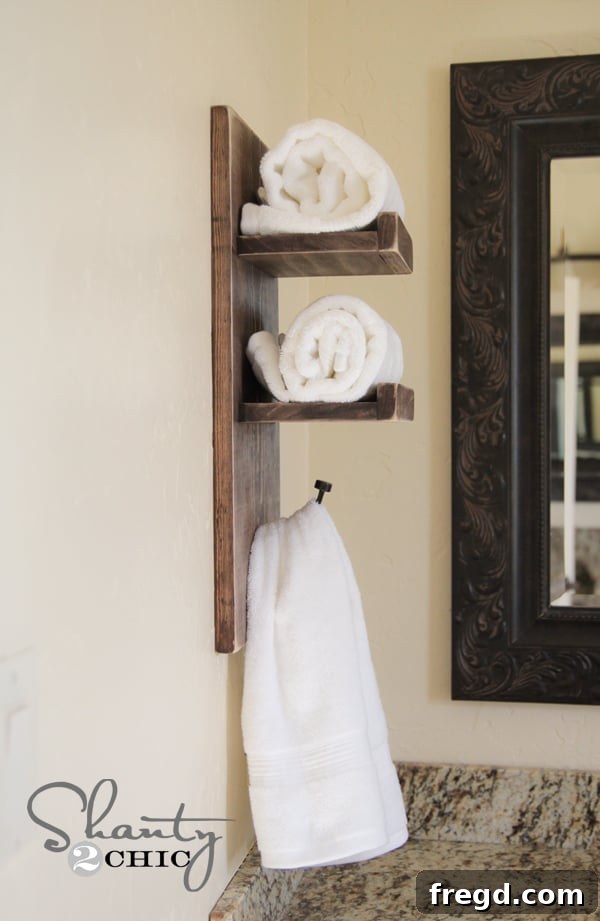
Transform Your Bathroom: Create Stunning DIY Towel Holders for Under $10!
Hello DIY enthusiasts and home improvement lovers! I trust you had a fantastic weekend. The beautiful weather recently inspired us to spend ample time in the workshop, making progress on various projects. To stay updated with all our latest creations and behind-the-scenes action, don’t forget to FOLLOW US ON INSTAGRAM!
Today, I’m thrilled to share a project that resolved a persistent problem I’ve faced for five long years. My husband, like many, has a very particular preference when it comes to hand towels. He insists on having one readily available at all times, along with an immediate backup, eliminating the need for a frantic search when a fresh towel is required. This specific need became the catalyst for designing these incredibly practical and stylish DIY towel holders. What makes this project even better? You can build these custom towel solutions for under $10 each! This isn’t just about hanging towels; it’s about adding a touch of personalized organization and charm to your bathroom space.
As you can see, with this clever design, he now has two fresh towels ready to go at a moment’s notice – a simple yet effective solution that brings a surprising amount of peace to our daily routine! Woohoo for functional design!
Why Choose a DIY Towel Holder?
Beyond the satisfaction of creating something with your own hands, there are numerous compelling reasons to embark on this DIY towel holder project:
- Budget-Friendly Bathroom Upgrade: For less than $10 per holder, you can achieve a high-end look without the high-end price tag. Store-bought towel racks, especially those with unique designs or solid wood construction, can quickly add up.
- Customization to Fit Your Space: Unlike off-the-shelf options, DIY allows you to perfectly match your existing bathroom decor, choose your preferred wood species, stain color, or paint finish, and even adjust dimensions to fit awkward spaces.
- Practical Organization: This design isn’t just a hook; it includes a small shelf, providing a designated spot for a backup towel, toiletries, or even decorative accents. It’s a smart solution for keeping your bathroom tidy and functional.
- Beginner-Friendly Woodworking Project: This is a fantastic starter project for anyone new to woodworking, especially those just getting acquainted with a Kreg Jig. If you have a Kreg Jig still sitting in its box, gathering dust, this is the perfect opportunity to unbox it and discover the magic of pocket-hole joinery.
- Personalized Home Decor: Add a rustic charm, modern elegance, or farmhouse appeal to your bathroom. A handmade item always brings a unique character that store-bought items often lack.
Project Overview: What You’ll Learn Today
In this comprehensive tutorial, we’ll guide you through every step of building your very own beautiful and functional wall-mounted towel holders. You’ll learn essential woodworking techniques, from precise cutting and pocket-hole assembly to staining, distressing, and secure installation. Let’s gather our supplies and get ready to create something amazing!
Materials and Tools List for Two DIY Towel Holders
Before diving into the build, ensure you have all your materials and tools ready. Planning ahead will make the process much smoother and more enjoyable. Remember, you can often find many of these items at your local hardware store or home improvement center.
Lumber List (for two towel holders):
- 1 x 10 x 4 board: This will serve as the main backer board for your towel holder, providing stability and surface area for mounting.
- 1 x 6 x 4 board: This board will be used to create the small, functional shelves that hold your backup towels or other items.
- 1 x 2 x 4 board: Used for the decorative front trim pieces, adding a finished look to your shelves.
- Note on Wood: Common pine boards work perfectly for this project and are very budget-friendly. You can also opt for premium woods like oak or maple for a different aesthetic, though this will increase the cost.
Hardware & Finishes:
- Stain: We highly recommend Varathane stain in Dark Walnut (available at Home Depot) for its quick-drying properties and single-coat coverage, saving you time and effort. Of course, feel free to choose any stain or paint color that matches your desired aesthetic!
- Metal Hooks: Select hooks that complement your bathroom’s style. These will be the primary point for hanging your hand towels.
- Gorilla Wood Glue: Essential for strong, durable joints, especially when attaching trim pieces.
- 1 1/4″ Pocket Hole Screws: Specifically designed for pocket-hole joinery, these will securely attach your shelves.
- Brad Nails: Used with a nail gun for attaching the front trim, providing a clean finish.
- 3″ Torx Screws: For securely mounting your finished towel holders to wall studs.
- Wood Filler: To conceal any visible screw holes or minor imperfections for a seamless look.
Essential Tools:
- Miter Saw (or Hand Saw): A Ridgid miter saw was used for precision cuts, but a simple hand saw combined with a miter box can also get the job done with a bit more manual effort.
- Kreg Jig: This is the star of the show for strong, hidden joinery. If you’re new to pocket holes, this project is an excellent introduction!
- Drill: A Ryobi 18-Volt One+ Lithium-Ion Drill is perfect for pre-drilling holes and driving screws.
- Ryobi Airstrike Cordless Brad Nailer: An absolute dream tool for quickly and neatly attaching trim pieces without the hassle of an air compressor.
- Sander: A Ryobi Corner Cat Sander is ideal for distressing edges and achieving a smooth finish. It’s also convenient as it uses the same battery as the Ryobi drill.
- Stud Finder: Crucial for safely and securely mounting your towel holder to wall studs. We recommend this reliable model.
- Measuring Tape, Pencil, Safety Glasses: Standard workshop essentials.
Step-by-Step Guide to Building Your Custom Towel Holders
Let’s roll up our sleeves and get started on this rewarding DIY journey. Remember to always prioritize safety by wearing appropriate protective gear.
Step 1: Precise Cuts for Your Wood Pieces
The first crucial step is making accurate cuts. For two towel holders, you will need to cut the following pieces. Please measure and mark carefully before cutting:
- From the 1×10 board: Cut two pieces, each to your desired backer board length (e.g., 20-24 inches, depending on how many towels you want to store).
- From the 1×6 board: Cut four pieces, each to your desired shelf length (e.g., 8-10 inches, to create two shelves per holder).
- From the 1×2 board: Cut four pieces, each matching the length of your 1×6 shelf pieces (for the front trim).
I used my Ridgid miter saw for all my cuts, which offers excellent precision. However, if you don’t own a power saw, a simple hand saw combined with a miter box can also achieve straight cuts. It might require a bit more “elbow grease,” but it absolutely gets the job done. Precision here sets the foundation for a professional-looking finish.
Step 2: Creating Strong Pocket Holes with a Kreg Jig
After all your wood pieces are cut to size, it’s time to create the pocket holes. This step is essential for creating strong, hidden joints that give your towel holder a clean, professional finish. Using your Kreg Jig, drill two 3/4″ pocket holes into each of your 1×6 shelf pieces. Position one pocket hole at each end of the piece, as indicated by the arrows in the image below. Ensure your jig is set for the appropriate wood thickness to achieve optimal joint strength.
Step 3: Assembling the Shelf Structure
Now that your pocket holes are ready, it’s time to assemble the shelves. Position your 1×6 shelf pieces onto the main 1×10 backer board. You’ll want to space these shelves evenly or at specific intervals depending on your preference and the size of the towels you plan to store. For this design, we placed two shelves per towel holder, one near the top and one towards the bottom.
Before fastening, you can apply a small amount of wood glue to the mating surfaces for added strength, though the pocket screws alone will provide a very secure hold. Using your Ryobi drill, drive 1 1/4″ pocket hole screws through the pocket holes in the 1×6 shelves and into the 1×10 backer board. Ensure the shelves are level and plumb as you attach them.
Step 4: Adding the Decorative Front Trim
To give your shelves a polished, finished look and to slightly conceal the front edge of the 1×6, we’ll add the 1×2 trim pieces. Apply a generous bead of Gorilla wood glue along the front edge of each assembled shelf piece. Carefully align the 1×2 trim piece with the front edge of the shelf. Once positioned, use your Ryobi Airstrike cordless nailer (this tool truly is a game-changer!) to secure the trim with a few brad nails. Space the nails every few inches for a firm hold. The combination of glue and brad nails ensures a robust attachment that will last.
Step 5: The Finishing Touches: Staining and Distressing
With the structure complete, it’s time to bring out the character of your wood! For this project, we used Varathane stain in Dark Walnut. We love this particular stain because it dries incredibly quickly and often requires only a single coat, saving you valuable time. Apply the stain evenly according to the manufacturer’s instructions, ensuring good ventilation. Once the stain is dry, it’s time for a bit of distressing.
Using your Ryobi Corner Cat Sander, gently sand the edges and corners of your towel holder. This technique creates a beautiful, aged, and rustic look by revealing the lighter wood beneath the stain. The Corner Cat sander is particularly convenient as it uses the same 18-Volt One+ battery system as many other Ryobi tools, meaning fewer chargers and batteries to manage. Adjust the amount of distressing to suit your personal preference – some like a subtle touch, while others prefer a more pronounced worn look.
Step 6: Secure Installation: Mounting Your Towel Holder
The final step is to securely mount your new towel holder to the wall. For maximum stability and safety, especially since towels will be pulled on, we highly recommend mounting it directly into wall studs. An easy and reliable way to locate your studs is by using a stud finder; this is the one I use and trust for accurate readings.
Once you’ve located your studs, use your drill to pre-drill two small pilot holes in the center of the top and bottom of your backer board. These pilot holes prevent the wood from splitting when you drive the screws. Then, using 3″ torx screws, drive them through the backer board and firmly into the wall studs. The bottom screw will eventually be covered by your metal hook, and the top hole can be discreetly filled with wood filler and then covered by a neatly rolled towel or a small decorative item on the shelf.
After the board is securely mounted, attach your chosen metal hooks to the desired position on the backer board. Make sure they are level and firmly attached. This clever placement ensures that all mounting hardware is either hidden or becomes part of the design. Easy peasy and incredibly sturdy!
Customization Tips & Ideas
The beauty of DIY is the endless possibilities for customization. While we opted for a rustic dark walnut finish, feel free to make this project truly your own:
- Paint It: Instead of stain, consider painting your towel holder to match your bathroom’s color scheme. A crisp white, a calming blue, or a bold accent color can completely change its look.
- Different Hooks: Explore various styles of hooks – classic single hooks, double hooks, or even vintage-inspired coat hooks – to fit your aesthetic.
- Vary Sizes: Adjust the dimensions of the boards to create larger towel racks for bath towels or smaller ones for guest bathrooms or kitchens.
- Add Decorative Elements: Stencils, distressed paint, or even small decorative embellishments can further personalize your creation.
- Different Wood Species: Experiment with different types of wood for unique grain patterns and characteristics.
Maintaining Your Wooden Towel Holder
To keep your DIY towel holder looking its best for years to come, occasional maintenance is key. Regularly wipe it down with a damp cloth to remove dust and grime. If your bathroom experiences high humidity, consider applying a clear polyurethane sealant after staining to protect the wood from moisture and ensure long-term durability. This extra step will help preserve its beautiful finish and structural integrity.
Your New Bathroom Organization Awaits!
So, what do you think of this functional and stylish solution? I absolutely love that these custom towel holders were made for under $10 each and completed in no time at all. It’s a testament to how simple tools and a little creativity can solve everyday problems beautifully.
We’d truly LOVE for you to share your thoughts on our towel holders and even better, PIN them below to inspire others! Your support and enthusiasm are always so awesome and deeply appreciated.
Thank you so much for joining us on this DIY adventure. Please don’t hesitate to reach out if you have any questions at all about the build process or customization ideas. Happy building!
~Whitney