
Hello, wonderful readers!
I hope you’re all having a fantastic week. Mine just wrapped up with a whirlwind of festive celebrations! Friday marked my birthday, Saturday was dedicated to my kids’ lively birthday party, and yesterday, our family gathered for our annual, much-anticipated Tacky Christmas Attire party. Phew! It was a blast, but I’m definitely still catching up on sleep after all that joyous chaos.
Crafting Unforgettable Memories: The Ultimate DIY Personalized Ornament Gift
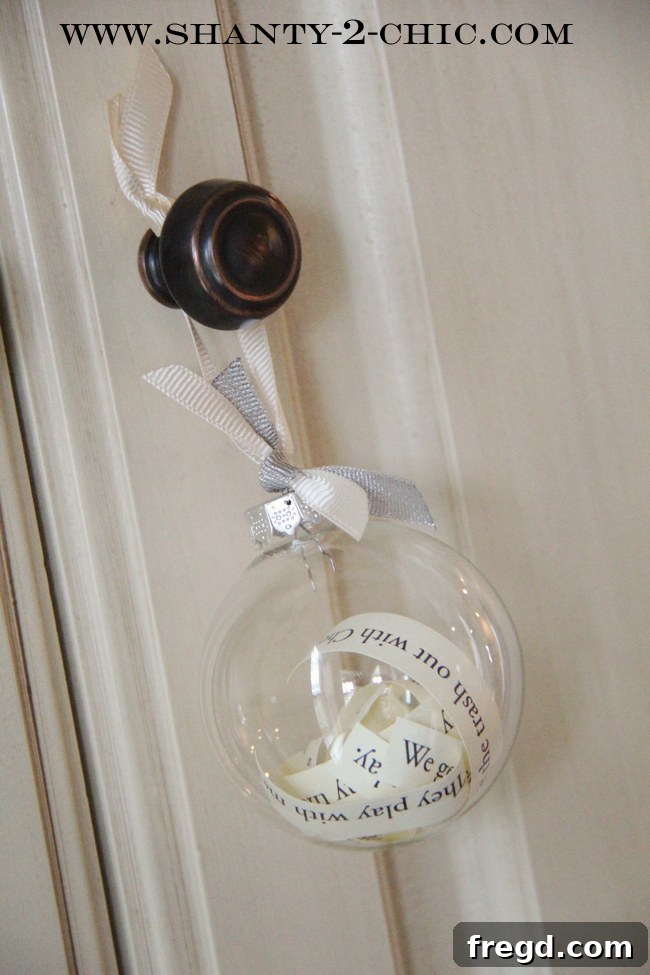
Amidst the joyful pandemonium, one moment from last week truly stood out and inspired this entire project. I received an incredibly special gift from my oldest daughter – a simple, yet profoundly thoughtful, personalized ornament. Its unique charm and the heartfelt sentiment behind it moved me so much that I immediately knew I had to recreate similar treasures to share with our loved ones this holiday season. And now, I’m thrilled to share this easy, meaningful DIY craft with you!
Here’s a snapshot of Ash and me with our wonderful sisters and our dear mom, enjoying the festive spirit at our party. Moments like these are what truly make the holidays special, and creating gifts that capture these feelings is what this project is all about.
The Power of Personalized Gifts: Why They Truly Stand Out
In a world overflowing with mass-produced items, a gift crafted with personal touches and genuine affection speaks volumes. Personalized gifts aren’t just objects; they are tangible expressions of love, memory, and appreciation. They tell a story, evoke emotions, and become cherished keepsakes that grow in value over time. This DIY ornament project embodies all of these qualities. It’s not about the monetary cost, but about the priceless emotional investment, making it the perfect choice for anyone looking to give something truly unique and memorable.
The beauty of these “Sentimental Story Ornaments” lies in their simplicity and profound impact. They capture fleeting moments and heartfelt sentiments, preserving them in a beautiful, enduring form. Imagine the joy of grandparents receiving an ornament filled with their grandchildren’s genuine thoughts and affections, or a spouse discovering an ornament listing all the little things you adore about them. These are more than just decorations; they are yearly traditions in the making, little time capsules of love that you can revisit and cherish for generations.
Your Step-by-Step Guide to Crafting Sentimental Story Ornaments
Ready to create your own cherished keepsakes? The process is wonderfully straightforward, requiring minimal time and materials, yet yielding a gift of immense sentimental value. Let’s gather our supplies and dive into this heartwarming craft.
Gathering Your Essential Supplies
Before you begin, ensure you have these basic items on hand. You’ll likely find most of these around your home or at any craft store.
- Clear Glass Ornaments: The clearer, the better, as you want the messages inside to be easily visible. You can choose classic round ornaments, flattened disc shapes, or even teardrop designs – whatever catches your eye! The opening at the top should be wide enough to insert curled paper strips.
- Ribbon or Twine: This adds a decorative touch and allows for easy hanging. Consider festive colors, natural jute twine for a rustic feel, or elegant silk ribbon for a sophisticated look.
- Lightweight Card Stock: Cream-colored card stock was my choice for a classic, elegant look, but you could opt for white, pastel, or even patterned card stock depending on your desired aesthetic. The “lightweight” aspect is important; it needs to be flexible enough to curl easily but sturdy enough to hold its shape inside the ornament. Standard printer paper is too flimsy, while heavy card stock can be difficult to curl and insert.
- Computer and Printer: For typing and printing your personalized messages.
- Scissors or Paper Trimmer: For neatly cutting your printed sentiments into strips. A paper trimmer will ensure precise, uniform cuts.
- Pencil or Thin Dowel: Essential for curling your paper strips.
- Optional: Small tweezers (for guiding strips inside), a fine-tip pen (for adding dates), small gift tags.
These clear ornaments are the perfect canvas for your heartfelt messages.
Choose your favorite ribbon or twine to add a charming finishing touch!
Capturing Loved Ones’ Thoughts: The Heart of Your Ornament
This is arguably the most crucial and heartwarming step. The core of this gift lies in the genuine sentiments it holds. For my initial project, I asked each of my three older children to tell me three of their favorite things about their grandparents. The answers were priceless and often unexpectedly sweet!
- For Grandparents: Ask children (or even adults!) questions like: “What’s your favorite thing to do with Grandma/Grandpa?”, “What makes Grandma/Grandpa special?”, or “What do you love most about Grandma/Grandpa?”. Encourage specific examples!
- For Parents: “What makes Dad/Mom the best?” or “What’s a happy memory you have with Dad/Mom?”
- For Spouses/Partners: “Three things I adore about you,” “My favorite qualities you possess,” or “Memories that make me smile when I think of us.”
- For Friends/Siblings: “Why I’m grateful for our friendship,” or “My favorite inside jokes/memories with you.”
I created a separate ornament for each set of grandparents, ensuring each gift was distinctly personal. You can adjust the number of “favorite things” to fit your ornament size or the age of the person giving the answers. The goal is authenticity and love!
Printing and Preparing Your Sentiments
Once you’ve collected these beautiful thoughts, it’s time to prepare them for their new home inside the ornament.
- Typing: Open a document on your computer and type out each sentiment. I found that a size 14 font was perfect – large enough to be easily readable once curled inside the glass, but not so large that it made the strips bulky. Choose a clear, appealing font like Arial, Calibri, or Times New Roman. Ensure there’s enough space between each sentiment to cut them into individual strips.
- Printing: Print your typed sentiments onto your chosen cream-colored lightweight card stock. Printing on card stock adds a touch of quality and durability that regular paper simply can’t match, ensuring your messages last for years to come.
Typed and printed, ready to be transformed!
Now, carefully cut these printed sentiments into strips. Aim for uniform width for a neater appearance inside the ornament. A paper trimmer can be very helpful here, but sharp scissors will work just as well. Each strip should contain one complete sentiment.
Neatly cut into individual strips, each holding a precious thought.
Next, take each strip and curl it gently around a pencil or a thin dowel. This step is important for two reasons: it makes the strips easier to insert into the narrow opening of the ornament, and once inside, the gentle curl allows them to unfurl slightly, creating a beautiful, airy display of words. You don’t need a tight curl; just enough to give them some shape.
A gentle curl helps them settle beautifully inside the ornament.
Assembling Your Treasured Keepsake
Now for the final, satisfying step of bringing your ornament to life!
- Insert Strips: Carefully remove the cap from your clear glass ornament. Take one curled paper strip at a time and gently guide it through the opening. The curl should help it slide in easily. Once inside, you can give the ornament a gentle shake to help the strips settle and spread out. Repeat this for all your sentiment strips. If you find it tricky, a pair of long tweezers can be helpful to maneuver the strips.
- Attach Ribbon: Once all the sentiments are nestled inside, replace the ornament cap. Then, take your chosen ribbon or twine and thread it through the hanger loop on the cap. Tie it securely, perhaps in a simple knot or a small bow, to create a hanger and add that final decorative flair.
And just like that, you’ve created a super easy, super thoughtful, and incredibly meaningful gift!
The Evolving Beauty: A Tradition for Years to Come
One of the aspects I absolutely *love* about these ornaments is their potential to become a cherished annual tradition. Each year, as children grow and their perspectives evolve, their answers to “favorite things” will change. What they adore about their grandparents (or whoever you make these for) at age five might be completely different from what they love at age ten, or even fifteen. Imagine collecting these ornaments year after year, each one a snapshot of love and perception from a specific moment in time.
It will be incredibly fun to look back and read their different answers through the years, reminiscing about past stages and witnessing the growth of their relationships. These ornaments become more than just holiday decor; they transform into living time capsules, preserving precious memories and sentiments that might otherwise be forgotten. They are a tangible reminder of enduring love and evolving connections, adding a deeper layer of meaning to your holiday decorations.
To truly maximize this aspect, I highly recommend adding a small detail to indicate the year. You can write the year directly on a tiny corner of one of the paper strips (perhaps the one with the child’s name, if you include it). Alternatively, tie a small, discreet tag to the outside of the ornament’s ribbon and jot down the year there. This simple addition will make revisiting these treasures in the future even more organized and delightful, allowing you to instantly know which year each heartfelt collection of thoughts belongs to.
Beyond Grandparents: Endless Possibilities for Thoughtful Gifting
While my initial inspiration was for grandparents, the versatility of these personalized ornaments is truly endless! Think beyond the holiday season and consider all the people in your life who would cherish such a unique and heartfelt gesture:
- For Dads: Imagine an ornament filled with “Things We Love About Daddy…” – perfect for Father’s Day, his birthday, or even a Christmas stocking stuffer.
- For Your Spouse or Partner: A romantic “Things I Love About You…” ornament would be a beautiful anniversary gift, Valentine’s Day surprise, or a simple “just because” token of affection.
- For Moms: “Reasons Mom is the Best” or “Our Favorite Memories with Mom” for Mother’s Day.
- For Teachers or Mentors: “Why You’re an Amazing Teacher” or “Lessons You Taught Me.”
- For Friends: “Our Top 5 Memories Together” or “What I Appreciate About Our Friendship.”
- For Pet Owners: “Reasons We Love Our Furry Friend” from the perspective of family members.
- For New Parents: “Hopes and Dreams for Baby’s First Year” written by close family and friends.
- For Siblings: “What I Admire About You” or “Our Best Childhood Memories.”
- Stocking Stuffers: These are ideal small, meaningful gifts that fit perfectly into a stocking, offering a personal touch amidst other presents.
The options are truly limitless! You can create these beautiful, personalized gifts in an hour or less, and they will be cherished forever. I absolutely love gifts that are made with heart, requiring little time or money but delivering immense emotional value. This project perfectly fits that description!
Here’s how some of mine turned out. I love seeing the variety and the personal touch each one carries:
Your Go-To Gift for Every Occasion
What do you think? I absolutely adore these ornaments! Have you been scrambling for a last-minute gift that feels truly special? This DIY project is your perfect solution. It requires virtually no significant financial outlay and minimal time, yet it promises to bring a HUGE smile and perhaps even a few happy tears to someone’s face. You truly can’t beat the emotional return on such a small investment of effort.
Whether you’re looking to create new holiday traditions, express profound gratitude, or simply give a gift that truly comes from the heart, these personalized sentiment ornaments are an ideal choice. They are budget-friendly, quick to make, deeply personal, and create lasting memories that will be cherished for years to come. What unique sentiments will you capture in your next ornament?
Wishing you all a wonderful and creative week ahead!
Thanks so much for stopping by!
~Whitney