
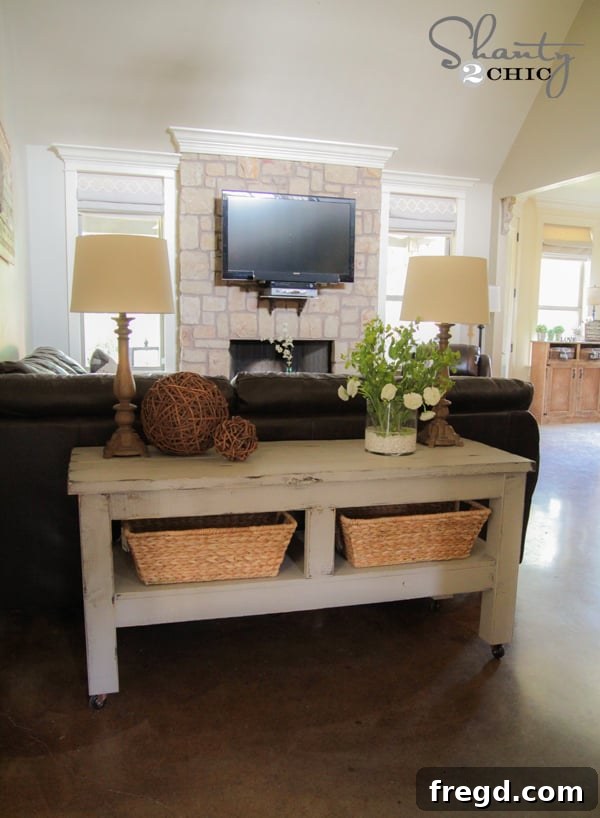
Welcome, DIY enthusiasts and home decor aficionados! We’re absolutely thrilled to share a project that has been a labor of love and a source of immense excitement: our very own Pottery Barn Inspired Console Table. If you’ve been following our journey on Instagram, you’ve likely caught glimpses of this beauty in progress over the past week. Today, we’re finally ready to unveil the complete transformation and walk you through every step of crafting this stunning piece that combines high-end style with a budget-friendly approach.
There’s something incredibly satisfying about bringing a dream piece of furniture to life with your own hands, especially when it saves you a significant amount compared to retail prices. This console table, a true testament to accessible DIY, mimics the classic elegance and rustic charm of popular Pottery Barn designs, making it a perfect addition to any entryway, living room, or hallway as a stylish sofa table or display unit. Get ready to embark on a woodworking adventure that’s simpler than you might imagine, provided you have the right tools and a dash of enthusiasm!
Isn’t she just captivating? This project proves that achieving sophisticated, designer-look furniture doesn’t require advanced carpentry skills or a massive budget. With a clear plan and the right approach, anyone can build a beautiful, functional console table that perfectly complements their home decor. Let’s dive into how we transformed simple lumber into this elegant statement piece.
Why Build Your Own Pottery Barn Inspired Console Table?
The allure of a Pottery Barn console table is undeniable – their timeless designs and quality craftsmanship are highly sought after. However, the price tag can often be a deterrent. Building your own custom console table offers numerous advantages:
- Significant Cost Savings: Recreate a high-end look for a fraction of the retail price.
- Complete Customization: Choose your exact dimensions, wood type, and finish to perfectly match your home’s aesthetic.
- Sense of Accomplishment: There’s immense pride in displaying a piece of furniture you’ve crafted yourself.
- Quality and Durability: You control the materials, ensuring a sturdy piece built to last.
- Versatility: A console table is incredibly versatile, serving as an entryway table, a sofa table, a media console, or a stylish display surface for decorative items.
For this project, we teamed up with our incredibly talented friend Ana White, who provided the comprehensive, free plans that make this build accessible to everyone. You can view the full set of free plans here on Ana’s site, where you’ll find detailed cut lists and diagrams. Our goal here is to supplement those plans with practical building and finishing tips, along with visual guidance, to ensure your project goes as smoothly as possible.
Essential Tools and Materials for Your DIY Console Table
Before you begin, gathering the right tools and materials is crucial for a successful and enjoyable build. While some tools are optional, others are truly game-changers for projects like this. Here’s what you’ll need:
Key Tools:
- Kreg Jig: This is, without a doubt, the hero of this project. A Kreg Jig allows you to create strong pocket-hole joints quickly and easily, making furniture construction simple and professional. We absolutely adore our Kreg Jig and highly recommend it for any woodworking enthusiast. If you’re new to pocket holes and wondering, ‘What exactly is a Kreg Jig?’, you can check out our video explanation here for a simple, clear demonstration.
- Jig Saw: Essential for cutting curves or intricate shapes. Our Ryobi Jig Saw was incredibly useful for this project, and a major plus is that it runs on the same ONE+ battery system as many other Ryobi tools, including our drill.
- Drill/Driver: For driving screws and pre-drilling holes.
- Measuring Tape, Pencil, Speed Square: For accurate measurements and markings.
- Safety Gear: Eye protection and hearing protection are always recommended.
- Orbital Sander: For smoothing surfaces and preparing for finishing.
Key Materials:
- Lumber: The specific dimensions are detailed in Ana White’s plans. We primarily used common pine boards and a project panel.
- Pocket Hole Screws: We used 1 1/2″ pocket holes and 2 1/2″ pocket hole screws for the entire build, ensuring strong, hidden joints.
- Wood Glue: Essential for added strength and durability in your joints, especially Gorilla Wood Glue.
- Caulk: For filling any small gaps or imperfections before painting, giving a smooth, professional finish.
- Rust-Oleum Dark Walnut Spray Paint: Used as the base layer for our distressed finish.
- Vaseline: The secret ingredient for an easy distressing technique.
- Paint: We chose Pantone String from Lowe’s – a beautiful, warm grey that we absolutely love.
- 80-Grit Sandpaper: For sanding and distressing the painted surface.
- Rust-Oleum Ultimate Polyurethane with Soft Touch: For a durable, protective topcoat.
- Casters: 2 1/2″ bronze casters from Lowe’s for mobility and a finishing touch.
Step-by-Step Construction Guide: Building Your Console Table
Let’s get down to the exciting part: constructing the console table! Follow these steps, referring to Ana White’s plans for precise measurements and cut lists.
1. Assembling the Base Structure with Pocket Holes
The foundation of your console table lies in a sturdy base, and the Kreg Jig makes this incredibly simple. Throughout the entire build, we utilized 1 1/2″ pocket holes and 2 1/2″ pocket hole screws. This technique allows for incredibly strong joints that are hidden from view, contributing to the clean, finished look of the piece. Take your time to measure accurately and drill your pocket holes in the locations indicated in the plans. Here are some visual examples of where we placed our pocket holes for the base assembly:
2. Crafting and Integrating the First Shelf
Once the main base framework is complete, attention shifts to the first shelf. For this component, we chose to use a project panel. This was a smart decision for a couple of reasons: the price was comparable to plywood, and it completely eliminated the need for tedious edgebanding, saving time and effort. Our panel from Lowe’s was 3/4″ thick and measured 20″x72″. All that was required was cutting it to the appropriate length specified in the plans. After cutting the panel, we carefully marked the positions where the console table’s legs would pass through, using a pencil to outline the squares, as shown in the image below:
To cut out these precise squares for the legs, our Ryobi Jig Saw proved invaluable. Its maneuverability allowed for clean cuts, and the convenience of using the same battery as our other Ryobi ONE+ tools was a huge bonus. We purposely held off on adding the middle braces until after this shelf was in place, as it made the installation process significantly easier. Once the cuts were made, the shelf simply dropped into position. Don’t fret too much over minor imperfections in your cuts – remember, a bit of caulk works wonders in concealing small gaps and ensuring a seamless finish!
3. Adding the Top Supports and Side Panels
With the shelf in place, the next step involves adding the top support pieces that will eventually hold the table’s main surface. This is a critical stage for ensuring the stability and structural integrity of your console table. You’ll attach these runners to the top of the legs and cross-braces, forming the upper frame. Here are a few progress shots showcasing this stage of the build:
An incredibly important tip for this section is to drill the pocket holes into your top runners *before* you attach them to the rest of the piece. This makes the drilling process much easier and more accurate. You can clearly see where we’ve strategically placed these pocket holes along each top board in the image below:
These pre-drilled pocket holes will later serve as the attachment points for the tabletop itself. Before securing the top, however, we added the short side pieces to complete the upper frame. We encountered a minor challenge here: our drill wouldn’t quite fit to insert the screws into the top pocket holes from the inside. To work around this, we pre-drilled guide holes from the top and used 4″ wood screws, driving them down into the side pieces, as illustrated in the photograph. Don’t forget to apply a generous amount of Gorilla Wood Glue to these joints for maximum strength and stability!
4. Constructing and Attaching the Tabletop
Now, it’s time to build the impressive tabletop! We again relied on our trusty Kreg Jig to create a seamless and robust surface. We joined several individual wood planks together edge-to-edge using pocket holes, creating a solid, cohesive top that looks professionally crafted:
Once the individual planks were securely joined to form the complete tabletop, the next step was to attach it to the console table’s base. This is where those previously drilled pocket holes on the top runners come into play. The easiest way to do this is to carefully turn the assembled base of the table upside down and center it precisely on top of your newly constructed tabletop. This alignment is crucial for a symmetrical and well-balanced final product, as seen here:
Now, using 2 1/2″ pocket hole screws, drive them through the pocket holes in the top runners of the base and into the planks of the tabletop. This method creates a very strong, concealed attachment that firmly secures the top to the base. It makes perfect sense, right? This invisible fastening ensures a clean look without any visible screw heads on your tabletop.
Phew! Explaining all those steps felt harder than actually doing the build, we promise! With the construction complete, let’s move on to the really fun part: giving your console table its signature distressed finish.
The Art of Finishing: Achieving a Distressed Look
The finishing stage is where your console table truly comes alive, transforming from raw wood into a character-rich piece that looks like it has a story to tell. We opted for one of our favorite finishing techniques – super simple, incredibly effective, and wonderfully budget-friendly! This method will give your table a beautiful, aged aesthetic that perfectly complements the Pottery Barn style.
1. Preparing for Distress: Dark Walnut Base
First, we applied a base layer of Rust-Oleum Dark Walnut spray paint to the edges and various other areas of the piece. This initial dark layer is crucial for achieving an authentic distressed look, as it will peek through the topcoat later, simulating natural wear and tear. At this stage, it might look a bit… shanty, as we like to say, but trust the process!
2. The Vaseline Distressing Technique
Next, for the magic touch, we used a small amount of Vaseline. Apply Vaseline sparingly to the specific edges and corners where you want the most distressing to occur – essentially, where natural wear would typically happen. You really don’t need much at all for this technique to work its charm. Gently rub it into the desired spots; you can see in the image below how lightly we applied it to a corner.
For an even more in-depth guide on this fantastic method, you can find another detailed tutorial on distressing with Vaseline HERE.
3. The Main Paint Layer: Pantone String
Once the Vaseline has been applied, you can proceed to paint over the entire piece with your chosen topcoat color. We used a beautiful new Pantone color from Lowe’s called “String,” and we absolutely adore it! It’s the perfect warm grey, featuring just a hint of brown that prevents it from looking cold or stark. This balanced shade beautifully complements a wide range of decor styles.
4. Revealing the Distress
After the paint has completely and thoroughly dried (patience is key here!), take an 80-grit sanding paper and gently scuff the paint off the corners and areas where you applied Vaseline. The Vaseline acts as a resist, making the paint chip off effortlessly, revealing the dark walnut base coat underneath. You can control the level of distressing by how much you sand, creating a truly customized, aged effect that suits your preference.
5. Protecting Your Investment: Polyurethane Sealant
To ensure your beautiful distressed finish lasts for years to come, we applied a protective coat of Rust-Oleum Ultimate Polyurethane with Soft Touch over the entire piece. This product, also available at Lowe’s, is fantastic because it’s low odor, goes on smoothly, and dries quickly, providing a durable, long-lasting seal without a strong chemical smell. This final step protects your hard work from daily wear and tear, ensuring your console table remains a cherished piece in your home.
The Final Touches: Casters and Styling
That’s nearly it! To add a touch of industrial charm and practical mobility, we installed some gorgeous bronze 2 1/2″ casters, also sourced from Lowe’s. These not only enhance the aesthetic but also make it incredibly easy to move your console table around when redecorating or cleaning. This small addition makes a big difference in both function and style.
Here it is, the finished Pottery Barn Inspired Console Table, ready to grace your home!
Your Custom Console Table Awaits!
We hope this detailed guide inspires you to take on your own DIY console table project. Creating custom furniture, especially a piece with the timeless appeal of this Pottery Barn inspired design, is incredibly rewarding. Not only do you get a beautiful, functional piece for your home, but you also gain valuable skills and the satisfaction of building something with your own hands.
Thank you so much for joining us on this creative journey! Remember, the full set of free plans are available on Ana White’s site here, providing all the precise measurements and diagrams you’ll need. Don’t hesitate to give this project a try; with the right tools and these instructions, you’re well on your way to a stunning new addition to your home.
We would absolutely LOVE for you to pin this project and share it with your friends and fellow DIY enthusiasts! Your support helps us continue to bring you exciting new projects and ideas.
You guys are truly amazing, and we wish you an awesome week filled with creative endeavors!
~Whitney