
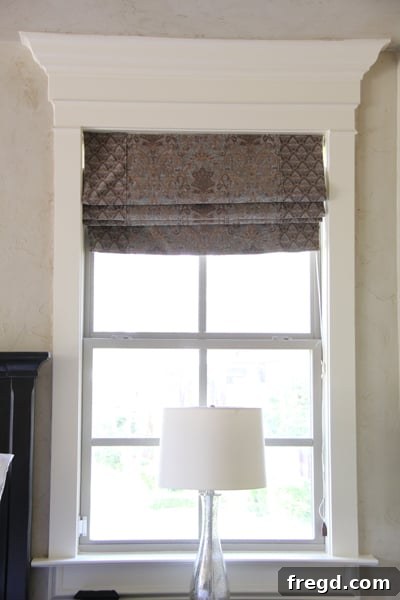
Master the Art of DIY Door & Window Trim: Elevate Your Home’s Style with Crown Molding
Hey fellow DIY enthusiasts!
First off, a huge thank you to everyone who dropped a comment on my recent crate coffee table reveal. Your kind words and support mean the world to me and truly fuel my passion for these projects! It’s incredibly rewarding to share these transformations with such an engaged community.
You know how it is with big projects – sometimes you just need a mental reset. That coffee table was actually a delightful detour from the current, larger undertaking: a new closet addition. I’ve found that constantly working on the same task can sometimes lead to a creative block, making me feel unmotivated. A quick, satisfying build like the coffee table was exactly what I needed to re-energize before diving back into the more extensive renovations.
Speaking of the closet, I’m currently knee-deep in painting the newly constructed space. What started as a potential nursery for our future little one has taken a wonderful turn. After much deliberation, I decided this room would be perfect for my two oldest girls! Their excitement is absolutely contagious – they’re constantly buzzing with ideas and counting down the days until it’s finished, which puts a fun kind of pressure on me to wrap it up soon!
Amidst all this activity, I realized there’s one specific detail in our home that consistently garners questions and compliments: our custom door and window trim. It’s a design element that truly elevates the character of a room, adding a layer of architectural sophistication often seen in more expensive homes. Before we even began building our house, I meticulously collected inspiration, snapping photos of trim work in various homes that caught my eye. Those images became the blueprint, which I handed over to my incredibly talented stepdad, who then brought this vision to life for all our doors and windows.
Why Custom Trim Work Makes a Big Impact
Upgrading your home’s trim might seem like a small detail, but it can dramatically transform the overall aesthetic and feel of a space. Think of trim as the frame around a beautiful painting – it defines the boundaries, adds depth, and provides a polished finish. Standard builder-grade trim often lacks character, but custom, detailed trim, like the layered style we’re installing, instantly introduces a sense of craftsmanship and elegance. It’s an effective way to infuse your home with a touch of farmhouse chic, classic charm, or modern elegance, depending on your chosen profile and finish. This kind of architectural detail adds perceived value and makes a room feel complete and intentional, rather than merely functional.
A Glimpse at Our Trimmed Spaces
To give you a better idea of the finished look we’re aiming for, here are a couple of examples from around our home. This cohesive trim style is carried throughout, ensuring a consistent and sophisticated design narrative.
These are my kitchen windows, benefiting from the robust and detailed trim that frames them beautifully, making them a focal point rather than just an opening.
And that’s a shot of one of my bedroom windows, where the same design principle applies. The consistency in trim style throughout the house creates a harmonious and custom-built feel. Since we needed to trim out the new closet door, I thought this would be the perfect opportunity to walk you through the process, step by step!
Essential Tools & Materials for Your Trim Project
Before we dive into the nitty-gritty of installation, let’s gather everything you’ll need. Having all your tools and materials organized before you start will make the process much smoother and more efficient. This project is highly customizable, so feel free to adjust board dimensions or molding profiles to match your personal style, but this guide will focus on the specific materials used for our elegant, layered look.
Materials List:
- 1×4 Boards: We used primed MDF (Medium-Density Fiberboard).
- 1×6 Boards: Also primed MDF.
- 4-inch Crown Molding: Choose a profile that complements your home’s aesthetic.
- Small Decorative Trim/Molding: For covering seams, often called shoe molding or quarter round, but a small flat trim works well too.
- Gorilla Wood Glue: Essential for strong, lasting bonds, especially with crown molding.
- Brad Nails: Various lengths to suit different thicknesses of wood.
- Wood Filler: To fill nail holes and minor imperfections.
- Caulk: For sealing seams and gaps between trim and walls.
- Primer and Paint: To achieve your desired finished color.
Tool Checklist:
- Brad Nailer: My absolute favorite tool for trim work! It makes quick, secure attachments with minimal damage.
- Air Compressor: If your brad nailer isn’t cordless.
- Miter Saw: Crucial for precise, angled cuts, especially for crown molding.
- Tape Measure: Accurate measurements are key!
- Level: To ensure all your trim pieces are perfectly straight.
- Pencil: For marking cuts and placement.
- Safety Glasses: Always protect your eyes when cutting and nailing.
- Stud Finder: To locate framing for secure attachment.
- Utility Knife: For scoring caulk lines or minor adjustments.
- Sanding Block/Paper: For smoothing rough edges and prepping for paint.
- Caulk Gun: For applying caulk neatly.
Step-by-Step Guide to Installing Custom Layered Trim
Step 1: Laying the Foundation with 1×4 Boards
The first step in creating this multi-layered, custom look is to frame the entire door or window opening with 1×4 boards. We specifically chose primed MDF boards from Lowe’s for this project. Why MDF? It’s a fantastic alternative to traditional pine. MDF is significantly smoother, which means less sanding for you, and it takes paint beautifully, resulting in a flawless finish. Plus, it’s generally more cost-effective than higher-grade pine. To begin, measure the top and side lengths of your door or window frame. Cut your 1×4 pieces to these dimensions. For the side pieces, they will run from the floor (or window sill) up to where your top piece will sit. The top piece will span the width of the opening, sitting atop the two side pieces. Use your brad nailer to attach these boards securely to the wall studs around the opening. Ensure they are level and plumb for a professional result.
Step 2: Building the Header with Stacked 1x6s
This is where the trim starts to gain its distinctive depth and architectural interest. Above the top 1×4 board, we stacked two 1×6 boards. It’s crucial that these 1×6 pieces are 1 inch longer than the 1×4 board directly below them. This slight overhang on each side creates a subtle, layered effect that adds visual weight and elegance to the header. Measure the length of your top 1×4, then add 1 inch to that measurement for each 1×6 piece. Cut both 1×6 boards to this exact length. Carefully align them and use your brad nailer to attach them directly above the 1×4, ensuring they are perfectly centered with a ½ inch overhang on each side. The top 1×6 will sit flush on top of the bottom 1×6. This double layer creates a substantial base for the crown molding that will come next.
Step 3: Crafting the Crown Molding Accent
Now for the crown jewel of our trim design – the crown molding. We opted for a substantial 4-inch crown molding, which beautifully complements the stacked header we just built. The trickiest part of crown molding is often the cuts. For the front piece of crown, you will measure the exact length of the topmost 1×6 board. This ensures the crown fits perfectly across the top of your header. When cutting crown molding, remember that it sits at an angle. If you’re using a miter saw, you’ll need to set both the bevel and miter angles correctly. A common technique is to cut it upside down and backward against the fence. For outside corners, you’ll typically use a compound miter cut (e.g., 45-degree miter and 33.9-degree bevel). Don’t be afraid to do some practice cuts on scrap pieces to get a feel for the angles. Accuracy here is paramount for tight, seamless joints.
Step 4: Assembling the Crown Piece
To ensure a flawless and robust crown installation, we pre-assemble the main crown piece before attaching it to the header. This involves cutting the side pieces of the crown molding. For these, measure the distance from the edge of the 1×6 board to the adjacent wall. These side pieces will have return angles, meeting the front piece with a mitered joint. Once all your crown pieces (front and sides) are cut, it’s time to assemble them. Apply a generous bead of Gorilla Wood Glue to the mitered edges where the pieces meet. Wood glue provides an incredibly strong bond that will prevent separation over time. After applying the glue, carefully align the pieces and secure them temporarily with your brad nailer. The brad nailer is fantastic for holding everything tightly while the glue dries, ensuring crisp, professional-looking corners. I truly LOVE my brad nailer – it’s an indispensable tool for this kind of detailed work!
And we used my brad nailer to hold the ends… LOVE my brad nailer.
Step 5: Attaching the Crown Assembly
With your crown molding piece beautifully assembled and the glue dried, it’s time to attach it to the header. Carefully position the crown assembly over the stacked 1×6 boards, ensuring it is perfectly centered and level. Once in place, use your brad nailer to firmly attach the crown to the underlying 1×6. Aim your nails into the thicker parts of the molding and into the 1×6 to ensure a secure hold. You’ll want to angle some nails slightly to get a better grip. The pre-assembly step greatly simplifies this part of the process, allowing for a much cleaner and more stable attachment than trying to piece together the crown molding directly on the wall.
Step 6: The Finishing Touch – Concealing Seams
To truly achieve a professional, built-in look, it’s essential to cover up any visible seams where the crown molding meets the underlying 1x6s. For this, we used a very small piece of decorative trim – often referred to as a small quarter round, shoe molding, or even a thin flat strip. This piece not only conceals the joint perfectly but also adds another subtle layer of detail to the overall design. Measure and cut this small trim to fit precisely along the bottom edge of your crown molding, where it meets the 1×6. Secure it with tiny brad nails. This final decorative flourish makes a tremendous difference, transforming the entire trim assembly into a seamless, elegant feature. These few simple, layered steps create a massive impact on the overall aesthetic of your doors and windows, making them look custom-built and truly chic!
A few simple steps make a big impact!
Tips for a Flawless DIY Trim Project
- Measure Twice, Cut Once: This old adage holds true, especially with trim. Mistakes can be costly in terms of time and materials.
- Practice Cuts: If you’re new to crown molding or specific miter saw settings, use scrap pieces to perfect your cuts before working on your final trim.
- Use Quality Adhesives: Don’t underestimate the power of wood glue for creating strong, lasting joints that won’t separate over time.
- Fill & Caulk: After nailing, fill all nail holes with wood filler and caulk every seam where the trim meets the wall or another trim piece. This step is crucial for a smooth, professional painted finish.
- Sand Between Coats: Lightly sand your primed MDF and after each coat of paint for an ultra-smooth, factory-like appearance.
- Safety First: Always wear safety glasses when operating power tools, and keep your workspace clean to prevent trips and falls.
Beyond the Trim: What’s Next in Our Home Renovation Journey
Phew! It feels good to get this trim project wrapped up and share it with all of you. It’s amazing how these architectural details can so significantly enhance the charm and character of a room. I’ll be back very soon to show you the newly painted girls’ room – it’s shaping up to be absolutely perfect for them, and I can’t wait for them to move in!
And speaking of new rooms, my mind is already racing ahead to the next big project: the baby’s nursery! This is going to be such a special space to create. I’m particularly excited because I’ll be making all his bedding myself. The fabric I ordered just arrived in the mail last week, and it’s even more beautiful than I imagined! I’m bursting with ideas and can’t wait to start cutting, sewing, and decorating. Stay tuned for all the updates on that magical transformation!
Thank you so much for stopping by and joining me on this creative journey. I hope this detailed guide empowers you to tackle your own trim projects and add a beautiful, custom touch to your home. Have a fantastic Friday!
~Whitney