
Hello DIY Enthusiasts!
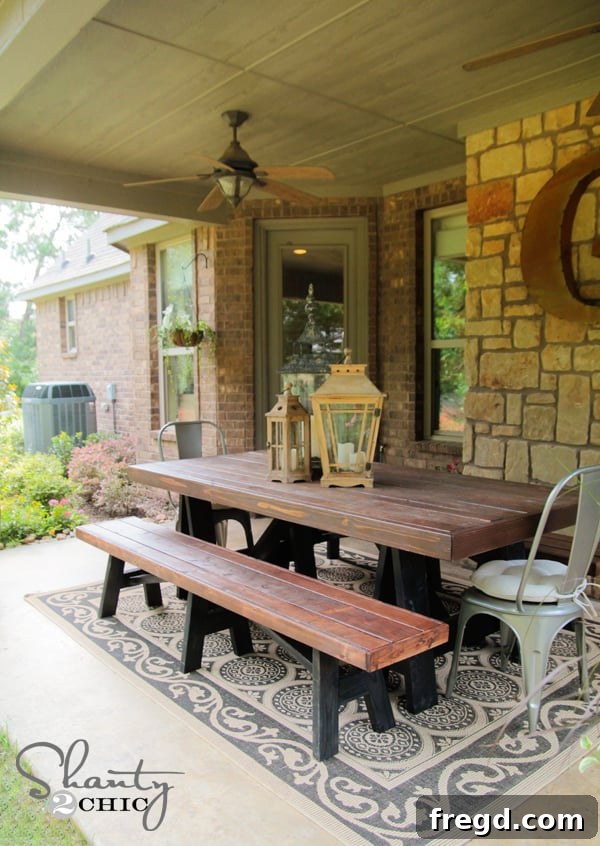
Welcome back! I trust you had a productive and inspiring weekend. I’ve been making incredible progress on my garage organization project, and I can’t wait to share those updates soon. But today, I’m thrilled to unveil a project that brought a new level of functionality and style to my outdoor space: a pair of custom-built dining benches, perfectly complementing my new outdoor dining table. And the best part? Each bench cost a mere $20 to build! Yes, you read that correctly – just twenty dollars per bench! This incredibly affordable DIY transforms any patio into an inviting outdoor living area without breaking the bank.
Take a look at how these beauties turned out!
Aren’t they absolutely charming? Crafting stylish and durable outdoor furniture on a tight budget can seem like a daunting task, but with the right guidance, it’s entirely achievable. For this particular project, I had the pleasure of collaborating with the incredibly talented Ana White, whose woodworking plans are renowned for their clarity and simplicity. Her expertise was invaluable in bringing these sawhorse-style benches to life, and I honestly couldn’t be more pleased with the result. These benches not only enhance the aesthetic appeal of my backyard but also provide robust, comfortable seating for outdoor gatherings. In this post, I’ll share some essential tips, tricks, and material choices that made this project a success. For the comprehensive, step-by-step building instructions, complete with detailed cut lists and diagrams, you can find the full set of plans directly on Ana White’s website. It’s an invaluable resource for any DIY enthusiast looking to tackle this project.
The Indispensable Kreg Jig: Your DIY Secret Weapon
When it comes to building these outdoor benches, or indeed almost any woodworking project involving strong, hidden joints, I cannot overstate the importance of a Kreg Jig. This tool was absolutely central to the entire construction process, and frankly, I don’t think I would have attempted to build these benches without one. The Kreg Jig allows you to create strong pocket-hole joints quickly and efficiently, making assembly far easier and cleaner than traditional methods like screws driven directly through the face of the wood or complex joinery. It enables even beginner woodworkers to achieve professional-looking results with minimal effort.
For this specific project, I set my Kreg Jig and the corresponding drill bit collar to a 1 1/2-inch depth. This setting was used consistently throughout the entire build, ensuring uniform and secure pocket holes for all the joints. The consistency of these joints is crucial for the structural integrity and stability of your benches, especially considering they will be exposed to the elements outdoors. The ease of use and the robust connections provided by the Kreg Jig truly make it a game-changer for DIY furniture projects.
Choosing the Right Fasteners: Durability for Outdoor Use
Since these benches are destined for outdoor living, selecting the appropriate hardware is just as important as choosing the right wood. Standard screws can quickly rust when exposed to moisture, leading to unsightly stains on your wood and, more importantly, compromising the structural integrity of your furniture over time. To combat this common issue, I opted for Kreg’s Blue-Kote screws. These specialized screws feature a weather-resistant coating that effectively prevents rust and corrosion, ensuring your outdoor projects stand the test of time and weather. Their superior durability makes them an excellent choice for any outdoor application. In fact, I’ve found them so reliable that I use them for many other outdoor projects, even those that don’t specifically require the Kreg Jig for pocket holes. Investing in high-quality, weather-resistant fasteners is a small but critical step that will significantly extend the life and beauty of your DIY outdoor furniture.
Assembling the Bench Legs and Frame
Creating the pocket holes with the Kreg Jig is a straightforward process once you get the hang of it. Here’s a visual representation of how I strategically placed the pocket holes in the leg pieces to ensure strong, invisible joints:
My assembly strategy involved building all the leg components first, ensuring they were sturdy and symmetrical. Once the individual leg structures were complete, I proceeded to connect them, forming the main frame of the benches. A key design decision I made during the build was to wrap the top perimeter of each bench with additional 1×4 pine pieces. This seemingly small detail made a significant impact on the overall appearance and feel of the benches. It gave the top a much “beefier” and more substantial look, enhancing its visual weight and creating a more cohesive match with the robust design of my outdoor dining table. This extra step elevates the benches from simple seating to a thoughtfully designed piece of outdoor furniture.
The Art of Finishing: Painting, Staining, and Weatherproofing
To achieve a coordinated and durable finish that would withstand outdoor conditions, I carefully selected Rust-Oleum products. This brand consistently delivers quality and performance, especially for projects that need to endure the elements. The benches were finished to perfectly complement the table, creating a harmonious outdoor dining set.
For the legs, I chose Rust-Oleum Painter’s Touch Spray Paint in Semi-gloss Black. Spray paint offers incredible ease and speed of application, providing a smooth, even finish. The semi-gloss sheen not only looks sleek and modern but also makes the legs easier to clean and provides an additional layer of protection against moisture and wear.
For the bench tops, I opted for a rich, warm wood stain – one of my absolute favorites:
Rust-Oleum Ultimate Wood Stain in Dark Walnut.
This particular stain is a fantastic choice for DIYers. It’s readily available at Lowe’s and comes in a wide array of beautiful colors, making it easy to find the perfect shade for any project. The most remarkable feature of this stain, however, is its incredibly fast drying time – it’s usually dry in under an hour! Plus, it typically requires only one coat to achieve a deep, vibrant color, saving you time and effort. This efficiency is a huge advantage when you’re eager to see your project completed.
Staining Techniques for a Flawless Finish
To apply the stain to the relatively large surface of the bench tops, I employed a rolling technique. This method proved incredibly efficient and fast, allowing me to cover the surface quickly and evenly. Here are the tools I used for staining:
While the roller made quick work of the broad surfaces, I used a foam brush to meticulously fill in any cracks, crevices, or areas that the roller couldn’t reach. This two-pronged approach ensures complete coverage and a professional-looking finish, highlighting the natural beauty of the wood grain.
The Essential Topcoat: Rust-Oleum Spar Varnish
To truly weatherproof these outdoor benches and protect them from the harsh realities of sun, rain, and temperature fluctuations, a robust topcoat is absolutely critical. After the stain had fully dried, I applied three generous coats of this powerhouse product:
Rust-Oleum Spar Varnish.
This spar varnish is specifically formulated for outdoor and marine applications, offering superior protection against UV rays, moisture, and temperature changes. It’s incredibly easy to apply, flows smoothly, and dries relatively quickly between coats, which means you can complete multiple coats in a single day. Another significant advantage is its low odor during application, making for a more pleasant working experience. This product has quickly become my go-to choice for any outdoor project that demands long-lasting durability and resistance to the elements. You can find this reliable spar varnish conveniently at Lowe’s, ensuring easy access for your next outdoor DIY endeavor.
The Finished Result: Affordable Outdoor Elegance
And that’s it! The combination of smart design, affordable materials, and quality finishing products resulted in beautiful, durable, and budget-friendly outdoor dining benches. Curious to see a few more angles of the finished project?
What are your thoughts on these budget-friendly outdoor benches? I hope you’re as delighted with them as I am! This project truly demonstrates that creating functional and beautiful furniture for your home doesn’t require a hefty investment or advanced carpentry skills. With clear plans, the right tools, and a little patience, anyone can achieve fantastic results.
Ready to build your own? Be sure to head over to Ana White’s site to get the complete set of plans for these sawhorse outdoor benches! Her detailed instructions will guide you through every step of the process, making your DIY journey smooth and successful.
Thank you so much for stopping by and sharing in this exciting project! If you found this post inspiring or helpful, please consider sharing it with your friends and pinning it to your favorite DIY boards. Your support means the world! Happy building!
~Whitney