
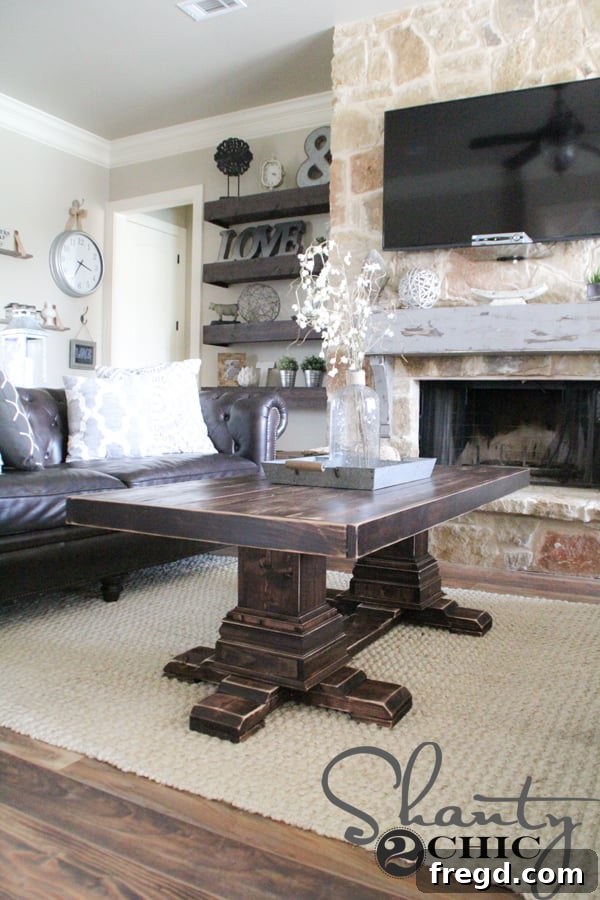
Build Your Dream Pedestal Coffee Table: A Comprehensive DIY Guide for Under $130!
There are some projects that simply capture your heart, and I can confidently say, without exaggeration, that this DIY Pedestal Coffee Table stands out as my absolute favorite creation to date! The journey to this stunning piece began with a common household dilemma. When we first moved into our new home, our existing sectional sofa, for which I had previously built a square coffee table, unfortunately, didn’t quite fit the layout of our living room. After much deliberation, we decided to sell the sectional and opted for two more versatile couches instead. This change left a noticeable void in the center of our living space, specifically the need for a long, rectangular coffee table that would complement the new seating arrangement and fill the area perfectly.
With numerous other furniture pieces on my DIY to-do list, this particular coffee table project lingered for a while. However, the empty space persistently called for a centerpiece. Finally, the stars aligned, and last week, I dedicated myself to bringing this vision to life. The result is not just a functional table but a true statement piece that has transformed our living room.
Affordable Elegance: Crafting a Custom Pedestal Coffee Table on a Budget
One of the most impressive aspects of this project, besides its stunning aesthetic, is the incredibly low total cost. This entire custom-built coffee table, featuring its robust and eye-catching pedestal legs, came in at a remarkable $130! It’s hard to believe such a high-quality, custom piece of furniture can be achieved on such a modest budget, making DIY not just a hobby, but a smart financial choice.
The star of the show truly is the chunky pedestal leg design. I am absolutely enamored with their substantial presence and intricate detailing. These aren’t just simple posts; they are a thoughtfully designed composition utilizing a clever mix of readily available 1x boards, elegant cove molding, and classic casing. This layering technique gives the legs an incredible depth and a professional, custom-made appearance that looks far more expensive than it is. Despite their complex look, I promise you, these legs are surprisingly easy to construct, making this an accessible project for intermediate DIYers.
Interestingly, this captivating pedestal design was initially conceived for a large dining table. However, the immediate need for a new coffee table in our living room took precedence. While the coffee table version stole the spotlight for now, the enduring appeal and structural integrity of this design mean a matching dining table is definitely on the horizon. Keep an eye out for that upcoming project – you won’t want to miss it!
Your DIY Journey Begins Here: Free Plans & Detailed Tutorial
To ensure your success in replicating this beautiful coffee table, we’ve meticulously put together free, printable plans for you to follow every step of the way. These comprehensive plans detail all the necessary cuts and dimensions, providing a solid foundation for your build. You can access and print them instantly by clicking HERE or simply by clicking on the image below. Having these plans on hand will be invaluable as you gather your materials and prepare for construction.
In addition to the printable plans, this page also provides a thorough, step-by-step tutorial, complete with illustrative images for each stage of the build. It’s important to note that the shopping list included in the main plans primarily covers the core table structure and offers flexibility for your choice of decorative trim. For those aiming to achieve the exact “chunky” leg aesthetic featured in my table, I’ve included a detailed breakdown of additional lumber purchases required for the specific trim pieces and an expanded tutorial dedicated solely to the trim work. This ensures you have all the information needed, whether you opt for a simpler trim or embrace the full, layered look.
Essential Tools and Materials for Your Pedestal Coffee Table Project
Before diving into the build, it’s crucial to gather all your tools and materials. Having everything prepared beforehand will make the process much smoother and more efficient. For this project, you’ll need standard woodworking tools:
- Miter Saw: Essential for precise angled and straight cuts.
- Drill/Driver: For drilling pocket holes and driving screws.
- 18-Gauge Brad Nailer: For securely attaching trim and planks with minimal visible fasteners.
- Bar Clamps: Invaluable for holding pieces flush during assembly.
- Measuring Tape, Pencil, Safety Glasses: Standard workshop essentials.
- Wood Glue: For strong, lasting joints.
- 2 1/2″ Pocket Hole Screws: For assembling the base.
- 1 1/2″ Pocket Hole Jig & Bits: To create strong, concealed joints.
- Wood Filler (optional): To fill any nail holes before finishing.
- Sander & Sandpaper: For preparing surfaces for staining.
- Clean Cloths: For applying stain and wiping excess.
- Paint Brush: For applying polyurethane.
The lumber and molding details are covered in the plans, but for the enhanced trim, make sure to add these to your shopping list:
- 1 – 1×6 @ 6ft. (for the initial trim layer)
- 1 – 1×3 @ 6ft. (for the second trim layer)
- 8 ft. of 2 1/2″ casing (linked here for reference)
- 13 ft. of cove molding (linked here for reference)
Investing in quality materials and tools, even for a budget-friendly project, ensures a beautiful and durable final product. Remember to prioritize safety by wearing appropriate protective gear throughout the build.
Step-by-Step Construction Guide: Building Your DIY Pedestal Coffee Table
Crafting the Sturdy Pedestal Base
The foundation of this stunning coffee table lies in its robust and elegantly designed pedestal base. Let’s begin by constructing the feet that will support the entire structure.
1. Preparing the Feet: Angled Cuts
The very first step involves making precise cuts for the feet of the table. To achieve the distinctive angled look, set your miter saw to a 45-degree angle. Carefully align the blade so it will cut off only the top half of the board. This creates a clean, beveled edge that adds to the visual appeal of the base. Precision here is key for a professional finish.
2. Drilling Pocket Holes for Strong Joints
“/>
Next, you’ll drill 1 1/2-inch pocket holes into the appropriate sections of your foot pieces, as indicated in the plans. Pocket holes are an excellent method for creating strong, concealed joints, providing a clean and professional appearance to your finished piece without visible fasteners on the exterior.
3. Assembling the Feet
With the pocket holes drilled, it’s time to assemble the feet. Apply a generous amount of wood glue to the mating surfaces, then secure the pieces using 2 1/2-inch pocket hole screws. Ensure the joints are tight and flush. Once assembled, your foot sections will begin to take on the distinct shape of the pedestal base.
4. Attaching the Foot Pads
To give your table a refined finish and protect your floors, attach the foot pads to the bottom of the base. Apply wood glue to the contact surfaces and secure them with finish nails. For this step, an 18-gauge brad nailer is ideal, as it leaves very small holes that are easy to conceal.
Here’s a view of the underside of the base, showcasing the securely attached foot pads, ready to provide stability and a polished look.
5. Building Up the Pedestal Legs
Now, flip the base over and begin the process of building up the pedestal legs. Start by attaching the 1×6 support pieces, which form the core structure of your legs. Use wood glue for a strong bond and brad nails to secure them in place while the glue dries. Work systematically, ensuring each piece is aligned correctly.
Continue attaching the boards, progressively forming the full dimensions of the legs. For best results, use bar clamps to hold the pieces tightly and flush against each other as you nail them. This prevents gaps and ensures a seamless appearance.
Constructing the Sturdy Tabletop
With the base taking shape, attention now turns to the tabletop, which will provide the spacious and elegant surface for your coffee table.
1. Assembling the Tabletop Frame
Follow the provided plans to construct the frame for the tabletop. This frame will serve as the supporting structure for your planks. Ensure all joints are square and secure, using appropriate fasteners and wood glue as directed in your plans.
2. Attaching the Tabletop Planks
Once the frame is complete, carefully center your tabletop planks on top. Apply wood glue to the frame and then secure the planks with brad nails. Ensure consistent spacing if desired, and make sure they are firmly attached to create a durable and level surface.
That completes the basic structure of your tabletop – a straightforward and satisfying step!
Elevating with Exquisite Trim Work: The “Chunky” Leg Detail
Now, for the part that truly transforms this coffee table into a custom masterpiece: the elaborate, chunky trim work on the pedestal legs. If you prefer a simpler trim as shown in some plan images, you can continue with the basic plans. However, to achieve the high-end, detailed look featured in my design, set aside the basic plans for a moment and follow this specialized trim tutorial.
Crucial Tip: MEASURE AND CUT AS YOU GO! I cannot emphasize this enough. Trim work, especially with multiple layers and angles, benefits immensely from precise, on-the-spot measurements rather than relying solely on pre-cut lists. This approach ensures perfect fits and seamless transitions.
Trim work is, for many, the most rewarding part of building. It’s a series of basic layering steps, but the cumulative effect is anything but basic – it adds incredible character and sophistication. Don’t let the thought of angle cuts intimidate you; this detailed guide will break down each step, making it easy to master.
Additional Lumber for “Chunky” Trim:
- 1 – 1×6 @ 6ft.
- 1 – 1×3 @ 6ft.
- 8 ft. of 2 1/2″ casing (ensure you get enough for all sides)
- 13 ft. of cove molding (again, generous length is better)
1. First Layer of Trim: Angled 1×6 Pieces for the Top of the Feet
Begin by cutting eight 1×6 pieces, each 5.5 inches long, with one end cut at a 45-degree angle. These are relatively small cuts, so I find it easiest to first cut the 45-degree angle off a longer board (setting your miter saw’s bevel arm to 45 degrees as shown). This maximizes safety and accuracy.
Then, measure 5.5 inches from the longest point of your angled cut and make a straight cut. This will give you the precise trim piece needed.
Apply wood glue to the bottom surface of each trim piece. Pay close attention to how the angle is held and where the glue is placed to ensure maximum adhesion.
Carefully position each piece on top of a foot, ensuring it’s flush against the base of the leg, and secure it with your brad nailer. Repeat this process for all eight sides of the legs, creating a continuous, layered effect around the base.
2. Wrapping the Base: 1×6 Layer
Now, measure and cut a 1×6 piece to fit the exact width of one side of a leg. This measurement will be approximately 5.5 inches long, but always verify with a physical measurement.
Attach this 1×6 piece to the base of the leg using wood glue and brad nails, ensuring it’s neatly aligned.
Repeat the process for the opposite side of the leg. Notice how the 1×6 trim neatly covers the width of the leg’s side.
Now, measure the length required to connect these two 1×6 trim pieces. For my table, this measurement was approximately 7 1/8 inches, but always measure your specific piece for accuracy.
Attach this connecting piece with wood glue and brad nails, ensuring it is flush with the previously attached 1×6 trim. Repeat this for the opposite side of the leg and then for the other pedestal leg. At this point, the base of both legs should be completely wrapped in a continuous layer of 1×6 trim, creating a solid, chunky look.
3. Second Layer of Trim: 1×3 Wrapping
With the 1×6 layer complete on both legs, it’s time to add the second layer of trim using 1×3 boards. Measure and cut the first two 1×3 pieces in the same manner as you did for the 1×6 pieces, matching the width of the leg sides. Attach them to the base of the legs with wood glue and brad nails.
Next, measure for the remaining two 1×3 pieces that will connect the first two, and attach them in the same way, ensuring a seamless wrap around the 1×6 layer.
At this stage, each leg will feature a primary layer of 1×6 trim, which is then enveloped by a secondary layer of 1×3 trim. This layering effect contributes significantly to the “chunky” and custom look.
Complete the same 1×3 layering for the other leg. By now, your table base should be looking quite impressive, showcasing the robust foundation and layered trim. It’s time to elevate it further with decorative molding!
4. Third Layer of Trim: Casing Molding
Applying casing molding effectively creates a sophisticated profile. My preferred method for measuring and cutting casing involves starting with a 45-degree cut on a long piece. To do this, rest the casing flat against the fence of your miter saw, just as it will sit on the table leg. Swing the miter arm (bottom part of the saw) to 45 degrees and make your initial cut. The specific 2 1/2-inch casing I used can be found here.
Once the first cut is made, place the casing piece on top of the 1×3 trim layer, precisely where it will be installed. Mark the point for your second angled cut, ensuring it aligns perfectly with the corner.
Return to the miter saw. Place the casing against the fence in the same orientation as your first cut, then swing the miter arm to cut a 45-degree angle in the opposite direction. This creates a perfect mitered corner when two pieces meet.
Attach the casing with wood glue and brad nails. A great tip for casing is to place your nails in the deepest grooves or recesses of the molding; they will be far less noticeable and easier to fill. Continue this measure-and-cut process as you wrap the leg with casing. Always make your first angle cut on a fresh piece of molding, then measure and mark for the second cut.
At this point, your legs should proudly display the casing, beautifully covering the majority of the 1×6 trim and further enhancing the layered look. It’s truly starting to look awesome! Our final decorative step is to crown this beautiful work with cove molding.
5. Final Touch: Cove Molding
Just like with the casing, begin by making your first angle cut on a long piece of cove molding. To ensure the correct orientation, rest the stick of cove molding against the fence of your miter saw so that the curve of the molding faces you. Set the miter saw to 45 degrees and make your cut. The 11/16-inch pine cove molding I purchased can be found here for reference.
Place the newly cut piece at the base of the leg, directly on top of the 1×3 trim layer. Ensure the short part of the angle is flush with the corner of the 1×3. Mark the exact point for your second cut.
Return to the miter saw, swing the miter arm to cut the opposite 45-degree angle, and make your cut, completing the first piece of cove molding for the base.
Attach the cove molding with wood glue and brad nails. Continue these steps, measuring and cutting each piece individually, until both leg bases are completely wrapped with this elegant molding. This adds a subtle yet significant detail that truly polishes the look.
Finally, measure and cut additional cove molding to fit the top perimeter of the existing trim, where it meets the main leg structure. This piece will sit directly on top of the 1×6 trim. Secure it with brad nails and wood glue, continuing until both legs have this finishing touch. That completes all the intricate trim work for the pedestal legs – congratulations on achieving such a detailed and professional look!
Applying Finishing Touches to Your Coffee Table
With the main construction and elaborate trim work complete, it’s time to prepare your coffee table for its grand reveal with proper finishing techniques. Before attaching the tabletop permanently to the base, I highly recommend applying your chosen finish.
1. Adding Trim to the Tabletop
Measure and cut the 1×3 trim pieces to perfectly fit the perimeter of your tabletop. These pieces will frame your tabletop beautifully.
Attach them securely with wood glue and brad nails, ensuring clean joints and a snug fit. It’s generally best practice to attach the end pieces first, then measure and cut the longer side pieces for a precise fit.
For any unruly 1×3 pieces that might not lay perfectly flat, use a clamp to flush them up while the glue dries. This ensures a perfectly flat and smooth trim around your tabletop.
Once the glue has completely dried, your table is ready for the exciting step of staining!
2. Staining Your Masterpiece
For this project, I applied a single coat of Varathane Carrington stain to the entire piece. This rich color enhances the natural wood grain beautifully. To apply, simply wipe the stain onto the wood using a clean, lint-free cloth. Allow it to penetrate for about 5 minutes, then wipe off any excess with a new clean cloth. This method ensures an even application and prevents pooling, which can lead to uneven color.
3. Attaching the Tabletop and Applying Polyurethane
Once the stain has thoroughly dried – usually 24 hours, but always check your product’s instructions – you can attach the table top to the base. Refer to your original plans for the specific attachment method, ensuring it’s secure and stable.
For the final protective finish, I prefer to bring my pieces indoors. The outdoor environment can introduce dust and debris that might adhere to the drying finish, compromising its smoothness. For this table, I used our absolute favorite poly: Varathane Triple Thick. This product is a game-changer because one brushed coat is equivalent to three standard coats, saving you significant time and effort. It dries incredibly fast, is water-based for easy cleanup, and leaves a wonderfully smooth finish. We opted for a satin sheen, which provides a lovely, subtle glow without being too glossy. You’ll notice in the picture that it appears white when wet, but don’t worry – it dries completely clear, leaving a durable and beautiful protective layer.
That’s it! Your magnificent, custom-built pedestal coffee table is now complete!
Showcasing Your DIY Pedestal Coffee Table Masterpiece
Behold the stunning result of your hard work and dedication! This gallery captures the essence of the finished coffee table, highlighting its robust structure, intricate pedestal legs, and elegant finish. Each image tells a story of transformation, from raw lumber to a beautiful, functional piece of furniture that enhances any living space.
The DIY Difference: Unbeatable Value and Custom Style
It’s truly astonishing what can be created from a few pine boards, a bit of elbow grease, and a pile of sawdust. For an incredible $130 in lumber, you’ve crafted a coffee table that exudes custom charm and high-end appeal, perfectly tailored to your space and style. This project isn’t just about building furniture; it’s about the satisfaction of creating something beautiful with your own hands, saving a significant amount of money compared to retail, and adding a unique, personalized touch to your home decor. The chunky pedestal legs, the layered trim, and the rich stain combine to form a piece that is both timeless and robust.
Thank you so much for following along with this detailed tutorial! I hope you feel inspired and empowered to tackle your own DIY furniture projects. Happy building!
~Ashley
Explore More DIY Projects for Your Home
This coffee table is just one piece of the DIY puzzle in this room! Our home is a testament to the power of custom craftsmanship and smart budgeting. Dive into these additional tutorials to discover how we transformed other areas of this space:
- Fireplace Mantel:Learn how to build and hang a stunning stone fireplace mantel for under $100.
- Floating Shelves:Master the art of creating sleek and modern floating shelves that add both storage and style.
- Leather Strap Shelves:Add a unique, rustic-chic touch with these easy-to-build shelves featuring elegant leather straps.
- Laminate Flooring:Get a step-by-step guide on how to install beautiful and durable laminate flooring yourself.
Decor and Design Notes
For those curious about the complementary decor in the room:
- The inviting rug is a find from World Market.
- The charming decorations adorning the shelves were sourced from various beloved home goods stores, including HomeGoods, Hobby Lobby, and Marshall’s.
- The elegant cabinet color is “Anonymous” by Sherwin Williams, offering a sophisticated backdrop.
Watch and Learn: DIY Rolling Storage Coffee Table
If you’re looking for another fantastic coffee table project with added functionality, check out this video tutorial for a DIY Rolling Storage Coffee Table. It’s perfect for those who need versatile storage solutions in their living areas!
Discover Your Perfect Coffee Table Project
This pedestal coffee table is just one of many possibilities! Whether you’re a beginner or an experienced woodworker, we have a design that fits your style, skill level, and size requirements. Explore our extensive collection of over 15 DIY Coffee Table Plans and find your next inspiring project today!
Ready to transform your living space with a custom-built piece? Grab your tools, gather your materials, and let’s get building!