
Welcome, fellow crafters and organization enthusiasts! The journey to a perfectly appointed creative space is almost complete, and I couldn’t be more thrilled to share the culmination of this significant decluttering and organizing project. I’ve meticulously sorted through nearly every single item in my craft collection, found a dedicated home for each, and now, I’m ready to unveil the truly transformative results. This isn’t just about tidiness; it’s about reclaiming peace of mind and igniting renewed inspiration for countless future projects. Organizing a craft space, especially one as dynamic as a closet, often feels like a monumental task, but the satisfaction derived from seeing everything in its rightful place is immeasurable. It’s a feeling of accomplishment that resonates deeply, turning chaos into calm and frustration into flow. For anyone grappling with overflowing supplies and a workspace that sparks more stress than creativity, this journey into efficient craft closet organization offers a beacon of hope and practical solutions.
I cannot adequately express the sheer joy and contentment that washes over me every time I glance into this closet now. It’s a profound sense of relief to finally have all my beloved craft supplies consolidated in one easily accessible location. The days of hunting for that specific ribbon, the elusive adhesive, or a particular shade of paper are officially behind me. Everything has a home, making both retrieval and, perhaps more importantly, put-away effortless. This newfound order not only saves precious time but also allows my creative process to flourish uninterrupted. Before we dive into the glorious “after,” let’s take one last nostalgic, albeit slightly cringeworthy, look at the “before” – a testament to the power of a dedicated weekend and some smart storage solutions.
Take a deep breath, and prepare for the inspiring revelation. And now, the highly anticipated after:
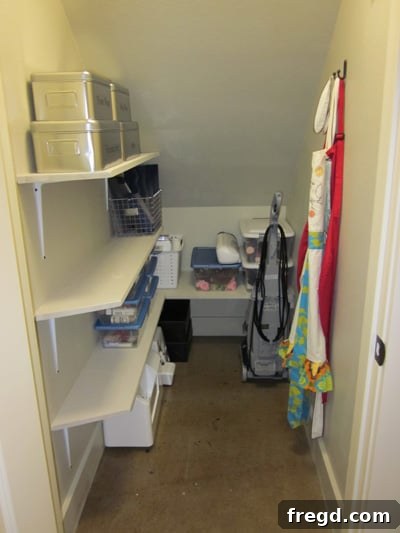
Isn’t it just a breathtaking transformation? Just look at all that glorious, open space! And the meticulously planned storage! This sight alone is enough to send a wave of exhilaration through any organized soul. The visual impact of a decluttered and beautifully arranged space is astounding, proving that even a small closet can become a highly efficient and inspiring craft hub. Every shelf, every container, and every nook now serves a specific purpose, maximizing vertical and horizontal space to its fullest potential. This craft room makeover truly feels like a breath of fresh air, providing a serene environment where creativity can flourish without the distraction of clutter. It’s a testament to the fact that effective DIY storage solutions can entirely redefine the functionality of a space, making it not just aesthetically pleasing but also incredibly practical for daily use.
To create this seamless look and truly integrate the storage into the room’s aesthetic, I painted all the shelves with the exact same paint color as my walls. This simple step instantly created a cohesive backdrop, allowing the actual craft supplies and storage containers to pop, rather than the shelving itself. While I confess I would absolutely adore adorning this space with an array of super cute, Pinterest-worthy baskets and decorative containers for my storage, I made a conscious decision for this particular closet: function triumphs over pure form. My priority was to establish a highly functional, easily navigable system that would stand the test of time and heavy use. This approach doesn’t mean sacrificing all aesthetic appeal, however. I did manage to infuse a bit of my personality and fun into a few key elements, proving that practical organization doesn’t have to be bland. The goal was durability, accessibility, and robust support for all my various craft treasures, ensuring that the shelves can handle the weight and volume of a serious crafter’s collection. The overall effect is one of serene efficiency, ready to tackle any creative project that comes its way.
These fantastic clear storage bins have quite a story! I originally stumbled upon them at Ikea about three months ago, captivated by their potential. However, like many good finds, they ended up patiently collecting dust in a corner, waiting for their moment to shine. Well, that moment has finally arrived! They are now a cornerstone of my craft supply organization. To truly put these babies to work and ensure every item has its designated spot, I utilized my trusty Silhouette cutting machine. I designed and cut custom vinyl letters, creating crisp, clear labels for each bin. This seemingly small detail makes an enormous difference in maintaining order, allowing me to instantly identify contents like “Fabric Scraps,” “Ribbons & Trims,” “Adhesives,” or “Small Embellishments” at a glance. No more rummaging or guessing! These IKEA storage hacks, combined with personalized labeling, have transformed formerly generic containers into highly efficient, purpose-driven organizers. It’s not just about storage; it’s about smart, systematic accessibility, making my crafting process smoother and more enjoyable. These bins are perfect for segmenting smaller items that can easily get lost in larger spaces, offering a clear view of their contents and preventing unnecessary purchases of items I already own but simply couldn’t find.
Adjacent to these meticulously labeled bins, you’ll spot one of my absolute favorite finds: that super cute metal locker basket. I discovered this gem on Amazon for a mere $12, and its industrial-chic aesthetic instantly captured my heart. It’s robust, stylish, and perfectly embodies that blend of function and subtle flair I was aiming for. This basket, too, had been patiently waiting in my garage for a few months, holding miscellaneous items without a true purpose. But no longer! This durable metal basket has now found its permanent and highly practical new home within the craft closet, serving as the dedicated holder for all my paper cutters. Whether it’s a rotary cutter, a guillotine cutter, or a smaller precision trimmer, they now reside safely and neatly within its confines. This not only keeps them protected from damage but also ensures they are always within arm’s reach when a cutting task arises, making it a stellar example of smart craft tool storage. Its open design allows for quick visual identification, eliminating the frustration of searching for the right tool. It’s a small detail, but these dedicated spots for specific tools are what elevate a merely tidy space into a truly efficient and inspiring workshop.
While the customized bins and the stylish metal basket add a touch of personality, the rest of the storage might seem, dare I say, “boring” to an outsider. But for me, it’s pure organizational bliss! Every component, no matter how simple, brings a genuine smile to my face because I know the meticulous thought that went into its placement and purpose. For the majority of my “other goodies” – think smaller supplies like glitters, beads, specialized threads, or various adhesive types – I turned to incredibly budget-friendly solutions. Specifically, I utilized some fantastic $1 plastic tubs I sourced from Target. These humble containers proved to be an absolute game-changer. They fit so remarkably well on my shelves, almost as if custom-made, providing perfect compartmentalization for a vast array of items. Their clear design allows for easy visibility, making it simple to see exactly what’s inside without having to pull everything out. The effectiveness and affordability of these simple plastic storage containers were so impressive that I’ve already planned a trip to acquire six more tomorrow, ensuring every last small item has a dedicated, easily accessible home. This strategy of using affordable craft storage solutions proves that you don’t need to break the bank to achieve a highly organized and functional craft space. It’s about smart choices and consistent application.
Moving to the lower section of the closet, you’ll find where I’ve strategically placed my larger machines and framed pictures. These bulkier items, such as my cutting machines, laminator, and perhaps a small printer, are now resting safely and securely on the ground. This floor storage solution is ideal for several reasons: it keeps them out of the way of the more frequently accessed supplies on the shelves, minimizes any risk of them falling, and provides excellent stability for heavy equipment. Despite being on the floor, they remain super easy to get to, which is crucial for tools I use regularly. The framed pictures, often waiting to be displayed or gifted, are also nestled here, protected from dust and damage, yet readily available when inspiration strikes for a new gallery wall or gift. This thoughtful placement ensures maximum safety for delicate electronics and artwork while maintaining a clear and open workspace above, demonstrating that even unconventional storage areas can be optimized for both practicality and protection in a craft machine storage strategy.
“/>
Ascending to the back shelf, this space is dedicated to some of my more specialized crafting categories. Here, I’ve neatly arranged all my bow making supplies – an array of ribbons, adhesives, and embellishments specifically for creating beautiful bows for gifts and décor. Alongside these, you’ll find my Silhouette goodies, including various rolls of vinyl, transfer tape, extra blades, and design tools, all essential for maximizing the potential of my cutting machine. And finally, a collection of delicate artificial flowers and floral embellishments, carefully organized to prevent crushing or damage. Grouping these related items together makes the crafting process significantly more efficient; when I’m in a “bow-making mood,” everything I need is right there, accessible and ready. This strategic craft supply organization on the back shelf exemplifies how segmenting by project type or machine accessory can streamline workflows and preserve the integrity of delicate materials, making it a perfect example of tailored Silhouette accessories storage and bow making supplies organization.
And that, dear readers, pretty much encapsulates the glorious transformation of my craft closet for now. It’s a project that has brought immense satisfaction and a newfound sense of order to my creative life. The beauty of organization isn’t just in the neatness, but in the freedom it provides to simply create without obstruction or delay. This detailed craft closet inspiration demonstrates how even the most chaotic spaces can be transformed with a bit of planning and strategic storage. For one final dose of visual pleasure, and just for kicks, let’s revisit the stunning “after” shot one more time to fully appreciate the impact of this home transformation.
I sincerely hope you’ve enjoyed this tour and perhaps found a spark of inspiration for your own organizational endeavors! While this space might not be super “shmancy” or overtly “chic” in a magazine-spread sense, its profound functionality and the peace it brings make me feel like a brand new woman, ready to tackle anything! This organized creative space is more than just a storage area; it’s a testament to the power of dedicated effort and intelligent design. And now that this major project is complete and all my supplies are beautifully housed, I can confidently begin the exciting second round of my home projects: the grand game of musical rooms! There are still so many areas in my home longing for a touch of organizational magic and aesthetic refinement. Woohoo for new projects and continuous improvements! Thank you so much for stopping by and sharing in this wonderful journey of transformation!