
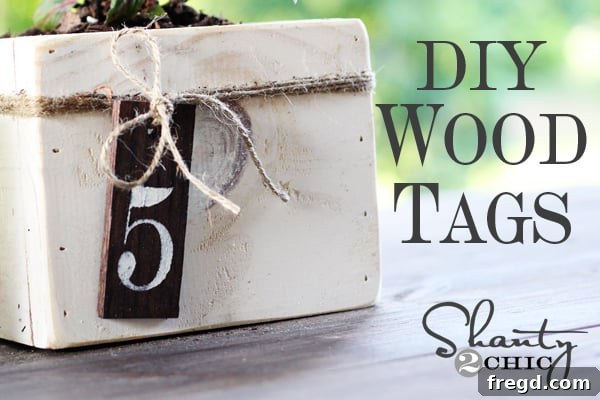
Craft Charming & Affordable DIY Wood Tags for Any Project
Hello, crafting enthusiasts and DIY lovers! I’m absolutely thrilled to welcome you back to a new tutorial today. If you’re anything like me, you appreciate projects that are not only incredibly satisfying to create but also wonderfully affordable and endlessly versatile. That’s precisely what we’re diving into today: a super simple, budget-friendly guide to making your own charming rustic wood tags.
These aren’t just any tags; they are little pieces of customizable charm, perfect for adding a personalized touch to countless items around your home or for special occasions. You might remember the mini planter boxes I shared previously – these tags were designed specifically to complement them, adding that final rustic flourish. But trust me, their potential extends far beyond planter boxes! Imagine them gracing gifts, organizing your pantry, marking herbs in your garden, or even as unique wedding favors. The possibilities are truly boundless.
In just a few quick steps and with minimal investment, you’ll discover how effortlessly these cute little labels come together. This project is a fantastic way to add a custom, handmade element to your decor without breaking the bank or requiring advanced woodworking skills. Get ready to transform a simple piece of wood into something truly special and functional!
Gathering Your Materials: What You’ll Need for Your DIY Wood Tags
One of the most appealing aspects of this project is how few supplies it requires and how incredibly inexpensive they are. You might even discover that you already have many of these items tucked away in your workshop or craft stash. Here’s a detailed list to ensure you have everything ready before you begin crafting your custom wooden tags:
- Wood Strip: A 1/4″ x 2″ x 4′ piece of oak wood. Oak is highly recommended for its beautiful grain and excellent staining properties, but other softwoods or hardwoods can work too.
- Cutting Tool: A miter saw, hand saw, or jigsaw for precisely cutting your wood strips.
- Drill & Small Drill Bit: Essential for creating neat holes at the top of each tag, allowing for easy attachment. A 1/8″ drill bit is usually ideal.
- Wood Stain: Rust-Oleum Ultimate Wood Stain in Kona. This particular shade provides a rich, dark, and elegant finish, perfect for a rustic aesthetic. Feel free to choose any stain color that matches your personal style.
- Stain Brush or Clean Rag: For smooth and even application of the wood stain.
- Stenciling Materials:
- Cutting Machine: A Silhouette machine (or a Cricut) for cutting custom stencils with high precision. This offers the most flexibility for fonts and designs.
- Alternative Stencils: If you don’t own a cutting machine, pre-made stencils from any craft store are a great alternative. You can also print your desired font and carefully hand-cut stencils from cardstock.
- Stencil Material: Regular cardstock (if using a cutting machine) or ready-to-use vinyl stencils.
- Font Choice: The Engravers font was used here for its classic, clean lines, but select any font that appeals to you!
- Acrylic Paint: An off-white acrylic paint for the stenciled numbers or letters. This provides a lovely contrast against dark stain, enhancing legibility and visual appeal.
- Stencil Brush: Specifically designed for stenciling, this brush helps in dabbing paint cleanly without bleeding.
- Twine: A roll of rustic twine from a craft store for attaching your finished tags. Natural fibers like jute or hemp twine work beautifully.
- Protective Gear: Always prioritize safety! Safety glasses for cutting and drilling, and gloves when handling wood stain.
For this specific project, I chose a 1/4″ x 2″ x 4′ piece of oak from my local Lowe’s. Not only does oak take stain exceptionally well, resulting in a beautiful, deep color, but the entire piece was incredibly economical, costing only about $2.50. This small investment allowed me to create numerous tags, demonstrating the project’s fantastic value!
Step-by-Step Guide: Crafting Your Personalized Wood Tags
Step 1: Precision Cutting Your Wood Blanks
The journey to your personalized tags begins by transforming your long piece of lumber into individual tag blanks. I opted to cut five tags, each measuring precisely 3 inches long. This particular length proved ideal for my mini planter boxes, providing ample space for clear stenciled numbers without appearing oversized. However, one of the greatest advantages of DIY is the freedom to customize! Feel empowered to adjust the tag length to perfectly suit your intended project, whether you need longer labels for larger items or shorter, more delicate accents.
It’s worth noting that from that single, budget-friendly $2.50 piece of oak, I could have easily produced 11 to 12 tags! This incredible yield highlights the project’s cost-effectiveness. When performing any cuts, always prioritize safety by wearing safety glasses and ensuring your wood is securely clamped. Aim for clean, straight cuts to ensure a professional and polished final product. A miter saw offers excellent precision and speed, but a trusty hand saw or jigsaw can achieve similar results with careful measurement and a steady hand.
Step 2: Drilling for Dangle – Adding the Hanging Holes
Once your wood pieces are accurately cut to size, the next essential step is to create a small hole at the top of each tag. This seemingly simple addition is crucial, as it’s where you’ll thread your chosen twine or string, allowing your beautifully crafted tags to dangle gracefully from your planter boxes or any other item. Using a standard drill equipped with a small drill bit – typically around 1/8 inch or slightly larger, depending on the thickness of your chosen twine – carefully drill a hole. I recommend positioning the hole approximately 1/4 to 1/2 inch from the top edge, ensuring it’s horizontally centered for an aesthetically pleasing and balanced appearance.
For optimal results and safety, always ensure your wood tag is securely clamped or held firmly in place before drilling. This prevents any unwanted movement or splintering, guaranteeing a clean, precise hole. Apply steady, even pressure, allowing the drill to do the work rather than forcing it. A clean, small hole is key to achieving a professional finish, transforming a plain piece of wood into a functional and decorative label ready for its next stage of customization.
Step 3: Staining for a Rich, Rustic Finish
Now we move to the stage where your tags truly begin to acquire their distinctive character: the staining process. I applied a quick, yet thorough, coat of my absolute favorite wood stain: Rust-Oleum Ultimate Wood Stain in Kona. If you haven’t had the pleasure of working with this particular shade, I cannot recommend it enough! The Kona color delivers an exquisitely beautiful, deep, and opulent dark brown finish that radiates warmth and rustic sophistication. It’s a remarkably versatile shade that effortlessly complements a wide array of interior design styles, from cozy farmhouse chic to sleek industrial modern.
Applying the stain is a straightforward process. Using a dedicated stain brush or a clean, lint-free rag, apply a thin, even coat across the entire surface of each tag. After allowing it to penetrate the wood for a few minutes (refer to the product’s specific instructions for exact timing), gently wipe off any excess stain. This step is crucial to prevent stickiness and to ensure the natural beauty of the wood grain remains visible beneath the rich color. Always work in a well-ventilated area and remember to wear protective gloves to safeguard your hands from the stain. Allow ample drying time as specified by the manufacturer – typically several hours, or even overnight, to ensure complete curing. The darker and more beautifully saturated your tags are with this stain, the more striking and pronounced your stenciled numbers or letters will appear, creating a magnificent, high-contrast effect.
Rust-Oleum Ultimate Wood Stain in Kona
I simply adore how dark, rich, and captivating this stain looks; it truly provides the perfect, sophisticated backdrop for our upcoming stenciled details, making them pop with elegant clarity.
Step 4: Designing and Cutting Your Custom Stencils
This step is where your wood tags truly become personalized and reflect your unique style! For crafting my stencils, I confidently relied on my ever-dependable Silhouette machine. This fantastic piece of equipment offers unparalleled precision and customization, allowing you to effortlessly cut intricate designs and virtually any font you desire from various materials. I carefully selected the “Engravers” font for its timeless, clean lines, which I felt perfectly complemented the rustic charm and classic aesthetic of these wooden tags. If you are fortunate enough to own a cutting machine like a Silhouette or Cricut, you’ll find it incredibly simple to design your chosen numbers or text and then cut them out from standard cardstock – there’s no need to invest in more expensive vinyl for this particular application!
However, if you don’t happen to have a cutting machine at your disposal, there’s absolutely no need to worry! You have several excellent and equally effective alternatives to achieve beautiful stenciled designs:
- Pre-made Stencils: Explore your local craft stores; they typically offer an extensive selection of pre-made number and letter stencils in a wide variety of fonts and sizes.
- Hand-cut Stencils: For a truly bespoke touch, you can print your desired font onto a sturdy piece of cardstock, then meticulously cut out the letters or numbers using a sharp craft knife, such as an X-Acto knife. Patience is key here!
- Purchased Vinyl Stencils: Another convenient option is to purchase pre-cut vinyl stencils online or have them custom-made to your exact specifications.
When using my Silhouette, I employ a clever little trick to ensure perfect alignment: I first position the negative space of the number (the outline or the part that was cut out) onto the wood tag. This helps me visualize and confirm the ideal placement. Then, I carefully lay the actual stencil piece (the cutout number itself) on top, aligning it precisely within the negative space. This two-step method guarantees flawless alignment, especially beneficial when dealing with multi-digit numbers or intricate text. Regular cardstock works wonderfully for stencils on wood, just ensure it’s firmly pressed down onto the stained surface to prevent any potential paint bleed underneath the edges during the next step.
Step 5: Painting Your Stenciled Designs with Precision
With your meticulously crafted stencils now ready and perfectly positioned on your stained wood tags, it’s time to bring your designs to life with paint! For the numbers on my tags, I chose a classic off-white acrylic paint. This particular color choice creates a beautifully soft, yet striking, contrast against the rich, dark Kona stain. The result is a highly legible, subtly weathered, and undeniably classic look that enhances the rustic charm of the tags. Acrylic paint is an excellent medium for this project, primarily because it dries relatively quickly and offers superb coverage, ensuring vibrant and opaque numbers.
The true secret to achieving crisp, impeccably clean stenciled designs lies not just in the stencil itself, but crucially, in your paint application technique. Instead of employing a traditional side-to-side brushing motion, which notoriously tends to push paint underneath the stencil edges, I highly recommend utilizing a dedicated stencil brush and adopting a straight up-and-down dabbing motion. Begin by loading your stencil brush sparingly – the key is to have just enough paint to cover the stencil opening without it pooling or being overly saturated. Gently dab the paint repeatedly over the open areas of your stencil. This controlled, vertical application method is incredibly effective at preventing paint from bleeding beneath the stencil’s edges, thereby ensuring your numbers or letters appear sharp, defined, and professional. If necessary, allow each thin coat to dry slightly before applying another, building up opacity for a truly solid and vibrant finish.
I absolutely adore the crisp, professional results this careful technique yields – truly worth the small extra effort for such a polished outcome!
Pretty darn easy, right? The transformation from a plain piece of wood to a beautifully marked, customized tag is incredibly rewarding and a testament to the power of simple DIY!
Bringing It All Together: Attaching Your Charming Wood Tags
With your stunning, personalized wood tags now completely dry and ready, the final and most gratifying step is to attach them to your chosen project. For my mini planter boxes, I was keen to maintain that authentic rustic, natural aesthetic. To achieve this, I thoughtfully selected some simple yet elegant twine from my local craft store. Twine is an excellent choice due to its wonderful versatility, remarkable cost-effectiveness, and its inherent ability to instantly infuse an authentic farmhouse or cottage-core charm into any item it graces.
To secure the tags and add a touch of decorative flair, I meticulously wrapped the twine five times around each individual planter box. This created a lovely layered texture that adds significant visual interest without ever appearing bulky or overwhelming the small boxes. After achieving the desired wrap, I carefully threaded one end of the twine through the pre-drilled hole in the top of the wood tag. To complete the attachment, I tied a neat, simple, and elegant bow. This method not only secures the tag firmly in its designated place but also adds another delicate layer of artisanal detail. While twine perfectly suited my vision, you could easily experiment with other attachment materials such as elegant satin ribbon, sturdy leather cord, or even fine decorative wire, depending on the specific aesthetic you’re aiming to achieve. The immediate transformation and elevation that these handmade tags bring to the planter boxes are truly fantastic – imbuing them with a level of personalized sophistication that generic, store-bought items simply cannot replicate.
And just like that, your project is complete! This endeavor is incredibly cheap to execute, surprisingly easy to complete, and yet, it adds a tremendous amount of adorable character, bespoke charm, and meaningful personalization to any item you wish to enhance. Whether your goal is purely decorative or highly practical labeling, these DIY wood tags are an absolute game-changer in the world of handmade decor.
Beyond the Planter Box: Endless Uses for Your DIY Wood Tags
While these beautifully crafted wood tags look absolutely perfect adorning mini planter boxes, their utility and charm extend far beyond a single application. The versatility of this simple DIY project means your creativity is the only limit! Here are just a few inspiring ideas to spark your imagination and demonstrate how truly adaptable these handmade wooden tags can be in various settings:
- Personalized Gift Tags: Elevate any gift with a unique, handmade touch. Replace generic paper tags on birthday, holiday, or housewarming presents with these bespoke wooden labels. They add a thoughtful, artisanal quality that recipients are sure to cherish and reuse.
- Chic Home Organization Labels: Bring stylish order to your home! Use these tags to label baskets, storage bins, drawers, or shelves in your pantry, craft room, home office, or even your children’s play area. Imagine elegantly organizing your spices, threads, stationery, or toys with a cohesive set of these charming tags.
- Durable Garden Markers: Perfect for identifying herbs, vegetables, or flowers in your garden bed or potted plants. The stained wood offers greater durability and weather resistance compared to typical paper or plastic markers, adding rustic charm to your green space.
- Enchanting Seasonal Decor: Craft tags adorned with festive greetings (“Autumn Blessings,” “Merry Christmas,” “Happy Easter”) or thematic numbers for fall displays, advent calendars, holiday wreaths, or even as decorative elements for seasonal centerpieces.
- Unique Wedding or Party Favors: Add a memorable, personalized element to wedding favors, bridal shower gifts, baby shower takeaways, or party goodie bags. They can be elegantly inscribed with dates, initials, sweet messages, or event themes, leaving a lasting impression on your guests.
- Rustic Key Tags: Give an old, dull set of keys a charming rustic makeover, or use them to clearly label keys for various rooms, sheds, or storage units, making identification effortless.
- Charming Jar Labels: Ideal for homemade preserves, delectable baked goods, or organizing craft supplies stored in clear glass jars. These tags provide a charming and clear labeling solution that complements a rustic or farmhouse kitchen aesthetic.
- Pricing or Display Tags: If you sell handmade goods at markets or online, these tags offer a professional yet artisanal way to display prices or product information.
The true beauty of these DIY wood tags lies in their incredible ability to be customized for literally any purpose or occasion. Don’t hesitate to experiment: change the wood stain color, opt for a different paint color for the text, select a unique font, or even incorporate small hand-painted illustrations or intricate patterns instead of simple numbers. They are genuinely a blank canvas awaiting your personal creative touch!
Conclusion: Elevate Your Decor with Handmade Charm
I sincerely hope this comprehensive tutorial has sparked your inspiration and encouraged you to grab some wood, dust off your tools, and begin crafting your very own set of simple, incredibly cheap, and utterly charming wood tags! This project stands as a testament to the idea that stunning home decor and personalized accents don’t have to be expensive or require advanced skills. It delivers maximum aesthetic impact with minimal effort and cost, proving that thoughtful, handmade touches can truly transform your living space.
Before you go, don’t forget to explore my detailed guide on how to create those delightful Mini Wood Planter Boxes. They serve as a fantastic companion project for these tags and are absolutely perfect for a fun, productive, and wonderfully simple weekend endeavor!
Thank you so incredibly much for stopping by and taking the time to embark on this DIY crafting journey with me. The satisfaction of creating something beautiful and functional with your own hands is truly unmatched. If you loved this tutorial and found it helpful, I would be immensely grateful if you could share it with your friends and pin it below to help other DIY enthusiasts discover this charming and accessible project! Your support and enthusiasm mean the world to me and help foster a vibrant creative community.
Have a wonderful and exceptionally creative weekend, filled with crafting and inspiration!
~Whitney