
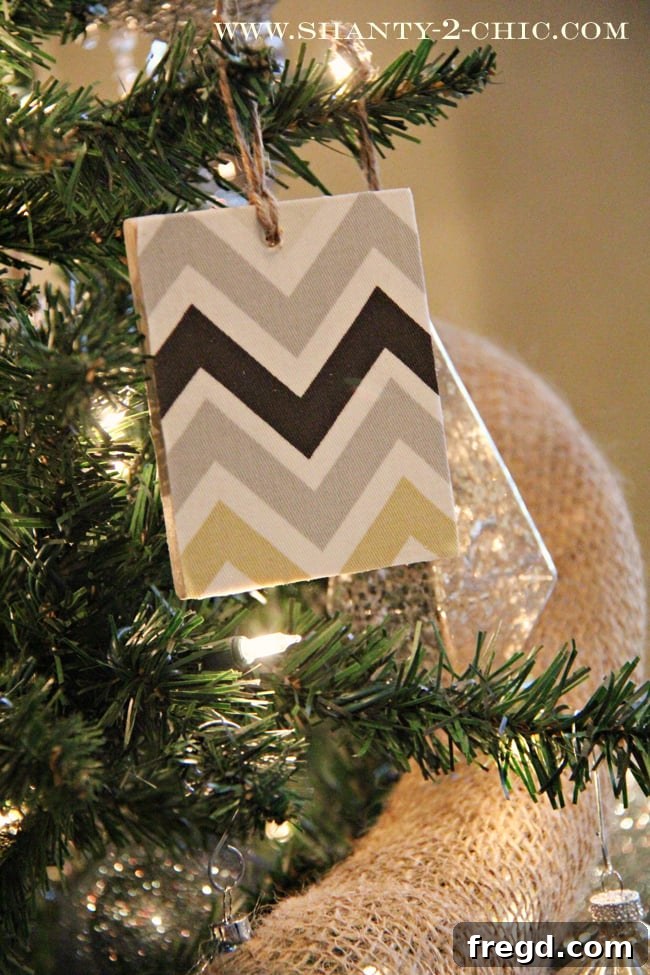
DIY Chevron Christmas Ornaments: Easy, Budget-Friendly, and Stylish Handmade Decorations
Hello fellow crafters and festive spirits! As the holiday season approaches, there’s nothing quite like adding a personal touch to your Christmas tree. Today, I’m thrilled to share a super simple yet incredibly charming DIY project: creating your very own chevron Christmas ornaments. These handmade decorations are not only beautiful but also incredibly affordable and quick to make, proving that thoughtful holiday decor doesn’t have to break the bank or take up all your precious time.
The inspiration for this project struck recently when I discovered this absolutely gorgeous River Rock Chevron Fabric online. I immediately fell in love with its modern aesthetic and knew it would be perfect for some new stockings I’m planning to make (stay tuned for that project!). The company itself is fantastic; even their packaging is delightful, adding an extra layer of joy to the crafting experience.
However, once the fabric arrived, I couldn’t wait to incorporate its chic pattern into my holiday decor. I had a strong “itch” to see some of it adorning my Christmas tree right away. So, I put on my creative hat and came up with these charming fabric-covered wooden ornaments. They’re a fantastic way to introduce a fresh, custom look to your festive display, and the best part is how incredibly easy they are to create. Let’s dive into how you can make these lovely ornaments for your own home!
Why Choose Handmade Christmas Ornaments?
In a world of mass-produced decorations, handmade ornaments stand out. They tell a story, reflect your personal style, and often carry sentimental value that store-bought items simply can’t replicate. Crafting your own ornaments, especially with loved ones, can become a cherished holiday tradition, creating memories alongside beautiful decor. These chevron ornaments are particularly appealing because they offer a contemporary twist on classic tree adornments, allowing you to match your holiday theme perfectly with your home decor aesthetic.
Gathering Your Materials: What You’ll Need
One of the many beauties of this project is its simplicity and the accessibility of the materials. You likely have some of these items already, and anything you need to purchase is typically very affordable. Here’s a detailed list:
- Thin Wood Board: I started with a 1/4-inch thick, 3-inch wide, and 4-foot long piece of wood from Lowe’s, which cost about $4. This specific dimension is ideal for creating multiple ornaments. You can typically find these thinner craft boards near the other lumber. Hobby Lobby or other craft stores also sell similar craft wood, though it might be slightly more expensive. The key is to find wood that is thin enough to cut easily and light enough not to weigh down your tree branches.
- Fabric of Your Choice: This is where your personality shines! I used the gorgeous River Rock Chevron fabric, but any pattern, color, or texture can work. Consider festive prints, classic plaids, modern geometrics, or even solid colors for a minimalist look. A small remnant piece is often more than enough, making this a great stash-busting project.
- Matte Mod Podge: This all-in-one glue, sealer, and finish is essential for adhering the fabric to the wood and providing a protective coat. I recommend matte finish for a subtle, sophisticated look, but glossy Mod Podge could also be used if you prefer a shinier appearance.
- Saw (Hand Saw or Power Saw): For cutting your wood. A small hand saw works perfectly because the wood is so thin. I used my power saw for speed, but a $12 hand saw from Lowe’s (or any hardware store) will do the trick just as well. Always exercise caution and follow safety guidelines when using any cutting tool.
- Craft Knife or Utility Knife: Necessary for precisely trimming the excess fabric around the edges of your wooden pieces. A sharp blade is crucial for clean cuts.
- Drill with a Small Drill Bit: To create a hole for hanging your ornament. A small drill bit (e.g., 1/8 inch or 3/16 inch) is usually sufficient for twine or ribbon.
- Thin Twine, Ribbon, or String: For creating the loop to hang your ornaments. Natural jute twine offers a rustic charm, while a colorful ribbon can add a pop of elegance.
- Scissors: For cutting fabric and twine.
- Paintbrush or Foam Brush: For applying Mod Podge smoothly.
- Work Surface Protection: Newspaper or a craft mat to protect your table from Mod Podge.
Step-by-Step Guide: Crafting Your Chevron Ornaments
Now that you have all your materials, let’s get crafting! This process is surprisingly straightforward and incredibly satisfying.
Step 1: Cutting Your Wood Pieces
Begin by cutting your long piece of wood into smaller, ornament-sized sections. I aimed for pieces approximately 5 inches long. This size is versatile and looks great on a Christmas tree. If you’re using a hand saw, secure your wood with clamps or a vise for stability, and make sure to cut slowly and carefully to achieve straight edges. With a power saw, precision is easier but always prioritize safety by wearing protective eyewear and gloves.
Step 2: Applying the First Coat of Mod Podge
With your wood pieces cut, it’s time to prepare them for fabric. Using a paintbrush or foam brush, apply a thin, even coat of Matte Mod Podge to one side of a wooden piece. Ensure the entire surface is covered but avoid thick globs, as this can lead to uneven drying or bumps under your fabric. Mod Podge dries relatively quickly, so work efficiently.
Step 3: Attaching the Fabric
Next, carefully lay a small piece of your chosen fabric onto the Mod Podge-coated wood. Make sure the fabric piece is slightly larger than the wood on all sides, giving you a bit of overhang to trim later. Gently smooth the fabric with your fingers, working from the center outwards, to remove any air bubbles or wrinkles. The goal is a perfectly flat, seamless bond between the fabric and the wood.
Step 4: Sealing the Fabric with Mod Podge
Once the fabric is smoothly applied, brush another thin coat of Mod Podge directly over the top of the fabric. This layer serves as a sealant, protecting the fabric, adding durability, and giving it a consistent finish. This step is crucial for making your ornaments last for many holiday seasons to come. Allow this second coat to dry completely. Drying time can vary depending on humidity, but usually, it takes about 15-20 minutes. You’ll know it’s dry when it turns clear and is no longer tacky.
Step 5: Trimming Excess Fabric
After the Mod Podge has fully dried, it’s time to trim the excess fabric for a clean, professional look. Carefully use a sharp craft knife or utility knife to cut along the edges of the wooden piece. Place the wood on a self-healing cutting mat to protect your work surface. Take your time with this step to ensure crisp, clean lines. A steady hand and a sharp blade will make all the difference in the final appearance of your ornament.
Step 6: Drilling the Hanging Hole
Now, prepare your ornament for hanging. Using a drill with a small drill bit (e.g., 1/8 inch), carefully drill a small hole on one side of the ornament. Choose a spot that is centered and not too close to the edge to prevent the wood from splitting. If you don’t have a drill, you might be able to use a Dremel tool with a tiny bit or even a strong awl and careful twisting, though a drill provides the cleanest hole.
Step 7: Adding the Hanger
Cut a piece of thin twine, ribbon, or string to your desired length (usually 6-8 inches works well). Thread one end through the drilled hole. Bring the two ends together and tie a knot at the top to create a loop for hanging. You can experiment with different knot styles or even add a small bead before tying the knot for an extra touch of flair.
Step 8: Hanging Your Beautiful Ornaments
The last and most rewarding step: hang your newly crafted chevron ornaments on your Christmas tree! Stand back and admire your handiwork. These ornaments add a unique, personal, and stylish touch that will make your tree truly one-of-a-kind. They also make fantastic handmade gifts for friends, family, and teachers.
Why You’ll Love This Project (My Favorite Things!):
These DIY chevron ornaments truly hit all the marks for a perfect craft project. Here’s what makes them so special:
- Cost-Effective: I made approximately 8 ornaments for around $5! This is incredible value, especially compared to store-bought options. You’re effectively creating unique, high-quality decorations for pennies on the dollar.
- Endless Options & Customization: The possibilities are limitless! You can use any fabric pattern, color, or texture you desire. This means your ornaments can perfectly complement your existing holiday decor, or you can use them to introduce a completely new theme. From traditional plaids to modern geometrics, or even personalized fabrics, your creativity is the only limit.
- Time-Efficient: This is my kind of project! I whipped up a batch of these “babies” in about 20 minutes. It’s an ideal craft for when you want to add a handmade touch but are short on time. Perfect for a quick crafting session after work or on a relaxed weekend afternoon.
- Personal Touch: There’s an undeniable charm that comes with handmade decorations. Each ornament carries a piece of your effort and love, making your holiday display feel warmer and more personal.
- Great Gift Idea: These ornaments aren’t just for your tree! They make thoughtful, unique gifts for friends, family, teachers, or as hostess gifts during holiday parties. Package a few together with some festive ribbon for a truly memorable present.
Tips for Ornament-Making Success:
- Fabric Choice Matters: While any fabric can work, consider lighter-weight cotton fabrics for easier adhesion and smoother finishes. Heavily textured or thick fabrics might be harder to trim cleanly.
- Even Mod Podge Application: A thin, even layer is key to avoiding lumps and ensuring good adhesion. If your Mod Podge feels too thick, you can dilute it with a tiny bit of water, but test on a scrap first.
- Patience During Drying: Don’t rush the drying process, especially after applying the top coat of Mod Podge. Ensure it’s completely dry and non-tacky before trimming the fabric to prevent tearing or smudging.
- Sharp Tools are Your Friend: A sharp craft knife makes trimming fabric effortless and results in clean edges. Dull blades can fray fabric or make cuts difficult.
- Batch Production: To maximize efficiency, cut all your wood pieces at once, then apply Mod Podge to several, lay fabric, and so on. This assembly-line approach speeds up the process significantly.
- Consider Different Wood Shapes: While rectangular pieces are easy, you could also cut wood into circles, stars, or other simple shapes for variety.
Beyond the Tree: Creative Ways to Display Your Ornaments
These versatile ornaments aren’t just for your Christmas tree! Here are a few ideas to display your creations around your home:
- Gift Toppers: Attach an ornament to a wrapped gift for an extra special touch. The recipient gets two gifts in one!
- Garlands: String several ornaments together with additional twine or ribbon to create a festive garland for your mantelpiece, doorway, or staircase.
- Window Decorations: Hang them from curtain rods or individual window panes to catch the light.
- Table Centerpieces: Place a few ornaments in a decorative bowl or scattered around a festive tablescape.
- Wreath Enhancements: Tie them onto a holiday wreath for added texture and charm.
Conclusion
Creating these DIY chevron Christmas ornaments has been a wonderfully fulfilling project, and I truly hope you enjoy making them as much as I did. They are the perfect blend of style, affordability, and ease, making them an ideal addition to your holiday crafting repertoire. Adding handmade elements to your home during the festive season brings a special warmth and personality that is simply unmatched.
I have some other fun holiday projects planned to share later this week, so be sure to check back for more creative inspiration. In the meantime, happy crafting and enjoy the magic of making your own holiday memories!
Happy Wednesday!!
~Whitney